Introduzzjoni
This manual provides essential information for the installation, maintenance, and troubleshooting of the Generic WB44K10005 Oven Bake Unit Lower Heating Element. This component is designed as a replacement part for specific GE self-clean range oven models. Please read these instructions carefully before proceeding with installation or any maintenance.
Importanti: Always verify compatibility with your specific oven model by checking your appliance's part number and comparing it with the specifications provided in this manual and the product images.
Informazzjoni dwar is-Sigurtà
Working with electrical appliances can be hazardous. Always follow these safety precautions:
- Skonnettja l-Enerġija: Before attempting any installation, repair, or maintenance, ensure the oven's power supply is completely disconnected at the circuit breaker or by unplugging the appliance.
- Ilbes Tagħmir Protettiv: Use appropriate personal protective equipment, such as gloves, to prevent injury.
- Assistenza Professjonali: If you are unsure about any step or uncomfortable performing the installation, consult a qualified appliance technician.
- Spezzjona għal Ħsara: Before installation, carefully inspect the new heating element for any signs of damage during shipping. Do not install a damaged part.
Kontenut tal-Pakkett
Il-pakkett jinkludi:
- 1 x WB44K10005 Oven Bake Unit Lower Heating Element (Color: Black)
Note: No additional tools or accessories are included.
Istruzzjonijiet għall-installazzjoni
This section outlines the general steps for replacing a lower bake element. Specific procedures may vary slightly depending on your oven model. Always refer to your oven's original service manual if available.
- Skonnettja l-Enerġija: Ensure the oven is completely disconnected from its power source. This is a critical safety step.
- Aċċess għall-Intern tal-Forn: Open the oven door. You may need to remove oven racks to gain better access.
- Locate the Old Element: The lower bake element is typically located at the bottom of the oven cavity. It is usually held in place by screws at the back and sometimes by clips at the front.
- Neħħi l-Viti tal-Immuntar: Using a screwdriver, carefully remove the screws securing the old heating element to the back wall of the oven.
- Gently Pull Element Forward: Carefully pull the old element forward a few inches. This will expose the electrical terminals at the back.
- Skonnettja l-Wajers: Note the position of the wires connected to the old element's terminals. Take a photo if necessary. Carefully disconnect the wires from the terminals. Be cautious not to let the wires retract into the oven wall. You may need to use needle-nose pliers to hold the wires.
- Neħħi l-Element Qadim: Once wires are disconnected, remove the old heating element from the oven cavity.
- Installa Element Ġdid: Carefully insert the new WB44K10005 heating element into the oven cavity.
- Qabbad Wajers: Connect the electrical wires to the terminals of the new heating element. Ensure a secure connection.
- Element Sikur: Push the new element back into place, aligning the mounting holes. Reinstall the screws to secure the element to the back wall of the oven.
- Funzjonalità tat-Test: Once the element is securely installed and wires are connected, restore power to the oven. Perform a test bake cycle to ensure the element heats up correctly and evenly.

Image 1: The complete WB44K10005 lower bake heating element, showing its characteristic shape.
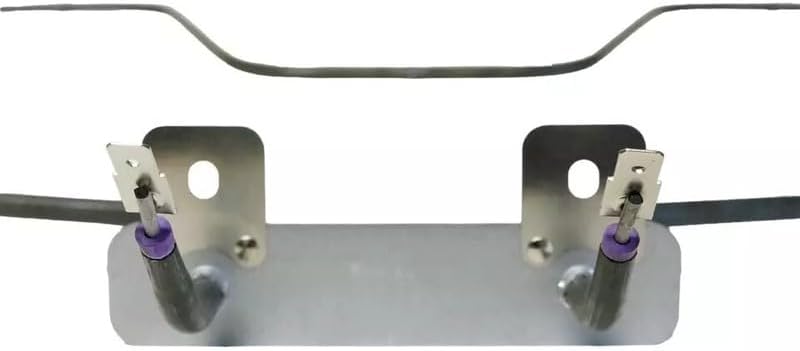
Immaġni 2: Mill-qrib view of the electrical terminals at the base of the heating element, where power wires connect.
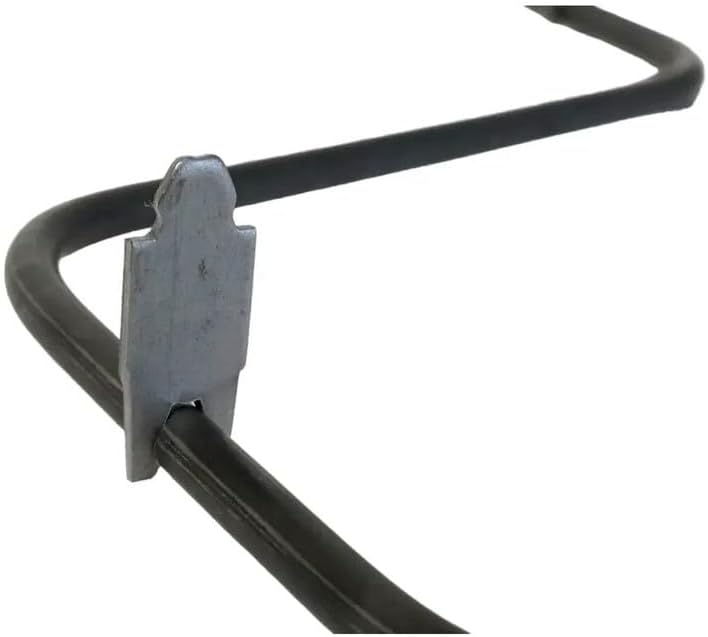
Image 3: Detail of a mounting clip or support bracket on the heating element, which helps secure it within the oven cavity.
Istruzzjonijiet Operattivi
Once the new bake element is installed and power is restored, the oven should function normally. Follow your oven's manufacturer instructions for specific operating procedures.
- Ħruq Inizjali: It is common for new heating elements to emit a slight odor or smoke during the first few uses. This is usually due to manufacturing residues burning off. Run the oven at a high temperature (e.g., 400°F / 200°C) for 30-60 minutes with good ventilation before cooking.
- Tisħin minn qabel: Allow the oven to fully preheat to the desired temperature before placing food inside for optimal cooking results.
Manutenzjoni
Proper maintenance can extend the life of your oven and its components.
- Spezzjoni regolari: Periodically inspect the bake element for any visible signs of damage, such as cracks, blisters, or uneven heating.
- Tindif: Ensure the oven cavity is clean. Food spills on the element can cause uneven heating or damage. Always clean the oven according to its manufacturer's instructions, ensuring the element is cool and power is disconnected before cleaning.
- Evita l-Impatt: Oqgħod attent li ma tolqotx l-element tat-tisħin b'oġġetti tat-tisjir jew għodda tat-tindif, għax dan jista' jikkawża ħsara.
Issolvi l-problemi
If your oven is not heating correctly after replacing the bake element, consider the following common issues:
- Element Mhux Tisħin:
- Check if the oven is receiving power.
- Verify that the electrical wires are securely connected to the element's terminals.
- Inspect the element for visible damage (e.g., a break in the coil).
- Ensure the oven's control settings are correct.
- Tisħin irregolari:
- Confirm the element is fully seated and secured in its mounting brackets.
- Check for any obstructions or debris on or around the element.
- Odor/Smoke During First Use: This is typically normal for new elements (see Operating Instructions). If it persists after several uses, disconnect power and inspect the element and wiring for issues.
Jekk il-passi għas-soluzzjoni tal-problemi ma jsolvux il-problema, huwa rakkomandat li tikkuntattja tekniku kwalifikat tal-apparat.
Speċifikazzjonijiet
| Numru tal-Parti | WB44K10005 (also known as CH44K10005, bakepart#353468) |
| Mudell Kompatibbli | GE Self-Clean Range Ovens (verify with your specific model) |
| Kulur | Iswed |
| Kwantità tal-Pakkett tal-Oġġett | 1 Set |
| Manifattur | Ġeneriċi |
| ASIN | B0F637Z256 |
Garanzija u Appoġġ
For warranty information or technical support regarding this replacement part, please refer to the seller or retailer from whom the product was purchased. Keep your proof of purchase for any warranty claims.
For issues related to the overall operation of your GE oven, please consult your original GE appliance manual or contact GE customer service.


