1. Introduzzjoni
Thank you for choosing the Beto CO2-008A Mini Bike Pump. This versatile pump offers dual functionality as both a traditional hand pump and a CO2 inflator, designed for quick and efficient tire inflation. Its patented auto-switching twin head is compatible with both Presta and Schrader valves, making it a convenient tool for all cyclists. This manual provides detailed instructions for safe and effective use, maintenance, and troubleshooting.
2. Informazzjoni dwar is-Sigurtà
- Always wear eye protection when using the CO2 inflator to prevent injury from gas discharge.
- CO2 cartridges become extremely cold during discharge. Use the provided EVA foam sleeve to protect your hands from frostbite.
- Do not expose CO2 cartridges to direct sunlight or temperatures exceeding 120°F (49°C).
- Żomm fejn ma jintlaħaqx mit-tfal.
- Ensure the pump head is securely attached to the valve stem before inflating to prevent air leakage or accidental detachment.
- Do not over-inflate tires. Always refer to your tire's recommended pressure (PSI/BAR) printed on the sidewall.
3. Kontenut tal-Pakkett
Ivverifika li l-oġġetti kollha huma preżenti fil-pakkett tiegħek:
- Beto CO2-008A Mini Bike Pump
- EVA Foam Sleeve (for CO2 cartridge)
- Bracket tal-Immuntar (bil-viti)

Figure 3.1: The Beto CO2-008A Mini Bike Pump, showcasing its compact design and dual valve head.
4. Twaqqif u Immuntar
The pump comes with a mounting bracket for convenient storage on your bike frame. The bracket can also carry two CO2 cartridges.
- Identify the water bottle cage mounts on your bike frame.
- Align the mounting bracket with these holes.
- Use the provided screws to securely attach the bracket to the frame.
- Slide the mini pump into the designated slot on the bracket.
- If using CO2 cartridges, place them into the additional holders on the bracket.
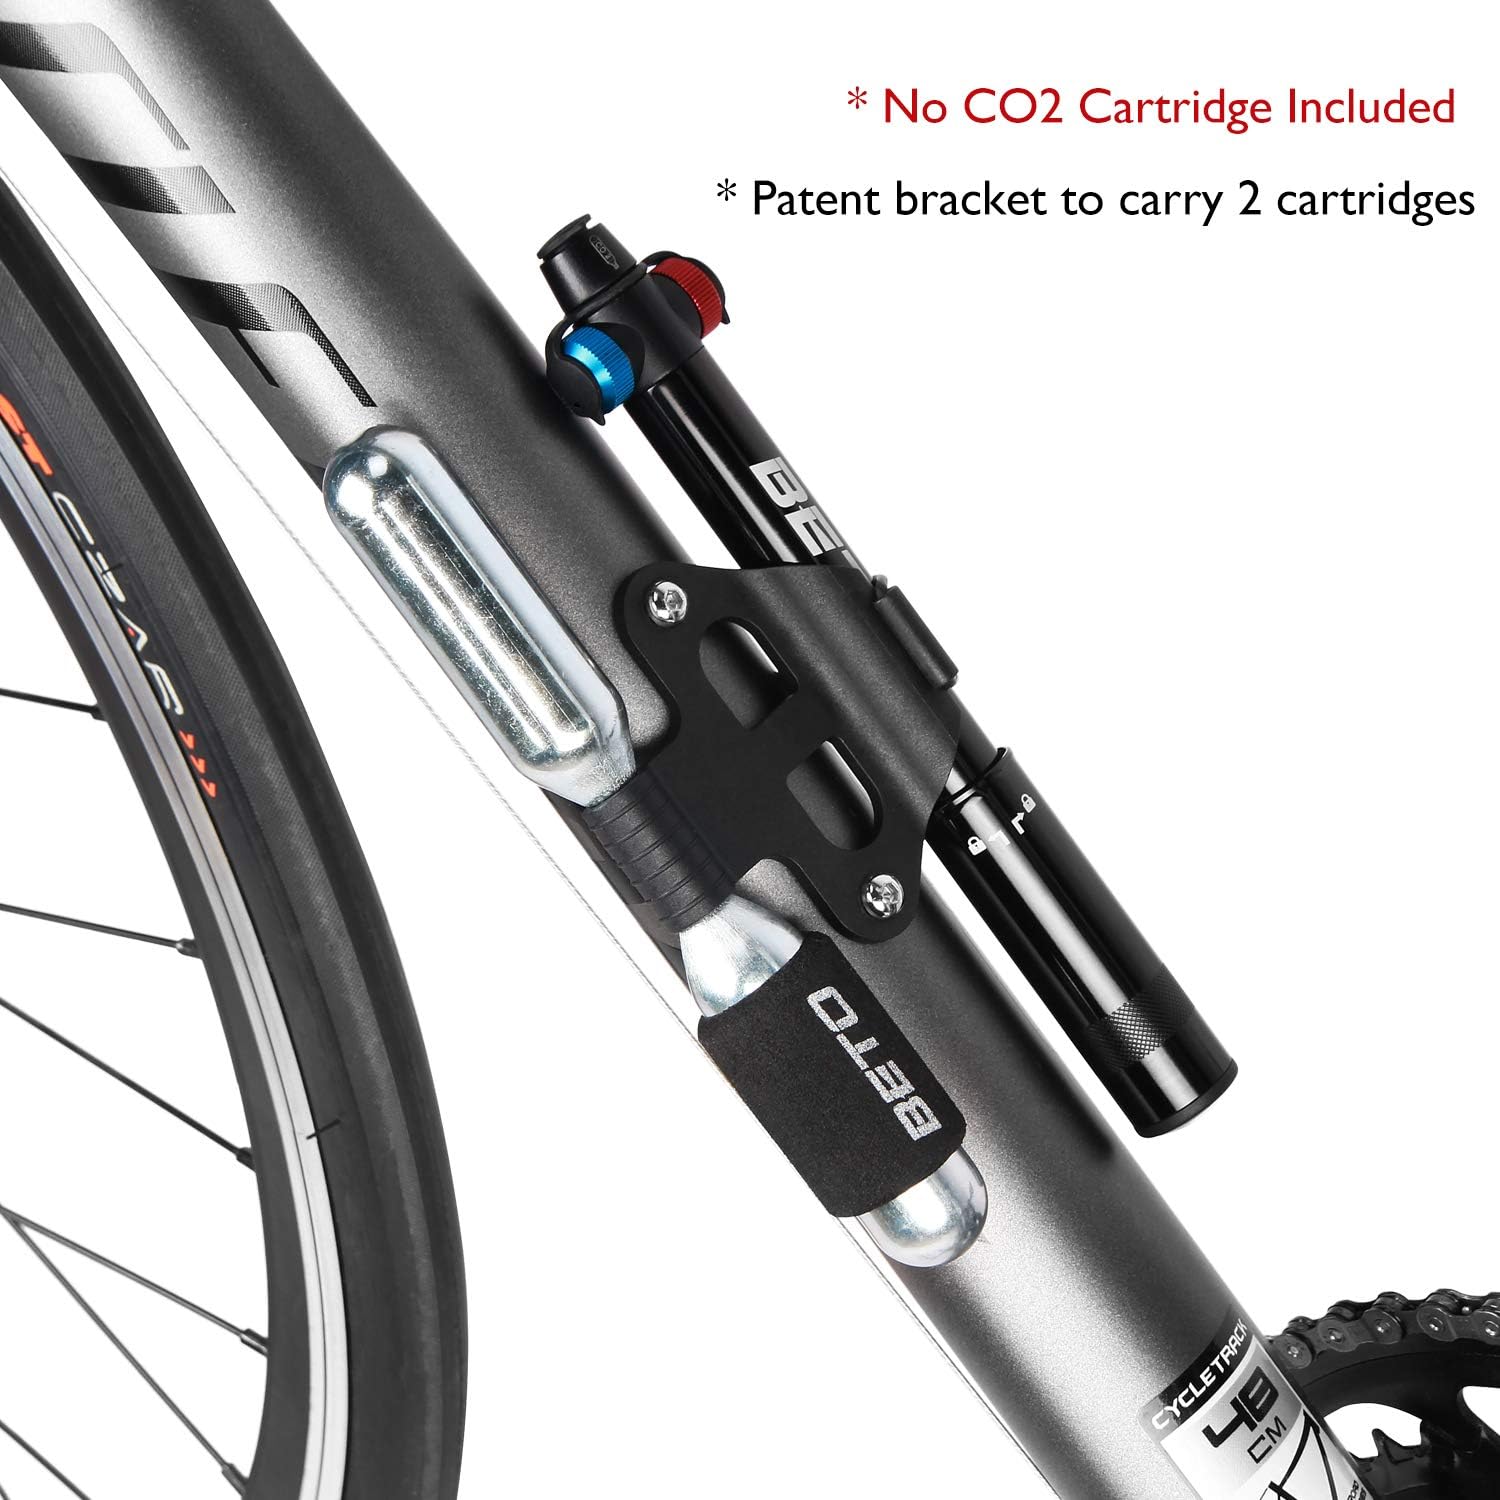
Figure 4.1: The Beto Mini Bike Pump securely mounted on a bike frame, demonstrating how it can carry extra CO2 cartridges for convenience.
5. Istruzzjonijiet Operattivi
The Beto CO2-008A pump features a patented auto-switching twin head that automatically adapts to Presta (F/V) and Schrader (A/V) valves without manual conversion. It can be used as a traditional hand pump or with CO2 cartridges.
Video 5.1: Official demonstration of the Beto CO2 & Hand Combo Pump, showing both hand pump and CO2 inflator modes. This video illustrates the steps for engaging the valve, pumping, and using CO2 cartridges for quick inflation.
5.1. Hand Pump Mode
- Ipprepara l-Valv: For Presta valves, unscrew the valve cap and then unscrew the small nut at the top of the valve stem. For Schrader valves, simply unscrew the valve cap.
- Involvi l-Pompa: Firmly push the appropriate side of the pump head (red for Schrader, blue for Presta) onto the tire valve stem. Once seated, twist the pump head clockwise to securely engage it with the valve. This creates an airtight seal.
- Pump the Tire: Twist the pump handle counter-clockwise to unlock it. Begin pumping by moving the handle up and down in a smooth, consistent motion until the desired tire pressure is reached.
- Disengage the Pump: Once inflation is complete, twist the pump head counter-clockwise to disengage it from the valve stem. Quickly remove the pump. For Presta valves, remember to tighten the small nut on the valve stem and replace the valve cap. For Schrader valves, replace the valve cap.

Figure 5.1.1: The patented auto-switching twin head, with blue indicating the Presta valve adapter and red for the Schrader valve adapter.

Figure 5.1.2: Engaging the pump head onto the tire valve stem. Ensure a tight seal by twisting the head.
5.2. CO2 Inflator Mode
This mode allows for rapid tire inflation using CO2 cartridges (not included with this model).
- Ipprepara l-Kartuċċa: Place the EVA foam sleeve over the CO2 cartridge. This sleeve is crucial for protecting your hands from the extreme cold generated during CO2 discharge.
- Attach Cartridge to Pump: Screw a threaded CO2 cartridge firmly into the designated port on the pump head. Ensure it is screwed in tightly to pierce the cartridge and create a seal.
- Engage the Valve: Firmly push the appropriate side of the pump head onto the tire valve stem (red for Schrader, blue for Presta). Twist the pump head clockwise to securely engage it.
- Nefħu t-Tajer: To release CO2, slightly unscrew the CO2 cartridge (no more than half a turn) from the pump head. You will hear gas flowing into the tire. Control the airflow by further loosening or re-tightening the cartridge. Only touch the insulated sleeve to avoid possible frostbite.
- Extra Stroke (Optional): If the tire is not fully inflated after CO2 discharge, you can use the hand pump function for additional air without removing the CO2 cartridge. Simply unlock the pump handle and pump as described in Section 5.1.
- Disengage and Remove Cartridge: Before disengaging the pump from the tire valve, re-tighten the CO2 cartridge completely to prevent any remaining gas from bursting out. Then, twist the pump head counter-clockwise to disengage it from the valve stem. Finally, unscrew and remove the empty CO2 cartridge from the pump. A sudden releasing noise is normal as residual gas escapes.
Figure 5.2.1: Attaching a CO2 cartridge to the pump head. Ensure the cartridge is screwed in tightly to pierce it.

Figure 5.2.2: Inflating a tire using the CO2 cartridge. Control the gas flow by slightly unscrewing the cartridge.
6. Manutenzjoni
- Tindif: Imsaħ il-pompa nadifa b'reklamaramp cloth after use, especially if it has been exposed to dirt or moisture. Do not use harsh chemicals.
- Lubrikazzjoni: Periodically apply a small amount of silicone-based lubricant to the pump's piston seal to ensure smooth operation and prolong its lifespan.
- Ħażna: Store the pump in a dry place, away from extreme temperatures and direct sunlight. Ensure the handle is locked when not in use.
- Handle Tightness: If the handle feels loose or stops locking, check if it has unscrewed slightly. Re-tighten it clockwise to secure it.
7 Issolvi l-problemi
| Problema | Kawża Possibbli | Soluzzjoni |
|---|---|---|
| Air leaks when pumping (hand pump mode) | Pump head not fully engaged or valve stem nut loose (Presta). | Ensure pump head is twisted tightly onto the valve. For Presta, ensure the valve stem nut is unscrewed before engaging, and tightened after disengaging. |
| CO2 not inflating tire | CO2 cartridge not pierced, not screwed in tightly enough, or valve not engaged. | Ensure CO2 cartridge is screwed in tightly to pierce. Check pump head engagement with tire valve. Slightly unscrew cartridge to release gas. |
| Pump handle is loose or won't lock | Handle has unscrewed slightly. | Twist the handle clockwise to re-tighten and secure it. |
| Difficulty removing pump from valve | Pump head is too tightly engaged. | Ensure pump head is fully unscrewed counter-clockwise before attempting to pull it off. |
8. Speċifikazzjonijiet
| Karatteristika | Dettall |
|---|---|
| Isem tal-Mudell | CO2-008A |
| Brand | Beto |
| Materjal | Metal (CNC Alloy Structure) |
| Piż tal-oġġett | 80 Gramm |
| Sors tal-Enerġija | Hand Pump / CO2 Cartridge |
| Mod ta' Operazzjoni | Manwal |
| Kompatibilità tal-valv | Presta (F/V) & Schrader (A/V) - Auto-Switching Twin Head |
| Dimensjonijiet (L x W x H) | 9.8 x 5.8 x 1.4 pulzieri (Pakkett) |
| Kulur | Iswed |
9. Informazzjoni dwar Garanzija
This Beto CO2-008A Mini Bike Pump comes with a garanzija ta 'sena mid-data tax-xiri. Din il-garanzija tkopri difetti fil-manifattura u difetti fil-materjal taħt użu normali. Ma tkoprix ħsara li tirriżulta minn użu ħażin, inċidenti, modifiki mhux awtorizzati, jew xedd u kedd normali. Jekk jogħġbok żomm il-prova tax-xiri tiegħek għal talbiet ta' garanzija.
10. Appoġġ għall-Klijent
Should you encounter any issues or have questions regarding your Beto Mini Bike Pump, please contact Beto customer support. You can often find contact information on the product packaging or the official Beto website. When contacting support, please have your product model number (CO2-008A) and proof of purchase ready. The manufacturer is known for providing excellent customer service and can assist with troubleshooting or replacement parts.