1. Introduzzjoni
This manual provides essential information for setting up, operating, maintaining, and troubleshooting your Lenovo ThinkCentre M75s Gen 5 Desktop. Please read this manual thoroughly before using your device to ensure proper functionality and safety.
2. Kontenut tal-Pakkett
Ivverifika li l-oġġetti kollha huma preżenti fil-pakkett tiegħek:
- Lenovo ThinkCentre M75s Gen 5 Desktop
- Adapter/Kejbil tal-Enerġija
- Tastiera USB
- Ġurdien USB
- Dokumentazzjoni (Gwida ta' Bidu Mgħaġġel, Informazzjoni dwar il-Garanzija)
3. Setup
3.1 Spakkjar u Tqegħid
Carefully remove the desktop from its packaging. Place the desktop on a stable, flat surface with adequate ventilation. Ensure no vents are obstructed.
3.2 Konnessjoni tal-Periferali
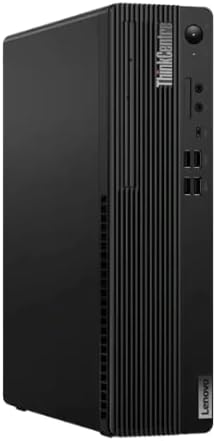
- Qabbad il-Monitor(s): Use the DisplayPort or HDMI ports on the rear of the desktop to connect your monitor(s).
- Qabbad it-Tastiera u l-Maws: Plug the USB keyboard and mouse into any available USB-A ports on the front or rear of the desktop.
- Qabbad in-Netwerk (Mhux obbligatorju): For a wired connection, connect an Ethernet cable to the RJ45 LAN port on the rear. For wireless, ensure the Wi-Fi antenna (if external) is connected or that the internal Wi-Fi is enabled.
- Qabbad l-Enerġija: Plug the power cable into the desktop's power input and then into a grounded electrical outlet.

3.3 Tixgħel Inizjali
Press the power button located on the front of the desktop. The system will boot up, and you will be guided through the Windows 11 Pro initial setup process. Follow the on-screen instructions to configure your operating system, user accounts, and network settings.
4. Istruzzjonijiet Operattivi
4.1 Power On/Off
- Biex Tixgħel: Agħfas il-buttuna tal-qawwa fuq il-pannell ta 'quddiem.
- Biex tagħlaq: Ikklikkja l-buttuna Start fil-Windows, imbagħad agħżel Power > Shut down.
- Biex terġa' tibda: Ikklikkja l-buttuna Start fil-Windows, imbagħad agħżel Power > Restart.
- Biex torqod: Ikklikkja l-buttuna Start fil-Windows, imbagħad agħżel Power > Sleep.
4.2 L-Użu tal-Portijiet USB
The desktop features multiple USB ports for connecting external devices such as external hard drives, USB flash drives, printers, and other peripherals. The front USB-C port and one front USB-A port support faster data transfer.
4.3 Konnettività bla fili
Your ThinkCentre M75s Gen 5 supports Wi-Fi 6 and Bluetooth 5.3. To connect to a Wi-Fi network, click the network icon in the Windows taskbar, select your desired network, and enter the password if prompted. For Bluetooth devices, go to Windows Settings > Bluetooth & devices to pair new devices.
5. Manutenzjoni
5.1 Cleaning the Desktop
Regularly clean the exterior of your desktop with a soft, dry, lint-free cloth. For stubborn marks, slightly dampen the cloth with water. Avoid using harsh chemicals or abrasive cleaners. Ensure vents are clear of dust and debris to maintain optimal airflow.
5.2 Aġġornamenti tas-Software
Keep your operating system and drivers updated. Windows 11 Pro automatically checks for updates, but you can manually check by going to Settings > Windows Update. Regularly updating your system ensures security and performance improvements.
5.3 Backup tad-Dejta
Huwa rrakkomandat li tagħmel backup tad-dejta importanti tiegħek regolarment fuq drajv estern jew ħażna fuq il-cloud biex tevita t-telf tad-dejta.
6 Issolvi l-problemi
6.1 Ebda Qawwa
- Kun żgur li l-kejbil tal-enerġija huwa konness sew kemm mad-desktop kif ukoll mas-sokit tal-elettriku.
- Ivverifika li s-sokit elettriku jaħdem billi tqabbad apparat ieħor.
- Iċċekkja l-adapter tal-enerġija għal xi ħsara viżibbli.
6.2 Ebda Display
- Confirm the monitor is powered on and connected correctly to the desktop's video output port (DisplayPort or HDMI).
- Ipprova qabbad il-monitor ma' port tal-ħruġ tal-vidjow differenti fuq id-desktop, jekk disponibbli.
- Test the monitor with another device or use a different cable if possible.
6.3 Kwistjonijiet ta' Konnettività tan-Netwerk
- For wired connections, ensure the Ethernet cable is properly connected and the router/modem is working.
- For Wi-Fi, check if Wi-Fi is enabled in Windows settings and if you are connected to the correct network. Restart your router/modem.
- Run the Windows Network Troubleshooter (Settings > Network & internet > Advanced network settings > Network troubleshooter).
6.4 Tnaqqis jew Iffriżar tas-Sistema
- Agħlaq l-applikazzjonijiet bla bżonn li jkunu qed jaħdmu fl-isfond.
- Check Task Manager (Ctrl+Shift+Esc) for processes consuming high CPU, memory, or disk resources.
- Kun żgur li s-sistema tiegħek għandha biżżejjed spazju ta' ħażna ħieles.
- Perform a system scan for malware or viruses.
7. Speċifikazzjonijiet
| Karatteristika | Deskrizzjoni |
|---|---|
| Proċessur | AMD Ryzen 7 PRO 8700GE (4.20 GHz, up to 5.10 GHz Max Boost, 8 Cores, 16 Threads, 16 MB Cache) |
| Sistema Operattiva | Windows 11 Pro |
| Grafika | Grafika AMD Radeon 780M Integrata |
| Memorja (RAM) | 16GB DDR5 (Configurable up to 64GB) |
| Ħażna | 1TB PCIe SSD (Configurable up to 2TB) |
| Konnettività bla fili | WiFi 6 (RTL8852BE 802.11AX), Bluetooth 5.3 |
| Portijiet ta' quddiem | 1x USB-C (USB 5Gbps), 4x USB-A (USB 5Gbps, 1 always on), Headphone/mic combo, Optional Card Reader (3-in-1) |
| Portijiet ta' wara | 2x DisplayPorts, 1x HDMI 2.1, 4x USB-A (Hi-speed USB), 1x RJ45 LAN (1G Full DASH), Audio-out, Optional Serial Port, Optional Parallel Port |
| Dimensjonijiet (H x W x D) | 13.4 x 3.6 x 11.7 pulzieri (340.36 x 91.44 x 297.18 mm) |
| Piż | Madwar 11.7 lbs (5.3 kg) |
| Kulur | Raven Iswed |
8. Garanzija u Appoġġ
Your Lenovo ThinkCentre M75s Gen 5 Desktop comes with a standard manufacturer's warranty. For detailed warranty terms and conditions, please refer to the warranty documentation included with your product or visit the official Lenovo support websit.
For technical assistance, driver downloads, or further support, please visit the Lenovo Support websit:
When contacting support, please have your product's serial number readily available. The serial number is typically located on a sticker on the desktop chassis.