Introduzzjoni
This manual provides essential information for the safe and efficient operation, maintenance, and troubleshooting of your GVDV 24V Cordless 3-in-1 Weed Wacker. Designed for versatility, this tool functions as a brush cutter, weed eater, and grass trimmer, making it suitable for various yard and garden tasks. Please read this manual thoroughly before initial use and retain it for future reference.
Istruzzjonijiet tas-Sigurtà
Dejjem agħti prijorità lis-sigurtà meta tħaddem għodda tal-elettriku. Jekk ma ssegwix dawn l-istruzzjonijiet, dan jista' jirriżulta f'korrimenti serji.
- Ilbes Tagħmir Protettiv Personali (PPE) Xieraq: Always wear safety goggles, gloves, long pants, and sturdy footwear to protect against flying debris and potential hazards.
- Żomm 'il bogħod minn Partijiet li jiċċaqilqu: Ensure hands, feet, and clothing are kept away from the cutting blades during operation.
- Żona tax-Xogħol Sikura: Clear the work area of any obstacles, rocks, or debris that could be thrown by the blades. Keep bystanders, children, and pets at a safe distance (at least 50 feet/15 meters).
- Spezzjona qabel l-użu: Before each use, check the tool for any damaged parts, loose connections, or worn blades. Do not operate if any components are compromised.
- Immaniġġjar kif suppost: Use both hands to operate the weed wacker. Maintain a firm grip and balanced stance.
- Dual Switches and Protective Guards: The unit is equipped with dual switches for safe activation and protective guards to minimize scattering of cut material and enhance user safety. Do not remove or bypass these safety features.
- Sigurtà tal-batterija: Use only the specified GVDV 24V 3000mAh Li-ion batteries and charger. Do not expose batteries to extreme temperatures or moisture.
- Evita li tlaħħaq iżżejjed: Do not overreach or stand on unstable surfaces while operating the tool.
- Itfi meta ma tkunx qed tuża: Always turn off the tool and remove the battery pack before making any adjustments, changing accessories, or storing the unit.
Kontenut tal-Pakkett
Iċċekkja li l-oġġetti kollha elenkati hawn taħt huma inklużi fil-pakkett tiegħek:
- 1 x GVDV Cordless Weed Wacker (Model: JY-LM2401)
- 2 x Batteriji tal-jone tal-litju ta' 24V 3000mAh
- 1 x Ċarġer Mgħaġġel
- 1 x Alloy Saw Blade
- 2 x Metal Blades
- 1 x Nuċċalijiet tas-Sigurtà
- 1 x Work Gloves
- 1 x Manwal tal-Utent (dan id-dokument)
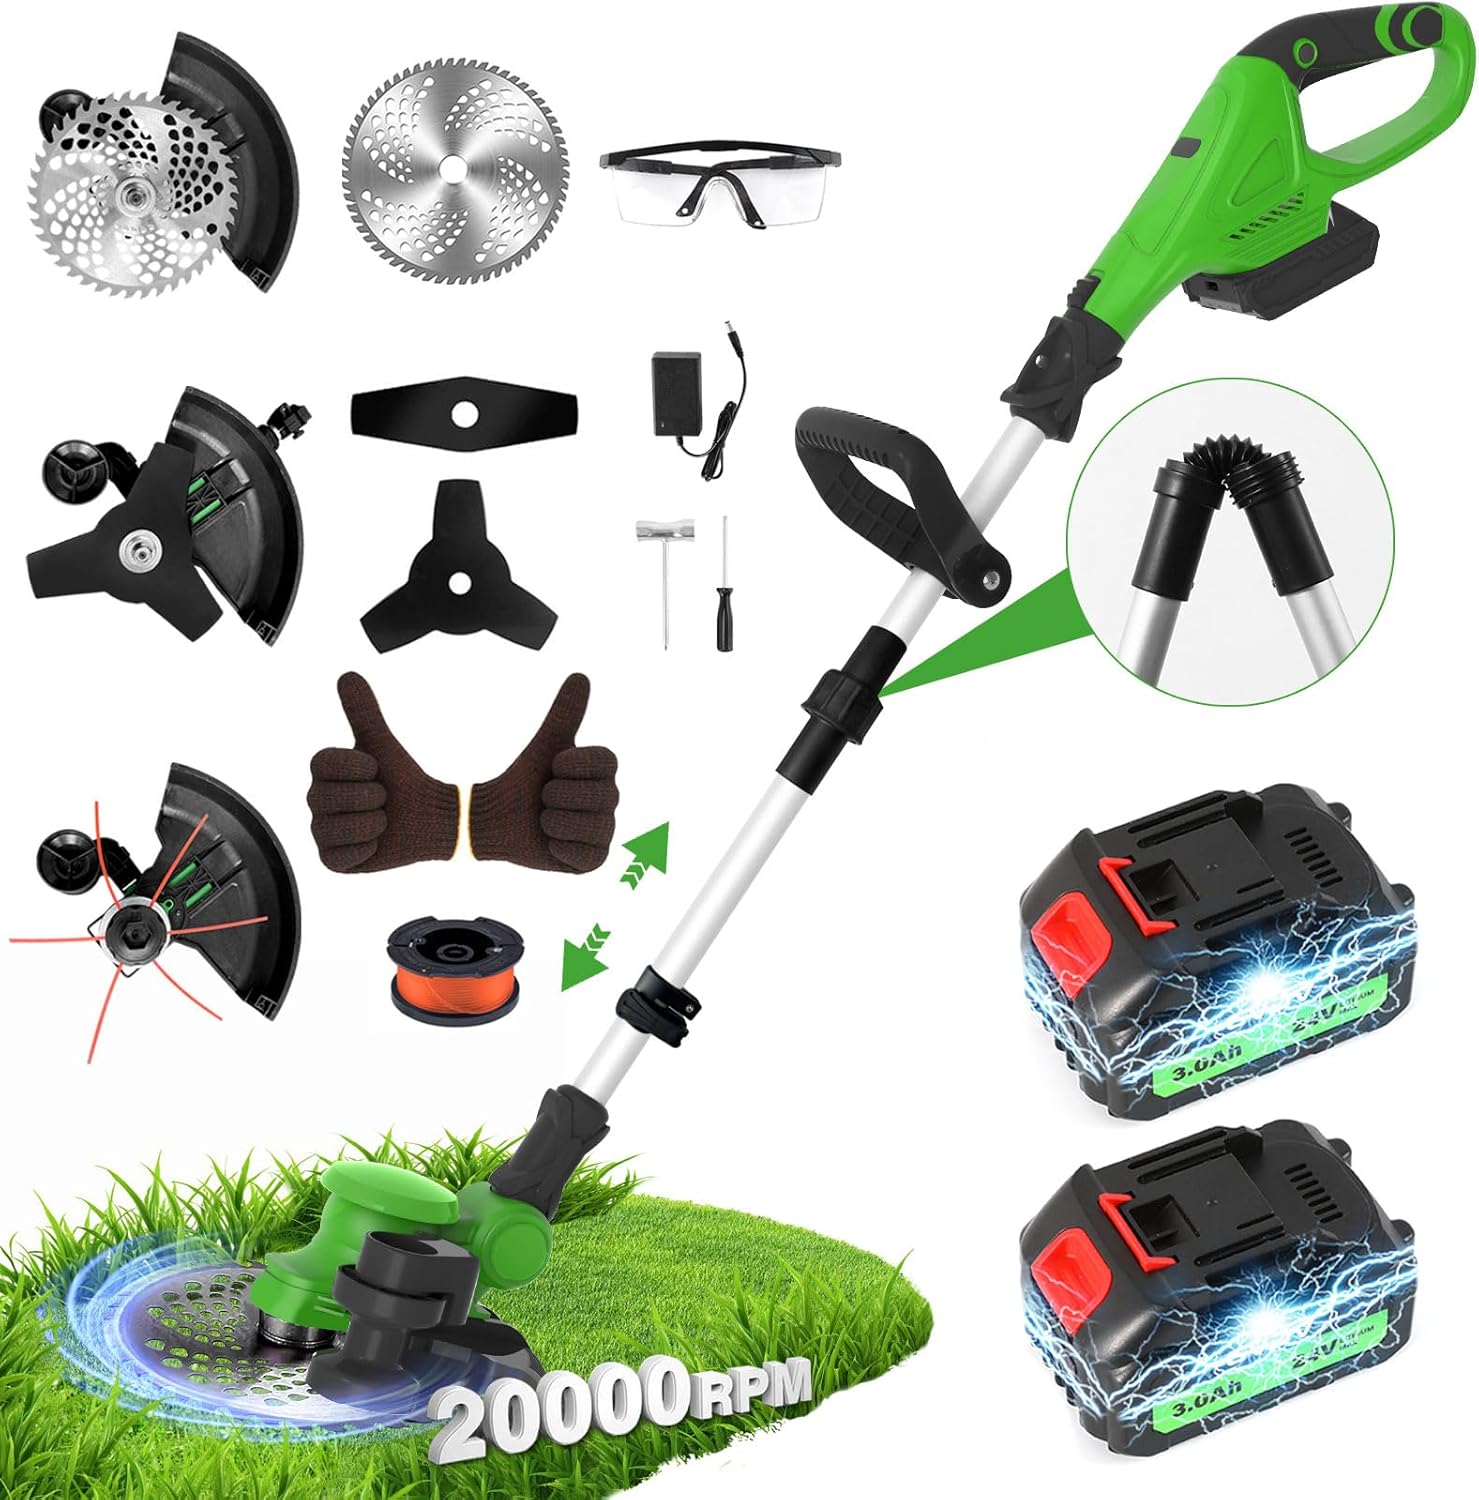
Figura 1: Fuqview of the GVDV 24V Cordless 3-in-1 Weed Wacker and its complete set of accessories, including the main unit, two batteries, charger, various blades, safety goggles, and gloves.
Setup u Assemblea
Follow these steps to assemble your GVDV Weed Wacker:
- Step 1: Take Down Screw - Locate and remove the screw on the cutting head assembly.
- Pass 2: Installa l-Qoxra - Align and install the protective cover onto the cutting head, ensuring it fits securely with the cutter mechanism.
- Pass 3: Allinjament tat-Toqob - Ensure the central hole on the cutting mechanism is properly aligned for blade installation.
- Step 4: Install the Blade Carefully - Select the desired blade (alloy saw blade or metal blade). Carefully place the blade onto the aligned hole, ensuring it is flat and centered. Secure it with the appropriate fastening mechanism (e.g., nut, washer).
- Step 5: Align and Tighten Handles - Align the two sections of the main pole and securely tighten the connection points to form the full handle.
- Step 6: Install Telescoping Handle - Attach the telescoping handle to the main pole, ensuring a correct and secure match.
- Step 7: Install Auxiliary Handle - Install the auxiliary handle onto the main pole and tighten its screw for a comfortable grip.
- Pass 8: Daħħal il-batterija - Press the safety lock button on the battery compartment and firmly insert a charged 24V 3000mAh Li-ion battery until it clicks into place.

Figura 2: Step-by-step assembly guide for the GVDV Weed Wacker, illustrating the process from attaching the protective cover to installing the battery.

Figura 3: The GVDV Weed Wacker features an expandable pole, allowing length adjustments from 35 to 51 inches for user comfort and versatility in mowing, trimming, and edging tasks.
Istruzzjonijiet Operattivi
Your GVDV Weed Wacker is designed for efficient and precise trimming. Here’s how to operate it:
- Power On/Off: To activate the unit, press and hold the dual safety switches simultaneously. Release to power off.
- Tul aġġustabbli: Utilize the adjustable telescopic pole to customize the tool's length (35-51 inches) for optimal comfort and reach, reducing strain during extended use.
- Angolu tar-Ras Aġġustabbli: The cutting head can be adjusted from 0° to 90°. This flexibility allows you to easily trim sloped lawns, reach under bushes, and access other tight areas that traditional mowers cannot.
- Għażla tax-Xafra: Choose between the alloy saw blade for tougher brush and thicker weeds, or the two metal blades for general grass trimming and edging. The 12-inch cutting diameter ensures efficient coverage.
- Brushless Motor Performance: The powerful 800W brushless motor delivers up to 20,000 RPM, providing strong cutting performance while operating quietly and efficiently.
- Funzjonalità tat-Tarf: For precise lawn edges, position the cutting head at a suitable angle and guide the tool along the desired line, as demonstrated in the product visuals.
- Trimming Around Obstacles: The adjustable head and lightweight design make it easy to maneuver around trees, rocks, and other garden features, ensuring a clean trim without damaging obstacles.

Figura 4: Multi-protection features of the GVDV Weed Wacker include an iron guardrail to prevent blade collision, dual start switches for safety, and grass protectors to contain debris.

Figura 5: The GVDV Weed Wacker is powered by an 800W high-speed brushless DC motor, capable of reaching 20,000 RPM for powerful and efficient cutting.
Iċċarġjar u Kura tal-batterija
Proper battery care ensures optimal performance and longevity:
- Iċċarġjar: Connect the quick charger to a power outlet and then to the battery. Each 3000mAh battery typically takes 2-3 hours to fully charge.
- Indikatur tal-batterija: The ergonomic handle features a real-time battery indicator, allowing you to monitor the remaining power at a glance and plan your work efficiently.
- Ħażna: Aħżen il-batteriji f'post frisk u niexef 'il bogħod mix-xemx diretta u minn temperaturi estremi. Għal ħażna fit-tul, huwa rakkomandat li l-batteriji jiġu ċċarġjati sa madwar 50% tal-kapaċità tagħhom.
- Rimi: Armi l-batteriji qodma jew bil-ħsara b'mod responsabbli skont ir-regolamenti lokali.

Figura 6: The GVDV Weed Wacker comes with two 24V 3000mAh large capacity batteries, each offering 0.5 hours of working time and requiring 2-3 hours for a full charge.
Manutenzjoni
Regular maintenance ensures the longevity and optimal performance of your tool:
- Tindif: After each use, remove any grass, dirt, or debris from the cutting head, protective guard, and motor housing. Use a dry cloth or soft brush. Do not use water or harsh chemicals.
- Spezzjoni u Sostituzzjoni tax-Xafra: Regularly inspect the alloy saw blade and metal blades for sharpness, damage, or wear. Replace dull or damaged blades immediately to maintain cutting efficiency and safety. Refer to the assembly section for blade replacement steps.
- Ħażna: Store the weed wacker in a clean, dry place, out of reach of children. Ensure the battery is removed before storage.
Issolvi l-problemi
If you encounter issues with your GVDV Weed Wacker, refer to the following common problems and solutions:
| Problema | Kawża Possibbli | Soluzzjoni |
|---|---|---|
| L-unità ma tixgħel. | Battery not charged or improperly inserted. Safety switches not engaged. | Ensure battery is fully charged and securely inserted. Press both dual safety switches simultaneously. |
| Prestazzjoni mnaqqsa tat-tqattigħ. | Dull or damaged blades. Excessive debris around the cutting head. | Replace blades if dull or damaged. Clean any accumulated grass or debris from the cutting head. |
| Il-batterija tiskula malajr. | Battery not fully charged. Operating in very dense or wet conditions. Old battery. | Ensure battery is fully charged before use. Avoid prolonged use in heavy conditions. Consider replacing the battery if it no longer holds a charge effectively. |
If the problem persists after attempting these solutions, please contact GVDV customer support.
Speċifikazzjonijiet
| Karatteristika | Dettall |
|---|---|
| Brand | GVDV |
| Numru tal-Mudell | JY-LM2401 |
| Sors tal-Enerġija | Mħaddma bil-batterija |
| Tip ta' Mutur | Mutur DC mingħajr brushes |
| Qawwa tal-Mutur | 800W |
| Veloċità | Sa 20,000 RPM |
| Tip ta 'batterija | 24V 3000mAh Li-ion (2 inklużi) |
| Dijametru tal-Qtugħ | 12 pulzieri |
| Adjustable Pole Length | 35-51 pulzier |
| Adjustable Head Angle | 0°-90° |
| Piż tal-oġġett | 6.4 lbs (madwar 2.9 kg) |
| Kulur | Aħdar |
Garanzija u Appoġġ
Your GVDV 24V Cordless 3-in-1 Weed Wacker comes with a garanzija ta 'sena mid-data tax-xiri. Din il-garanzija tkopri difetti fil-materjali u l-abbilità taħt użu normali.
For warranty claims, technical support, or any questions regarding your product, please contact GVDV customer service. Refer to the contact information provided on the product packaging or the official GVDV websit.
Ask a question about this manual
Ask about setup, troubleshooting, compatibility, parts, safety, or missing instructions. Manuals+ will review the question and use this page’s manual context to help answer it.