
1. Introduzzjoni
Welcome to the user manual for your ASUS NUC 15 Pro Tall Barebones Mini PC. This guide provides essential information for setting up, operating, maintaining, and troubleshooting your new mini PC. This barebones kit features an Intel Series 2 Core 7 240H processor, supports dual-channel DDR5 RAM, offers a dual storage design, Thunderbolt™ 4, Wi-Fi 7, Bluetooth 5.4, and toolless chassis access for easy upgrades. A VESA mount is included for flexible placement.
2. X'hemm fil-Kaxxa
- ASUS NUC 15 Pro Tall Mini PC Unit (Model: RNUC15CRHC70000U)
- Muntatura VESA
- Adapter tal-Qawwa AC
- Korda tal-Enerġija
3. Prodott Aktarview
Familiarize yourself with the physical layout and connectivity options of your ASUS NUC 15 Pro Tall Mini PC.
3.1 Panel ta 'Quddiem

Image: Front panel of the ASUS NUC 15 Pro Tall Mini PC, highlighting the USB ports, audio jack, and power button.
- Buttuna tal-Qawwa: Biex tixgħel jew titfi l-unità.
- USB 3.2 Gen 2x2 Type-C Port: For high-speed data transfer and connecting compatible Type-C devices.
- 2x USB 3.2 Gen2 Type-A Ports: Għall-konnessjoni ta' periferali USB.
- Awdjo Jack: Għall-konnessjoni ta' headphones jew speakers.
3.2 Panel ta 'wara

Image: Rear panel of the ASUS NUC 15 Pro Tall Mini PC, detailing the power input, display outputs, network, and additional USB/Thunderbolt ports.
- DC-In: Konnettur tad-dħul tal-enerġija.
- 2x HDMI 2.1 (TMDS) Ports: Għall-konnessjoni ta' displays.
- Port tal-Ethernet ta' 2.5Gb: Għal konnettività ta' netwerk bil-fili.
- USB 3.2 Gen2 Type-A Port: Għall-konnessjoni ta' periferali USB.
- Port USB 2.0 tat-Tip A: Għall-konnessjoni ta' periferali USB.
- 2x Thunderbolt™ 4 Ports: For high-speed data transfer, display output, and power delivery to compatible devices.
- Security Mechanism for Power Cable: To secure the power cable connection.
3.3 Disinn Intern
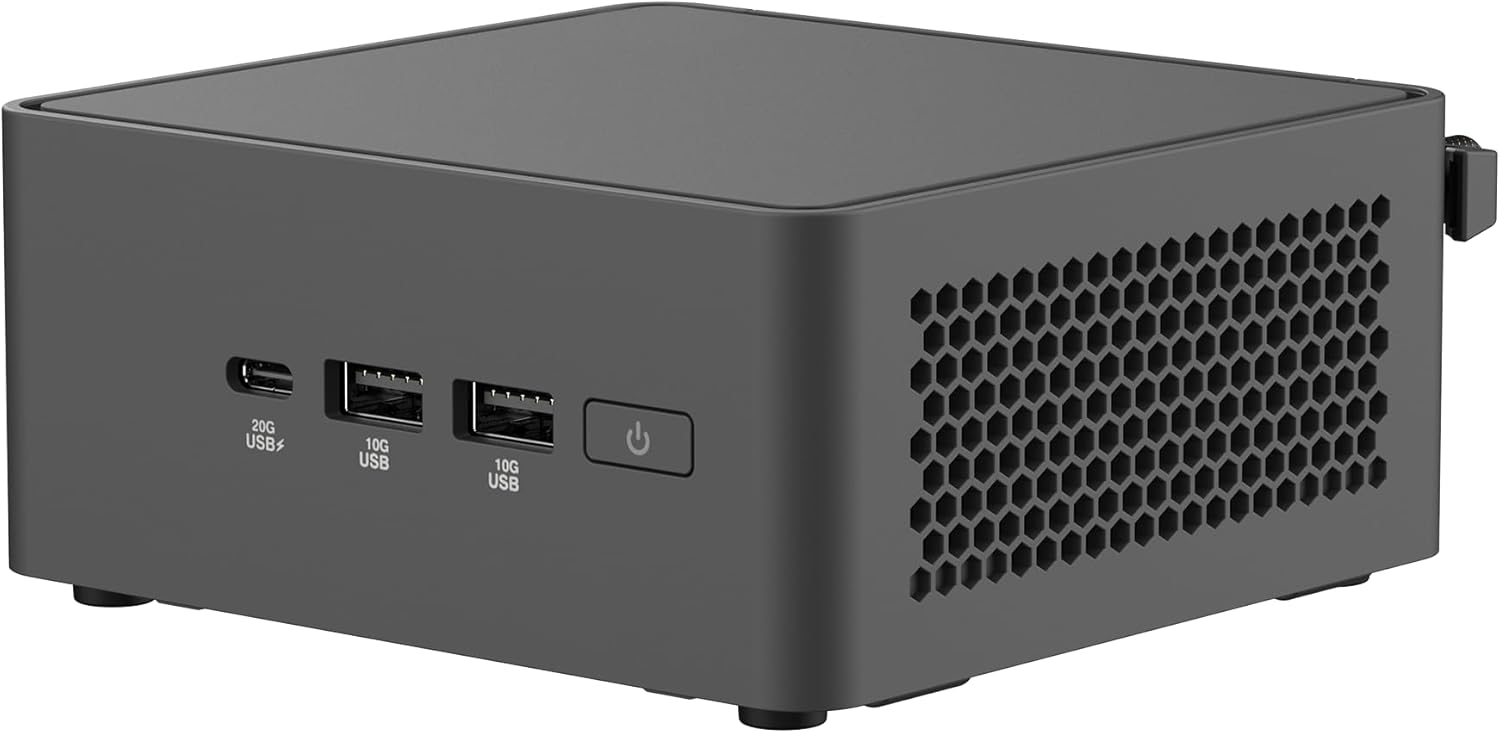
Image: The ASUS NUC 15 Pro Tall Mini PC with its top cover open, illustrating the toolless access for installing or upgrading RAM and storage components.
The chassis features a toolless design, allowing for easy access to internal components for RAM and storage upgrades. This design simplifies maintenance and customization.
4. Setup
Follow these steps for the initial setup of your ASUS NUC 15 Pro Tall Mini PC.
- Spakkjar: Neħħi bir-reqqa l-komponenti kollha mill-imballaġġ.
- Immuntar (Mhux obbligatorju): If using the included VESA mount, attach it to the rear of a compatible display or a wall mount. Secure the mini PC to the VESA mount. This allows for a clutter-free workspace.

Image: The ASUS NUC 15 Pro Tall Mini PC shown mounted on the back of a display, demonstrating its VESA mounting capability for flexible configuration.
- Konnessjoni Periferali:
- Connect your monitor(s) to the HDMI 2.1 or Thunderbolt 4 ports. The device supports up to four 4K displays.
- Qabbad it-tastiera u l-maws tiegħek mal-portijiet USB disponibbli.
- For wired network access, connect an Ethernet cable to the 2.5Gb Ethernet port.
- Connect speakers or headphones to the audio jack on the front panel.
- Konnessjoni tal-Enerġija: Connect the AC power adapter to the DC-In port on the rear panel, then plug the power cord into an electrical outlet.
- Qawwa Inizjali Mixgħula: Agħfas il-buttuna tal-qawwa fuq il-pannell ta 'quddiem biex tixgħel il-mini PC.
- Installazzjoni tas-Sistema Operattiva: As a barebones unit, an operating system (e.g., Windows) will need to be installed. Follow the operating system's installation instructions.
5. Joperaw
This section covers basic operation of your mini PC.
5.1 Power On/Off
Press the power button on the front panel to turn the unit on. To shut down, use the operating system's shutdown procedure. A short press of the power button can also put the system to sleep.
5.2 Konfigurazzjoni tal-Wiri
Utilize the HDMI 2.1 and Thunderbolt 4 ports to connect multiple displays. Refer to your operating system's display settings for configuring multi-monitor setups. The device supports headless emulation and a sync power-off feature for energy efficiency.
5.3 Konnettività
- Wi-Fi 7: Connect to wireless networks for high-speed internet access.
- Bluetooth 5.4: Pair with compatible Bluetooth devices such as keyboards, mice, and audio peripherals.
- Portijiet USB: Use the various USB ports (USB 3.2 Gen 2x2 Type-C, USB 3.2 Gen2 Type-A, USB 2.0 Type-A) for connecting external devices and data transfer.
- Thunderbolt™ 4: For high-speed data transfer and connecting advanced peripherals.
6. Manutenzjoni
Proper maintenance ensures the longevity and optimal performance of your mini PC.
6.1 Toolless Chassis Access for Upgrades
The mini PC features a toolless 2.0 chassis design for easy upgrades. To access internal components:
- Ensure the device is powered off and disconnected from all power sources.
- Follow the instructions in the detailed hardware guide (typically provided with barebones kits) to open the chassis.
- Install or upgrade DDR5 RAM modules (up to 96GB supported).
- Install or upgrade SSD storage drives (dual storage design).
- Close the chassis securely.
6.2 Sistema tat-tkessiħ
The advanced cooling system is designed to maintain optimal performance and reliability. Ensure proper ventilation around the unit to prevent overheating. Avoid blocking air vents.
6.3 Tindif
Use a soft, dry cloth to clean the exterior of the mini PC. Do not use liquid cleaners or aerosols, as they may damage the components.
7 Issolvi l-problemi
Din it-taqsima tipprovdi soluzzjonijiet għal kwistjonijiet komuni li tista’ tiltaqa’ magħhom.
7.1 Ebda Qawwa
- Verify the power adapter and cord are securely connected to the mini PC and a working electrical outlet.
- Kun żgur li l-buttuna tal-qawwa hija ppressata sew.
7.2 L-ebda Output tal-Wiri
- Check all display cable connections (HDMI, Thunderbolt).
- Kun żgur li l-monitor ikun mixgħul u ssettjat għas-sors tad-dħul korrett.
- If using multiple displays, try connecting only one display at a time to isolate the issue.
7.3 System Instability or Overheating
- Ensure the mini PC has adequate ventilation and its air vents are not obstructed.
- Update drivers and BIOS to the latest versions from the ASUS support websit.
- Jekk il-problemi jippersistu, ikkonsulta l-appoġġ tal-ASUS websit jew ikkuntattja lis-servizz tal-konsumatur.
7.4 Kwistjonijiet ta' Konnettività (Wi-Fi/Bluetooth)
- Kun żgur li l-Wi-Fi u l-Bluetooth huma attivati fis-settings tas-sistema operattiva tiegħek.
- Check for updated wireless drivers.
- Verify that your router or Bluetooth device is functioning correctly and within range.
8. Speċifikazzjonijiet
| Karatteristika | Dettall |
|---|---|
| Isem tal-Mudell | RNUC15CRHC70000U |
| Proċessur | Intel Series 2 Core 7 240H (2.5 GHz) |
| RAM | Sa 96 GB DDR5 |
| Ħażna | Dual Storage Design (SSD, PCIE x 4 interface) |
| Koproċessur tal-Grafika | Grafika Intel (Integrata) |
| Riżoluzzjoni Massima tal-Iskrin | 3840x2160 Pixel (4K) |
| Wiri Output | 2x HDMI 2.1, 2x Thunderbolt™ 4 (Supports up to 4x 4K displays) |
| Konnettività bla fili | Wi-Fi 7 (802.11.be), Bluetooth 5.4 |
| Ethernet | 2.5Gb Ethernet |
| Portijiet USB (ta' Quddiem) | 1x USB 3.2 Gen 2x2 Type-C, 2x USB 3.2 Gen2 Type-A |
| Portijiet USB (Wara) | 1x USB 3.2 Gen2 Tip-A, 1x USB 2.0 Tip-A |
| Sistema Operattiva | Windows (Barebones kit, OS not included) |
| Dimensjonijiet (LxWxH) | 4.61 x 4.41 x 2.13 pulzieri |
| Piż tal-oġġett | 12.8 uqija |
| Kulur | Iswed |
9. Garanzija u Appoġġ
Your ASUS NUC 15 Pro Tall Barebones Mini PC comes with a standard manufacturer's warranty. Please refer to the warranty card included with your product or visit the official ASUS support websit għal termini u kundizzjonijiet dettaljati tal-garanzija.
For technical assistance, driver downloads, or further support, please visit the ASUS support website. You can find the latest information and contact options at www.asus.com/support.