
Introduzzjoni
Thank you for choosing the SUNLUX Reflective Digital Alarm Clock. This manual provides essential information for the proper setup, operation, and maintenance of your new alarm clock. Please read these instructions carefully before use and retain them for future reference.
Informazzjoni dwar is-Sigurtà
- Tesponix l-apparat għal temperaturi estremi, dawl tax-xemx dirett, jew umdità għolja.
- Evita li twaqqa’ jew tissuġġetta l-apparat għal impatti qawwija.
- Tippruvax tiżżarma jew issewwi l-apparat int stess. Irreferi għal kull manutenzjoni f'idejn persunal kwalifikat.
- Żomm l-apparat 'il bogħod mill-ilma u likwidi oħra.
- Armi l-batteriji kif suppost skont ir-regolamenti lokali.
- Use only the specified power adapter (not included) to avoid damage.
Kontenut tal-Pakkett
Jekk jogħġbok iċċekkja l-pakkett għall-oġġetti li ġejjin:
- SUNLUX Reflective Digital Alarm Clock (1 unit)
- CR2032 3V Battery (1 unit, pre-installed or separate)
- Manwal għall-Utent (dan id-dokument)
Note: A USB power adapter and cable are typically required for primary operation and are not included.
Prodott Overview
The SUNLUX Reflective Digital Alarm Clock combines modern design with practical features to enhance your daily routine.
- Reflective Digital Display: Features a clear, visible digital display with adjustable brightness, designed to be elegant and modern.
- Laser Time Projector: Projects the time onto a wall or ceiling, offering convenience and easy viewing from any position. The projection angle is adjustable.
- CR2032 3V Battery Backup: Includes a long-lasting CR2032 battery to maintain time settings during power outages, preventing resets.
- Disinn kompatt u ħafif: Measuring 18.5 x 9 cm, its sleek design fits well on any surface without occupying excessive space.

Figura 1: Quddiem view of the SUNLUX Reflective Digital Alarm Clock, showcasing its digital display and the projector module.
Setup
- Spakkja l-Apparat: Oħroġ bir-reqqa l-arloġġ tal-allarm u l-aċċessorji kollha mill-imballaġġ.
- Install/Check Backup Battery: The CR2032 3V battery is typically pre-installed or included separately. If separate, locate the battery compartment (usually on the bottom or back) and insert the battery with the correct polarity (+/-). This battery ensures time settings are retained during power interruptions.
- Qabbad l-Enerġija: Connect a compatible USB power adapter (not included) to the alarm clock's power input port and then plug it into a wall outlet. The display should light up.
- Issettjar tal-Ħin Inizjali: Upon first power-on, the display may show a default time or flash. Proceed to the "Operating Instructions" section to set the correct time.
Istruzzjonijiet Operattivi
Button Functions (Typical)
While specific button labels may vary, most digital alarm clocks follow a similar pattern:
- MODE / SET: Used to switch between time, alarm, and other settings modes. Press and hold to enter setting mode.
- UP / +: Used to increase values or navigate options.
- DOWN / -: Used to decrease values or navigate options.
- SNOOZE / LIGHT / PROJECTION: Activates snooze, adjusts display brightness, or controls the projector.
1. Issettjar tal-Ħin
- Agħfas u żomm il- MODALITÀ or SET Agħfas il-buttuna sakemm iċ-ċifri tas-sigħat jibdew jteptep.
- Uża l- UP or 'L isfel buttuni biex taġġusta s-siegħa.
- Agħfas MODALITÀ or SET għal darb'oħra biex timxi għaċ-ċifri tal-minuti.
- Uża l- UP or 'L isfel buttuni biex jaġġustaw il-minuti.
- Agħfas MODALITÀ or SET to confirm and exit time setting mode. Some models may require multiple presses to cycle through 12/24-hour format or date settings.
2. Issettjar tal-Allarm
- Agħfas il- MODALITÀ or SET button repeatedly until "AL" or the alarm time appears on the display.
- Agħfas u żomm MODALITÀ or SET until the alarm hour digits flash.
- Uża l- UP or 'L isfel buttuni biex tissettja s-siegħa tal-allarm mixtieqa.
- Agħfas MODALITÀ or SET għal darb'oħra biex timxi għaċ-ċifri tal-minuti tal-allarm.
- Uża l- UP or 'L isfel buttuni biex tissettja l-minuti tal-allarm mixtieqa.
- Agħfas MODALITÀ or SET to confirm. An alarm icon (e.g., a bell) should appear on the display, indicating the alarm is active.
- To turn off the alarm sound when it rings, press any button except SNOOZE. To activate snooze, press the SNOOZE buttuna.
3. Using the Laser Time Projector
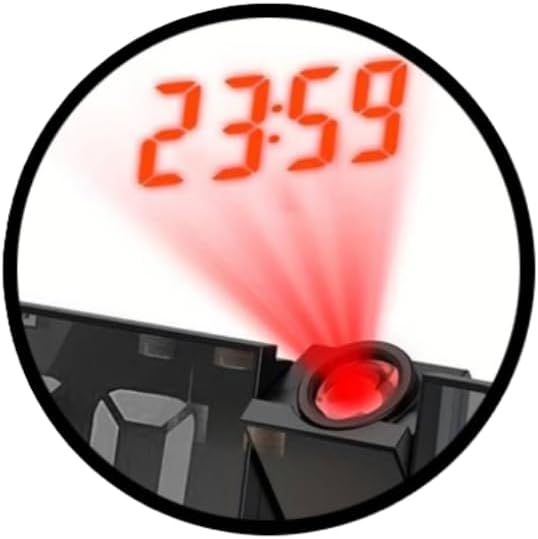
Figure 2: Detail of the laser projector in action, showing the time projected onto a surface.
- Attiva l-Projezzjoni: Sib il- PROJEZZJONI button or a dedicated switch (often combined with SNOOZE/LIGHT). Press it to turn the projector on or off.
- Aġġusta l-Angolu tal-Projezzjoni: The projector lens module is typically rotatable. Gently adjust its angle to direct the time display onto your desired surface (wall or ceiling).
- Adjust Focus (if available): Some models may have a small focus wheel near the projector lens. Rotate it to sharpen the projected image.
4. Aġġustament tal-Luminożità tal-Wiri

Figure 3: The digital display of the alarm clock, showing time and additional environmental data.
The display brightness is adjustable to suit different lighting conditions and personal preferences.
- Agħfas il- DAWL or SNOOZE / DAWL button repeatedly to cycle through different brightness levels (e.g., High, Medium, Low, Off).
- Agħżel il-livell ta' luminożità mixtieq għal prestazzjoni komda viewing.
Manutenzjoni
- Tindif: Use a soft, dry cloth to wipe the surface of the alarm clock. Do not use abrasive cleaners or solvents.
- Sostituzzjoni tal-batterija: If the CR2032 backup battery needs replacement (e.g., if settings are lost during a power outage), open the battery compartment, remove the old battery, and insert a new CR2032 3V battery with the correct polarity.
- Ħażna: If storing the device for an extended period, disconnect it from power and remove the backup battery to prevent leakage.
Issolvi l-problemi
| Problema | Kawża Possibbli | Soluzzjoni |
|---|---|---|
| Id-displej huwa vojt jew mudlam. | No power, power adapter faulty, brightness set to off/low. | Ensure power adapter is connected and working. Press the LIGHT button to adjust brightness. |
| Is-settings tal-Ħin/Allarm jintilfu wara li tintefa' l-elettrikutage. | CR2032 backup battery is dead or not installed correctly. | Replace the CR2032 3V battery. Ensure it is inserted with correct polarity. |
| L-allarm ma jdoqqx. | Alarm not set, alarm volume too low (if adjustable), alarm turned off. | Verify alarm time is set and activated (check for alarm icon). Ensure volume is audible. |
| Projected time is blurry or not visible. | Projector not focused, angle incorrect, too much ambient light. | Adjust the focus wheel (if present) and projection angle. Reduce ambient light for better visibility. |
Speċifikazzjonijiet
| Ditta: | SUNLUX |
| Mudell: | 18.5x9cm Reflective Digital Alarm Clock |
| Dimensjonijiet: | 18.5 x 9 ċm |
| Kulur: | Iswed |
| Tip ta' wiri: | Digital, Reflective |
| Karatteristiċi Speċjali: | Laser Time Projector, Adjustable Display Brightness |
| Sors tal-Enerġija: | Electric (via USB adapter, not included), CR2032 3V Battery (backup) |
| Materjal: | Plastik |
| Użu: | Ġewwa |
Garanzija u Appoġġ
This product is covered by a standard manufacturer's warranty. For specific warranty details, please refer to the documentation provided at the time of purchase or contact your retailer.
For technical support or inquiries, please contact SUNLUX customer service through their official webis-sit jew il-bejjiegħ bl-imnut minn fejn inxtara l-prodott. Jekk jogħġbok żomm il-mudell tal-prodott tiegħek u d-data tax-xiri disponibbli meta tikkuntattja l-appoġġ.