
1. Introduzzjoni
This manual provides detailed instructions for the installation, operation, maintenance, and troubleshooting of your ASUS ROG Strix Z890-H Gaming WiFi Motherboard. Please read this manual thoroughly before proceeding with installation or use to ensure proper functionality and to prevent damage to your components.
2. Prodott Aktarview
The ASUS ROG Strix Z890-H Gaming WiFi motherboard is designed for Intel Core Ultra Processors (Series 2) with an LGA 1851 socket. It features robust power delivery, advanced cooling solutions, and comprehensive connectivity options, including DDR5 memory support, PCIe 5.0, WiFi 7, and multiple M.2 slots. Integrated AI technologies enhance performance and system management.

Figure 2.1: ASUS ROG Strix Z890-H Gaming WiFi Motherboard and included accessories.
Karatteristiċi ewlenin:
- Sokit tal-Intel LGA 1851: Kompatibbli mal-Proċessuri Intel Core Ultra (Serje 2).
- Soluzzjoni ta' Enerġija Robusta: 16+2+1+2 power stages for stable power delivery.
- Disinn Termali Ottimizzat: Features massive heatsinks, a U-shaped heatpipe, and high-conductivity thermal pads.
- Appoġġ għall-Memorja DDR5: Enhanced signal routing for high-speed DDR5 modules.
- Advanced Storage: Multiple M.2 slots, including PCIe 5.0 M.2, with cooling solutions.
- Netwerking ta' Prestazzjoni Għolja: Wi-Fi 7 (802.11be) integrat b'ASUS WiFi Q-Antenna, Intel 2.5Gb Ethernet, u Realtek 5Gb Ethernet.
- Konnettività Abbundanti: Dual Thunderbolt 4 USB Type-C ports, USB 20Gbps Type-C, and multiple USB 10Gbps ports.
- Teknoloġiji Esklussivi tal-AI: ASUS AI Overclocking, AI Cooling II, AI Networking II, and AI Advisor.
- Disinn DIY Friendly: PCIe Slot Q-Release Slim, M.2 Q-Latch, M.2 Q-Release, M.2 Q-Slide, Q-Antenna, Q-Code, Q-LED, and BIOS FlashBack button.

Figura 2.2: Aktarview of ASUS exclusive AI technologies.
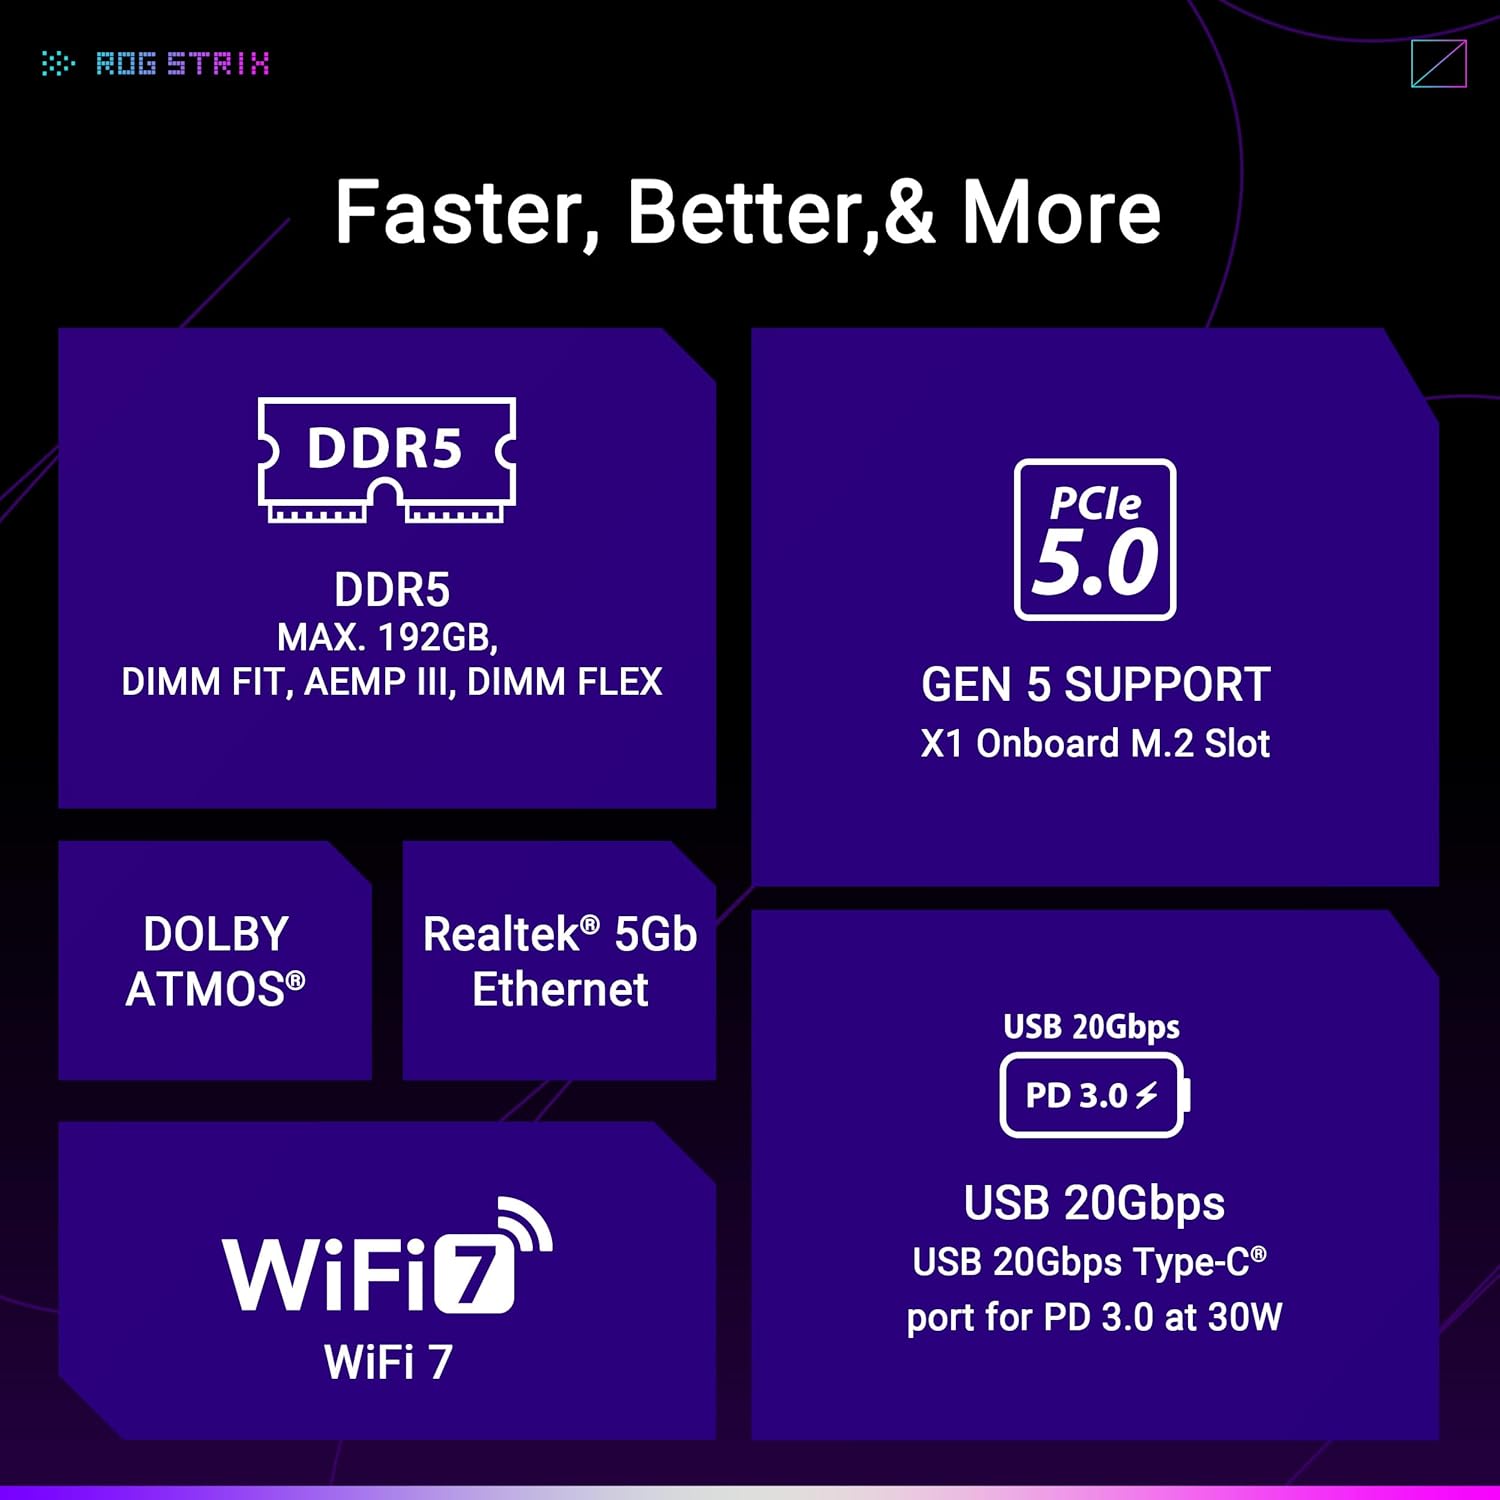
Figure 2.3: Performance and cooling features of the motherboard.
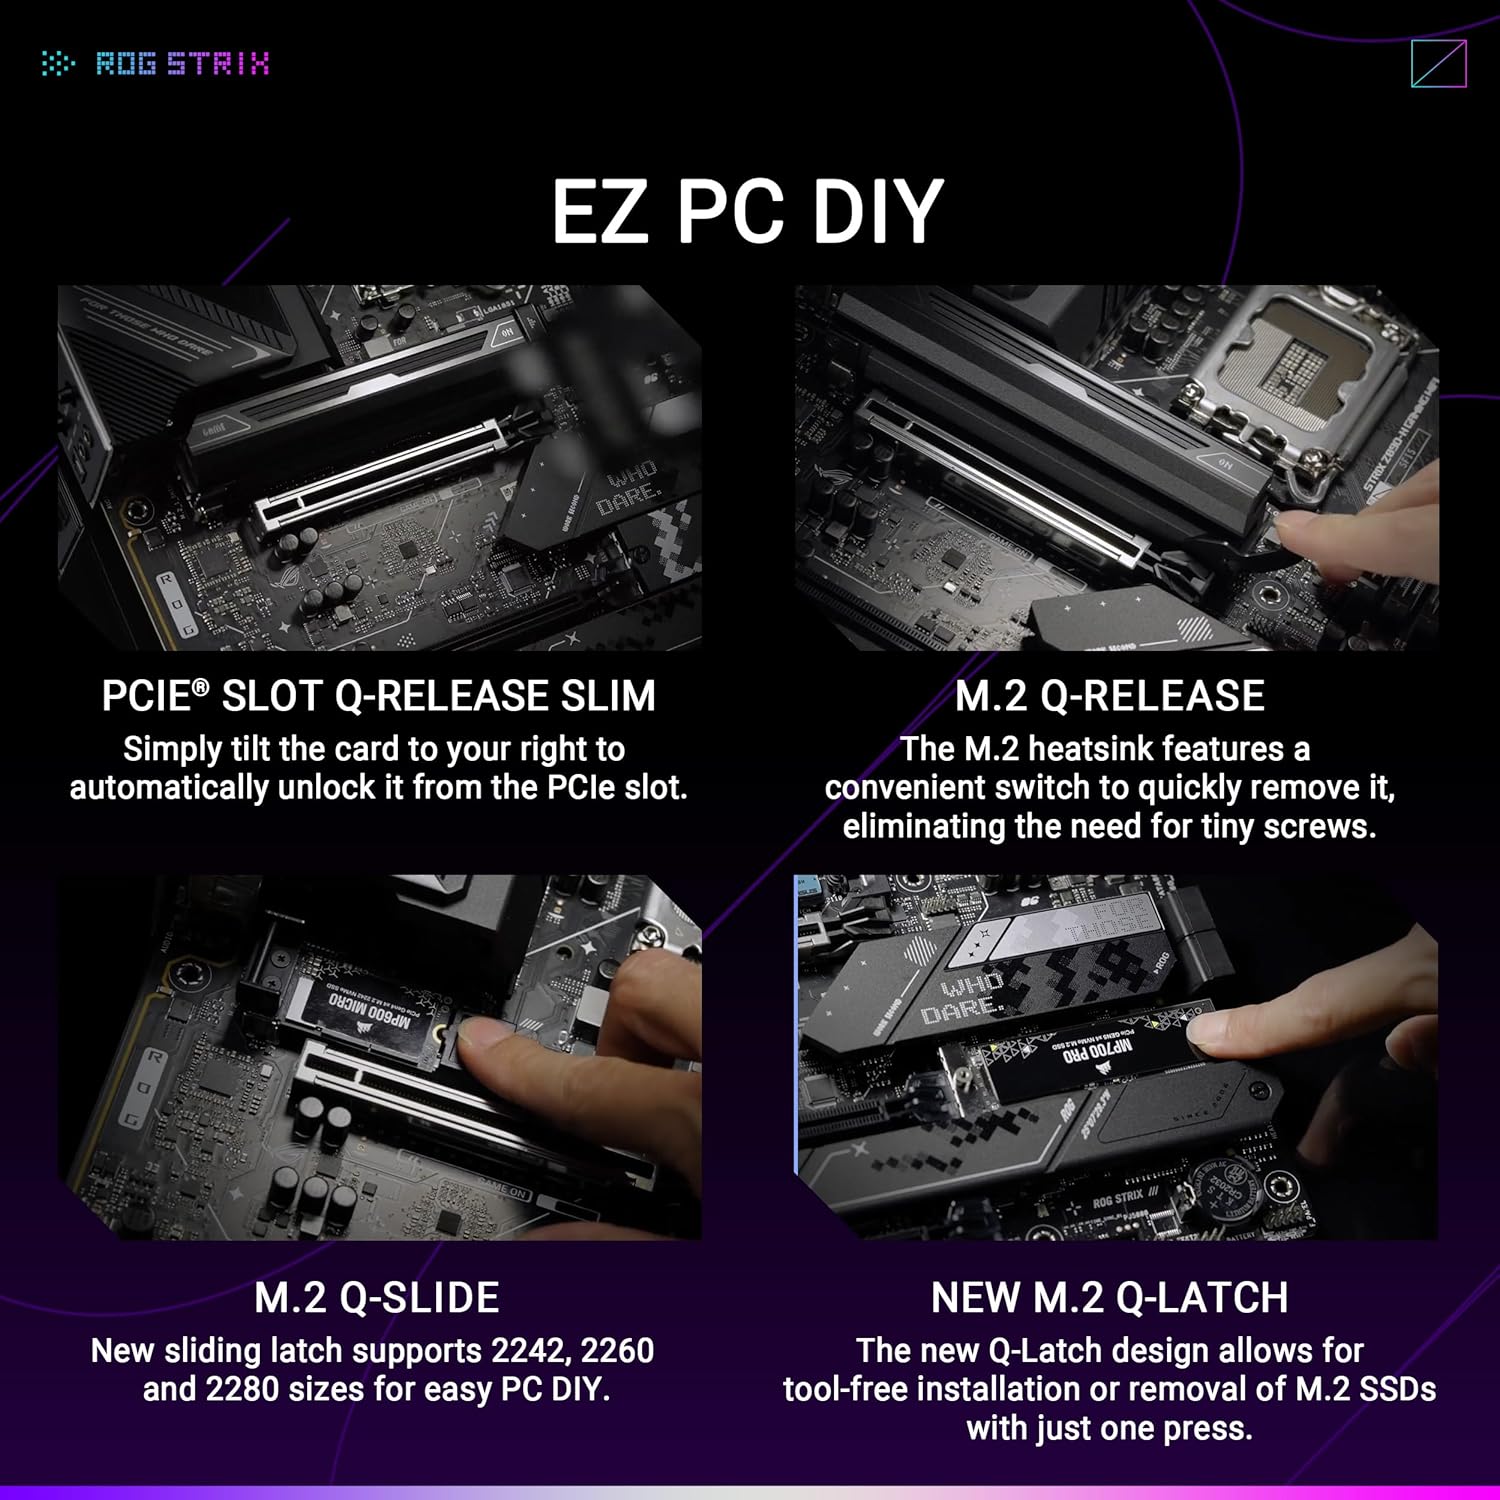
Figure 2.4: Connectivity and speed enhancements.
3. Gwida għall-Installazzjoni
3.1. Qabel ma Tibda
- Prekawzjonijiet tas-Sigurtà: Always disconnect the power supply before installing or removing any components. Wear an anti-static wrist strap to prevent electrostatic discharge (ESD) damage.
- Għodod Meħtieġa: Phillips-head screwdriver, anti-static wrist strap, thermal paste (for CPU cooler).
- Iċċekkja l-Kompatibbiltà: Ensure your CPU, RAM, and other components are compatible with the Z890 chipset and LGA 1851 socket.
3.2. Passi tal-Installazzjoni tal-Komponenti
- Installa s-CPU:
- Iftaħ il-lieva tas-sokit tas-CPU u neħħi l-għatu protettiv.
- Allinja s-CPU bir-reqqa mas-sokit, filwaqt li tiżgura li t-trijangolu tad-deheb fuq is-CPU jaqbel mat-trijangolu fuq is-sokit.
- Poġġi s-CPU bil-mod fis-sokit. Tisforzahx.
- Agħlaq il-lieva tas-sokit biex twaħħal is-CPU.

Figure 3.1: LGA 1851 CPU Socket.
- Installa l-CPU Cooler: Apply thermal paste to the CPU (if not pre-applied on the cooler) and install the cooler according to its manufacturer's instructions.
- Installa l-Moduli tal-Memorja (RAM):
- Iftaħ il-klipps fiż-żewġt itruf tas-slots tad-DIMM.
- Align the notch on the DDR5 memory module with the key on the DIMM slot.
- Agħfas sew 'l isfel fuq iż-żewġt itruf tal-modulu tal-memorja sakemm il-klipps jidħlu f'posthom.
- Installa SSDs M.2:
- Sib l-islots tal-M.2 u neħħi kwalunkwe heatsink installat minn qabel.
- Daħħal l-M.2 SSD fl-islott f'angolu.
- Secure the SSD using the M.2 Q-Latch mechanism or a screw, then reattach the heatsink.

Figure 3.2: M.2 Q-Latch and other DIY features.
- Installa l-Karta tal-Grafika (GPU):
- Open the retention clip on the PCIe 5.0 x16 slot.
- Align the GPU with the slot and press down firmly until it clicks into place.
- Secure the GPU to the case with screws.
- Qabbad il-Provvista tal-Enerġija: Connect the 24-pin ATX power connector and the 8-pin/4-pin CPU power connectors from your power supply to the motherboard.
- Qabbad il-Kejbils tal-Panel ta' Quddiem: Connect the power button, reset button, USB ports, and audio jacks from your case to the corresponding headers on the motherboard. Refer to the motherboard layout diagram for header locations.
- Install the WiFi Q-Antenna: Screw the included WiFi Q-Antenna onto the antenna connectors on the rear I/O panel.

Figura 3.3: Il-Panel tal-I/O ta' wara.
4. Istruzzjonijiet Operattivi
4.1. L-Ibbutjar Inizjali u s-Setup tal-BIOS
After assembling your system, connect a monitor, keyboard, and mouse. Power on your system. During the boot process, press the DEL or F2 key to enter the BIOS/UEFI setup utility. Here you can configure system settings, boot order, and enable features like XMP for memory overclocking.
4.2. Softwer u Sewwieqa
After installing your operating system, install the necessary drivers for your motherboard components (chipset, audio, LAN, WiFi, etc.). These can be found on the ASUS support website for your specific motherboard model. ASUS also provides utility software such as Armoury Crate for system monitoring, RGB lighting control, and driver updates.
4.3. Karatteristiċi tal-AI
- Overclocking tal-AI: This feature intelligently profiles your CPU and cooling system to predict optimal overclocking settings, allowing for enhanced performance with stability.
- Tkessiħ bl-AI II: Balances system thermals and acoustics by optimizing fan speeds based on system load and temperature, configurable through software.
- Netwerking tal-AI II: Prioritizes network traffic for gaming and other critical applications, ensuring stable and low-latency connectivity.
- Konsulent tal-AI tal-ASUS: An intelligent tool that uses AI to understand natural language questions, providing guidance and information about motherboard functionalities.
5. Manutenzjoni
Manutenzjoni regolari tgħin biex tiżgura l-lonġevità u l-prestazzjoni ottimali tal-motherboard tiegħek.
- Aġġornamenti tal-BIOS: Iċċekkja l-appoġġ tal-ASUS perjodikament website for BIOS updates. Updates can improve compatibility, stability, and performance. Use the BIOS FlashBack feature for convenient updates without a CPU or RAM installed.
- Aġġornamenti tas-sewwieq: Żomm id-drajvers tiegħek aġġornati biex tiżgura l-kompatibilità mas-softwer il-ġdid u biex tibbenefika minn titjib fil-prestazzjoni u tiswija ta' żbalji.
- Tindif Fiżiku: Regularly clean dust from your system components, especially heatsinks and fans, using compressed air. Ensure the system is powered off and unplugged before cleaning.
6 Issolvi l-problemi
Din it-taqsima tindirizza kwistjonijiet komuni li tista’ tiltaqa’ magħhom.
- Ebda Qawwa/Ebda Boot:
- Iċċekkja l-konnessjonijiet kollha tal-enerġija (24-pin ATX, 8-pin CPU, GPU).
- Kun żgur li l-provvista tal-enerġija tkun mixgħula.
- Ivverifika l-konnessjoni tal-buttuna tal-enerġija tal-pannell ta' quddiem.
- Ebda Display:
- Ensure the monitor cable is connected to the graphics card (or motherboard if using integrated graphics).
- Erġa' poġġi l-karta grafika u l-moduli tal-memorja f'posthom.
- Check the Q-LED indicators on the motherboard for diagnostic codes.
- Indikaturi Q-LED: The motherboard features Q-LEDs (CPU, DRAM, VGA, BOOT) that light up to indicate the status of key components during boot. A lit LED indicates a problem with that component.
- Q-Code Display: The Q-Code display provides a two-digit code that corresponds to specific boot stages or errors. Refer to the motherboard manual for a complete list of Q-Codes and their meanings.
- Kwistjonijiet ta' Konnettività tan-Netwerk:
- Kun żgur li l-kejbils tal-Ethernet huma konnessi sew.
- Verify WiFi antenna is properly installed.
- Check network driver installation.
- CMOS ċar: If system instability or incorrect settings prevent booting, use the Clear CMOS button on the rear I/O panel to reset BIOS settings to default.
7. Speċifikazzjonijiet Tekniċi
| Karatteristika | Speċifikazzjoni |
|---|---|
| Brand | ASUS |
| Isem tal-Mudell | ROG STRIX Z890-H GAMING WIFI |
| Socket tas-CPU | LGA 1851 |
| Proċessuri Kompatibbli | Proċessuri Intel® Core™ Ultra (Serje 2) |
| Tip ta' Ċipset | INTEL Z890 |
| Teknoloġija tal-Memorja RAM | DDR5 |
| Veloċità tal-Memorja | 320 MHz (Bażi, jappoġġja ogħla permezz ta' OC) |
| Pjattaforma | Windows 11 |
| Tip ta 'Konnettur tal-Enerġija Prinċipali | 24-Pin |
| Piż tal-oġġett | 5.08 liri |
| Dimensjonijiet tal-Pakkett | 13.98 x 10.71 x 2.87 pulzieri |
| Kulur | ISWED |
8. Garanzija u Appoġġ
ASUS products are manufactured to high quality standards. For specific warranty terms and conditions, please refer to the warranty card included with your product or visit the official ASUS support website. Technical support, driver downloads, and further documentation can be found at www.asus.com/support/.