1. Prodott Aktarview
The QWORK Coax Cable Crimper Kit is designed for efficient and reliable termination of coaxial cables. This kit provides the necessary tools for preparing and crimping various coaxial cable types, ensuring secure and professional-grade connections for your home or professional installations.
Kontenut tal-Pakkett:
- 1 x Coax Cable Crimper
- 1 x Coax Cable Stripper/Cutter
- 10 x RG6 F-Connectors
2. Linji Gwida dwar is-Sigurtà
No specific safety warnings are applicable beyond general tool handling precautions. Always exercise caution when using cutting and crimping tools. Keep tools out of reach of children. Wear appropriate personal protective equipment, such as safety glasses, to prevent eye injury from flying debris.
3. Getting Started: Identifying Components

Immaġni: Fuqview of the QWORK Coax Cable Crimper Kit, showing the crimper, stripper, and F-connectors.

Image: Close-up of the Coax Cable Crimper, highlighting its non-skid, comfortable handles for secure grip.
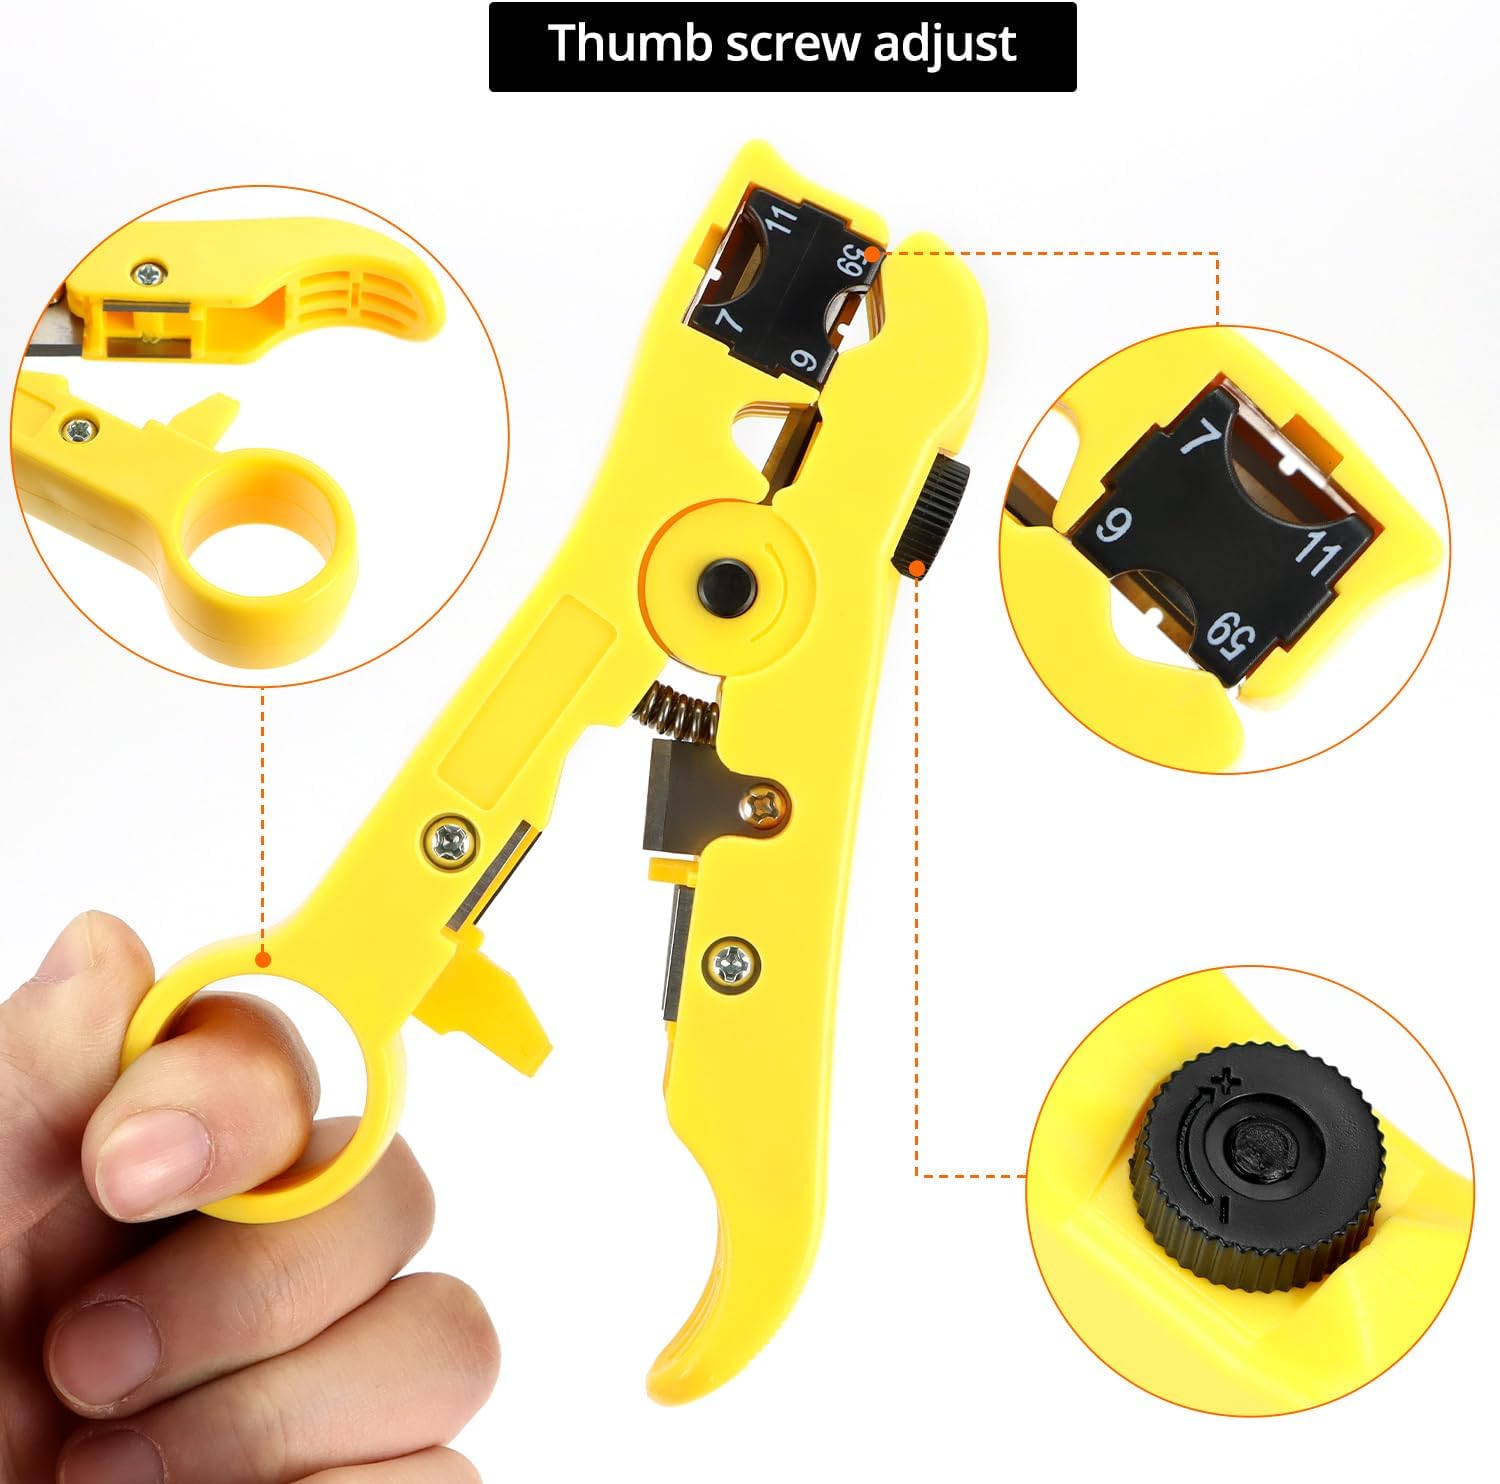
Image: Close-up of the Coax Cable Stripper, showing the thumb screw for adjusting the blade depth.

Image: Detail of the Coax Cable Stripper's steel refining blade, designed for precise cable preparation.
4. Step-by-Step Coaxial Cable Preparation and Crimping
4.1. Using the Coax Cable Stripper
- Adjusting the Stripper: The cable stripper features an adjustable module for different cable types (RG59, RG6, RG7, RG11). Rotate the internal black block to align the correct cable type number (e.g., '6' for RG6, '59' for RG59) with the indicator.
- Inserting the Cable: Open the stripper jaws and insert the end of the coaxial cable into the appropriate slot until it reaches the internal stop.
- Stripping the Cable: Close the stripper jaws firmly around the cable. Rotate the stripper tool around the cable several times (typically 3-5 rotations) to cut through the outer jacket and dielectric.
- Removing the Stripped Section: Open the jaws and carefully remove the stripped cable. The stripper will expose the center conductor, dielectric, and braided shield. Ensure the center conductor is clean and straight.
Video: Demonstrates how to use the coax cable stripper to prepare the cable end for connector attachment.
Video: A detailed guide on how to properly prepare a coax cable using the stripping tool.
4.2. Attaching the F-Connector
- Slide on Connector: Carefully slide an F-connector onto the stripped end of the coaxial cable. Ensure the center conductor extends slightly beyond the connector's tip and the braided shield is fully covered by the connector's body.
- Ivverifika l-Adattament: The connector should fit snugly. If it's too loose or too tight, re-strip the cable or check for proper cable type selection.
4.3. Using the Coax Cable Crimper
- Adjusting the Crimper: The crimper is adjustable for various F-head types (75-5, 75-7 metric and imperial). Adjust the screw mechanism on the crimper to match the length of your F-connector.
- Positioning the Connector: Place the F-connector with the attached cable into the crimper's designated slot. Ensure the connector is seated correctly and the cable is aligned.
- Crimping: Squeeze the handles of the crimper firmly and completely until the mechanism releases. This action compresses the F-connector onto the cable, creating a secure and waterproof connection.
- Spezzjona l-Konnessjoni: Release the crimper and remove the cable. Inspect the crimped connector to ensure it is tight, uniform, and the center conductor is still properly exposed.
Video: Shows the process of using the coaxial compression tool to crimp an F-connector onto a cable.
Video: Illustrates the complete process of preparing a coax cable and crimping a connector using the kit.
5. Speċifikazzjonijiet tal-Prodott
| Karatteristika | Dettall |
|---|---|
| Brand | QWORK |
| Numru tal-Mudell | QS34929 |
| Crimping Capability | RG6, RG59, RG11 coaxial cables; 75-5, 75-7 metric and imperial F-heads |
| Materjal tal-manku | Rubber (Ergonomic) |
| Piż tal-oġġett | 531 g (1.17 Liri) |
| Kulur | Chrome |
| UPC | 795973721594 |
6. Kura u Manutenzjoni
To ensure the longevity and optimal performance of your QWORK Coax Cable Crimper Kit, follow these simple care instructions:
- Tindif: After each use, wipe down the tools with a clean, dry cloth to remove any debris or residue.
- Lubrikazzjoni: Periodically apply a light machine oil to the moving parts of the crimper to maintain smooth operation.
- Ħażna: Store the tools in a dry environment to prevent rust. Keep them in their original packaging or a suitable toolbox to protect them from damage.
- Spezzjoni tax-xafra: Regularly check the blades of the cable stripper for sharpness and damage. Replace if necessary to ensure clean and precise cuts.
7 Issolvi l-problemi
If you encounter issues while using your QWORK Coax Cable Crimper Kit, consider the following:
- Poor Strip Quality: Ensure the cable stripper is adjusted correctly for your specific cable type (RG6, RG59, etc.). Dull blades can also cause poor stripping; inspect and replace if needed.
- Loose Connector: Verify that the F-connector is fully seated onto the stripped cable before crimping. Ensure the crimper's adjustment screw is set correctly for the connector type.
- Damaged Cable: If the cable is damaged during stripping or crimping, cut off the affected section and restart the process with a fresh end.
- Crimper Malfunction: Check for any obstructions in the crimper mechanism. Ensure it opens and closes smoothly. Lubricate if stiff.
8. Appoġġ għall-Klijent
For further assistance or inquiries regarding your QWORK Coax Cable Crimper Kit, please contact QWORK customer service through your retailer or the official QWORK website. Please have your model number (QS34929) and purchase information ready.