
Introduzzjoni
This manual provides essential information for the safe and efficient operation of your SCULPFUN S9 PRO 10W Laser Engraver. The S9 PRO features 10W laser beam shaping technology, offering a 0.06mm ultra-fine laser focus for strong cutting penetration and precision. It is capable of cutting materials such as 15mm thick wood and 10mm acrylic, and engraving ceramics and stainless steel. Please read this manual thoroughly before use to ensure proper setup, operation, and maintenance.

Informazzjoni dwar is-Sigurtà
It-tħaddim ta' inċiżur bil-lejżer jinvolvi perikli potenzjali. Segwi l-linji gwida kollha tas-sigurtà biex tevita korrimenti jew ħsara.
- Protezzjoni tal-għajnejn: Always wear appropriate laser safety glasses when operating the machine. The integrated laser filter on the S9 PRO blocks 98% of ultraviolet light, allowing observation without additional safety glasses for bystanders, but direct laser exposure should always be avoided.
- Swiċċ tal-Enerġija: The machine is equipped with a secure power switch. Always turn off the machine when not in use or during maintenance.
- Pjazzament Sikur: Utilize the fastening holes on the four feet and frame structure to secure the machine and data cables, preventing accidental movement.
- Protezzjoni tal-wiċċ: Use the provided A4-sized steel pad to protect your work surface from laser damage.
- Ventilazzjoni: Ensure adequate ventilation in your workspace to dissipate fumes produced during engraving and cutting.
- Materjali li jaqbdu: Do not engrave or cut highly flammable materials without proper precautions.
- Tfal u Pets: Keep children and pets away from the operating area. The laser point can attract attention, but direct exposure is dangerous.

Kontenut tal-Pakkett
Ivverifika li l-komponenti kollha huma preżenti meta tiftaħ il-pakkett:
- 1 x SCULPFUN S9 Pro 10 W Laser Engraver
- A4-sized steel pad
- Adapter tal-enerġija
- Kejbil USB
- Għodod tal-assemblaġġ
- Manwal għall-Utent (dan id-dokument)
Gwida ta' Setup
1. Assemblea
The SCULPFUN S9 PRO features a fast assembly design, allowing for installation typically within 10 to 20 minutes. Follow the steps below:
- Pass 1: Assemble the main frame components.
- Pass 2: Attach the X-axis and laser module to the frame.
- Pass 3: Qabbad il-kejbils kollha meħtieġa.
- Temm: Kun żgur li l-konnessjonijiet kollha huma siguri u li l-qafas huwa stabbli.
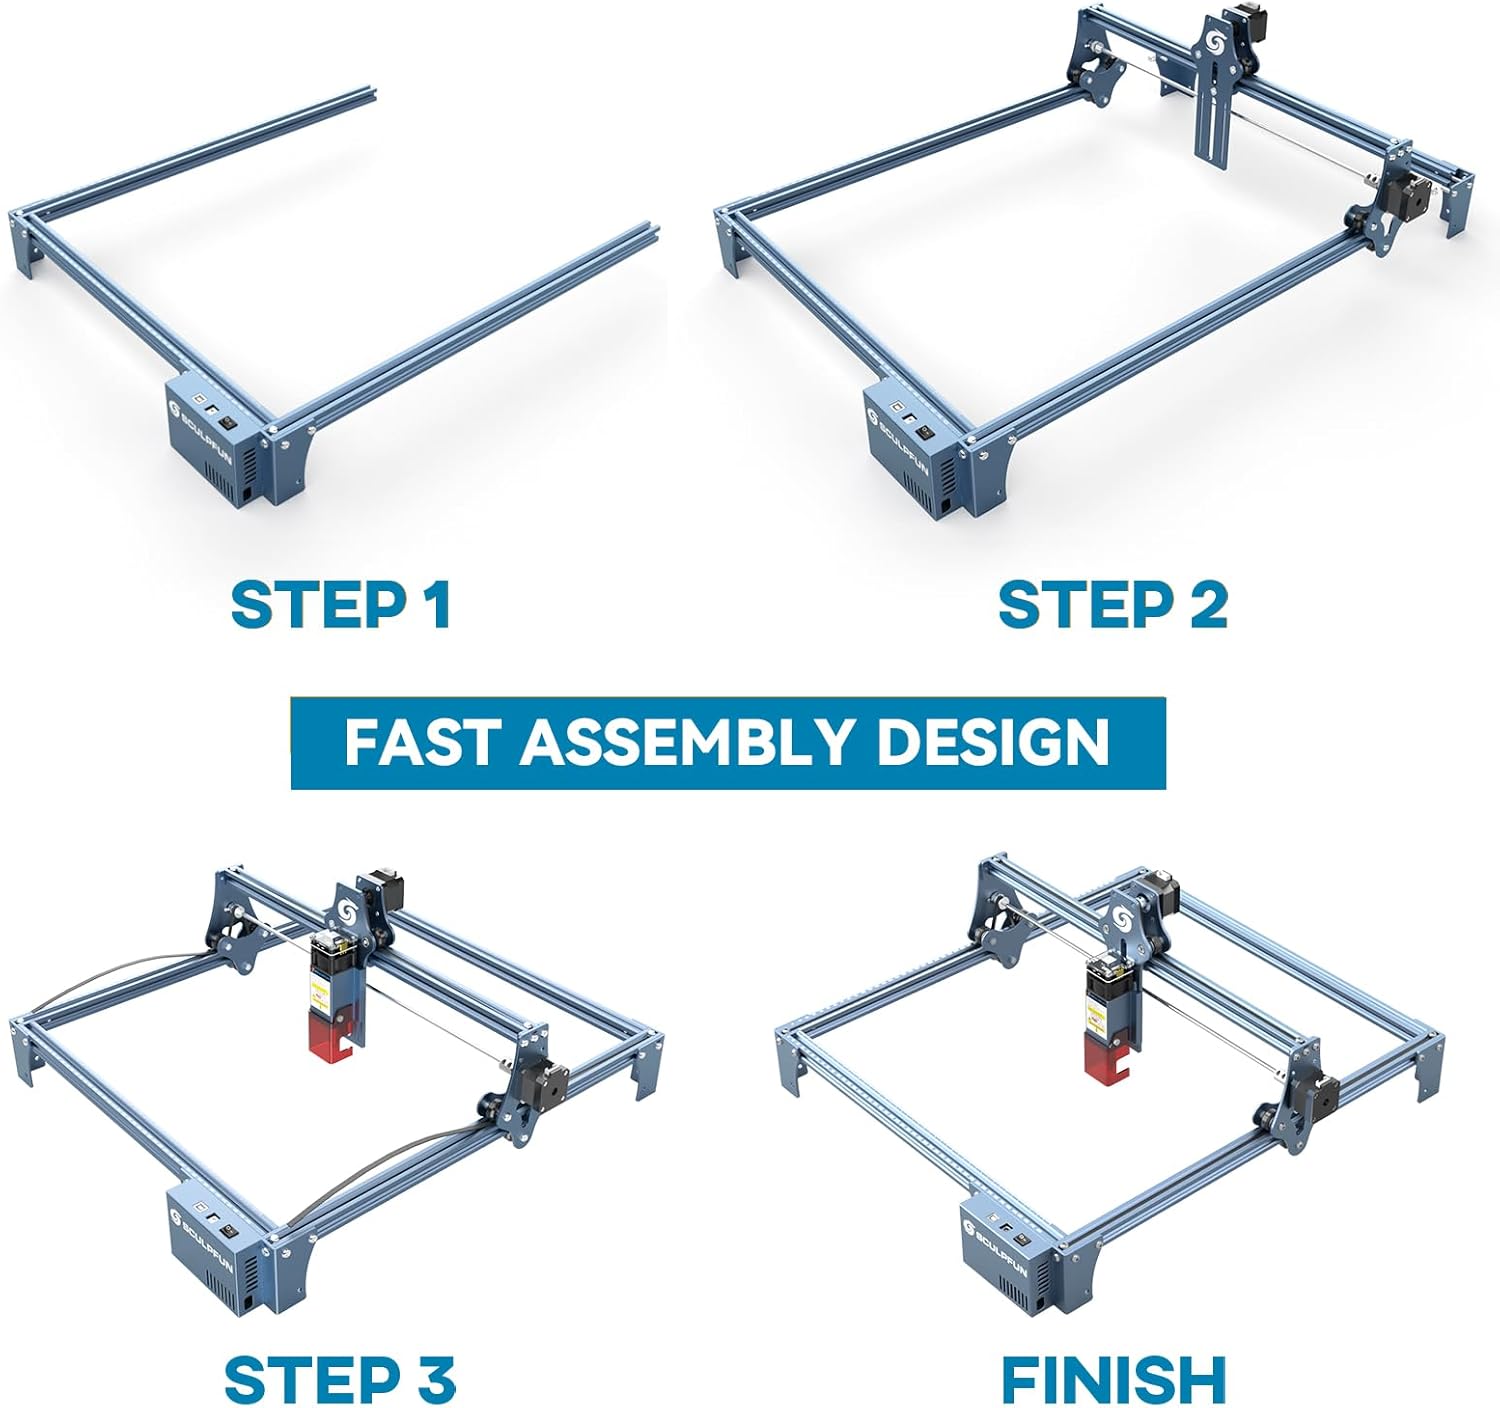
The full-metal structure enhances robustness and engraving accuracy. The X and Y axes include precise scale lines, forming a rectangular measuring ruler for quick object sizing.


2. Aġġustament tal-Focus
The S9 PRO features a quick fixed-focus design. The laser combines a fixed-focus lens with a sliding design for easy adjustment.
- Place the laser module over your material.
- Move the laser module up or down until the focus is achieved.
- Tighten the screws to secure the laser module in place.

Istruzzjonijiet Operattivi
1. Kompatibilità tas-Softwer
The SCULPFUN S9 PRO is compatible with various advanced engraving software:
- LaserGRBL (Windows)
- LightBurn (Windows, macOS, Linux)
- Benbox
- GrblController
- LiteFire
It supports engraving in PWM mode and various file formats including JPG, PNG, DXF, SVG, AI, G-code, NC, and BMP.

2. Material Capabilities
The 10W laser module provides strong cutting and engraving capabilities across a wide range of materials:
- Qtugħ: Up to 15mm thick wood, 10mm black acrylic.
- Inċiżjoni: Wood, leather, ceramics, stainless steel, aluminum oxide, PCB board, paper, cardboard, dark stone, and more.


3. General Operation Workflow
- Disinn: Create or import your design using compatible software (e.g., LightBurn, LaserGRBL).
- Tqegħid tal-Materjal: Place your material on the work surface, ensuring it is flat and secure. Use the integrated rulers for precise positioning.
- Aġġustament tal-Focus: Adjust the laser focus as described in the Setup section.
- Issettjar tas-softwer: Configure laser power, speed, and passes in your chosen software according to the material and desired effect. Refer to software documentation for detailed settings.
- Ibda l-Operazzjoni: Initiate the engraving or cutting process from the software. Monitor the machine during operation.
- Tlestija: Once the process is complete, turn off the machine and carefully remove your finished piece.
Manutenzjoni
Regular maintenance ensures optimal performance and extends the lifespan of your SCULPFUN S9 PRO.
- Naddaf il-Lenti tal-Laser: Periodically clean the laser lens with a soft, lint-free cloth and lens cleaning solution to maintain laser precision.
- Naddaf iż-Żona tax-Xogħol: Remove debris and dust from the engraving area after each use to prevent interference with machine movement.
- Inspect Belts and Rails: Check the drive belts for tension and wear. Keep the guide rails clean and lubricated if necessary to ensure smooth movement of the laser module.
- Aġġornamenti tal-Firmware: Check the official SCULPFUN webżur is-sit għal kwalunkwe aġġornament tal-firmware disponibbli biex tiżgura li l-magna tiegħek għandha l-aħħar karatteristiċi u titjib.
Issolvi l-problemi
Din it-taqsima tindirizza kwistjonijiet komuni li tista’ tiltaqa’ magħhom.
- Il-Laser Mhux Jaħdem:
- Check if the power cable is securely connected and the power switch is on.
- Verify that the USB cable is connected to your computer and the machine.
- Ensure the software is correctly configured and sending commands.
- Check the laser module connection.
- Kwalità Fqira tal-Inċiżjoni/Qtugħ:
- Re-check the laser focus. An incorrect focus is a common cause of poor quality.
- Adjust laser power and speed settings in your software. Different materials require different settings.
- Ensure the material is flat and securely placed.
- Naddaf il-lenti tal-lejżer jekk tidher maħmuġa.
- Machine Not Moving Correctly:
- Check for any obstructions on the rails or belts.
- Ensure belts are properly tensioned and not slipping.
- Verify that all cables are securely connected.
- Erġa' ibda s-softwer u l-magna.
- Kwistjonijiet ta' Konnessjoni tas-Softwer:
- Ensure the correct COM port is selected in your software.
- Try restarting your computer and the engraver.
- Reinstall the software or drivers if necessary.
For persistent issues, refer to the SCULPFUN support websit jew ikkuntattja lis-servizz tal-konsumatur.
Speċifikazzjonijiet
| Brand | SCULPFUN |
| Numru tal-Mudell | S9PRO10W-ELE |
| Qawwa tal-Laser | 10W (Lejżer tad-Dijodu) |
| Focus tal-Laser | 0.06mm (Ultrafine) |
| Preċiżjoni tal-inċiżjoni | 0.01mm |
| Żona tal-inċiżjoni | 400 x 410 mm |
| Sors tal-Enerġija | AC |
| Dimensjonijiet tal-Pakkett | 61.79 x 38.4 x 13.4 ċm |
| Piż tal-Pakkett | 4.95 kg |
| Komponenti Inklużi | 1 x SCULPFUN S9 Pro 10 W laser engraver |
| Kompatibilità tas-Software | LaserGRBL, LightBurn, Benbox, GrblController, LiteFire |
| OS appoġġjat | Windows, macOS, Linux |
| Appoġġjati File Formati | JPG, PNG, DXF, SVG, AI, G-code, NC, BMP |
Garanzija u Appoġġ
For warranty information, technical support, or service inquiries, please contact SCULPFUN customer support through their official webis-sit jew il-bejjiegħ bl-imnut minn fejn inxtara l-prodott. Żomm l-irċevuta tax-xiri tiegħek bħala prova tax-xiri.
Manifattur: SCULPFUN
L-Ewwel Data Disponibbli: 29 ta’ Novembru, 2024