1. Introduzzjoni
This manual provides essential information for the safe and effective installation, operation, and maintenance of your Generic RE250562 Tractor LED Warning Light. This LED warning light is designed for use with various John Deere tractor models, sprayers, and extremity arms, enhancing visibility and safety during operation. Please read this manual thoroughly before installation and use, and retain it for future reference.
2. Informazzjoni dwar is-Sigurtà
TWISSIJA: Nuqqas li ssegwi dawn l-istruzzjonijiet ta’ sigurtà jista’ jirriżulta fi korriment serju jew ħsara lill-proprjetà.
- Always disconnect the tractor's battery before performing any electrical work to prevent electrical shock or short circuits.
- Ensure all wiring connections are secure and properly insulated to prevent corrosion and electrical hazards.
- Mount the warning light in a location that provides maximum visibility without obstructing the operator's view or interfering with moving parts.
- Ivverifika li l-volum operattivtage of the light matches the electrical system of your tractor.
- Do not modify the light or its components. Use only genuine replacement parts if necessary.
- Consult a qualified technician if you are unsure about any installation or wiring procedures.
3. Kontenut tal-Pakkett
Jekk jogħġbok iċċekkja l-pakkett għall-oġġetti li ġejjin:
- 1 x RE250562 Tractor LED Warning Light
- Ħardwer tal-Immuntar (boltijiet, skorfini, woxers)
- Basic Wiring Harness (may vary by package)
Jekk xi oġġetti huma nieqsa jew bil-ħsara, jekk jogħġbok ikkuntattja lill-fornitur tiegħek immedjatament.
4. Setup u Installazzjoni
Follow these steps for proper installation of the LED warning light:
- Ipprepara t-Trattur: Ensure the tractor is turned off, the engine is cool, and the battery is disconnected. Park on a level surface and engage the parking brake.
- Agħżel Post tal-Immuntar: Select a suitable location on your John Deere tractor (e.g., fender, cab, extremity arm) that offers clear visibility and is free from obstructions. Ensure the surface is flat and strong enough to support the light.
- Immonta d-Dawl:
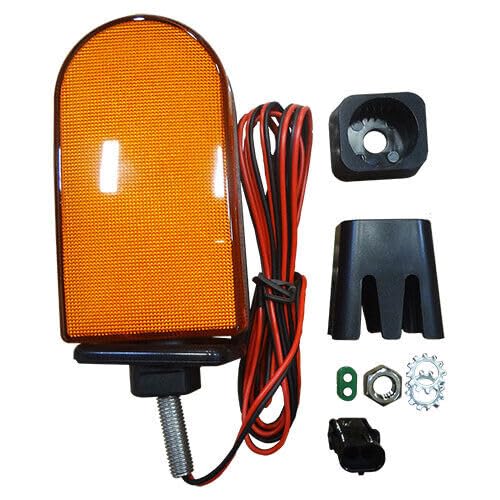
Immaġni 1: Eż.ample of the RE250562 Tractor LED Warning Light. This image shows the LED warning light, typically rectangular or square, with a clear lens and a robust housing, ready for mounting.
Using the provided mounting hardware, securely attach the warning light to the chosen location. Drill pilot holes if necessary, ensuring they are appropriately sized for the bolts. Do not overtighten, but ensure the light is firmly fixed and will not vibrate loose during operation.
- Konnessjonijiet tal-Wiring:
- Identify the positive (+) and negative (-) wires from the warning light.
- Connect the positive wire from the light to a switched 12V or 24V power source on your tractor (e.g., a dedicated accessory circuit or a switch-controlled power line). It is recommended to use an inline fuse for protection.
- Connect the negative wire from the light to a good chassis ground point on the tractor.
- Ensure all connections are clean, tight, and protected from moisture and abrasion using electrical tape or heat shrink tubing.
- Funzjonalità tat-Test: Reconnect the tractor battery. Turn on the ignition and activate the circuit connected to the warning light to ensure it functions correctly.
5. Istruzzjonijiet Operattivi
The RE250562 LED Warning Light is designed for simple operation.
- Once properly installed and wired, the light will activate when the connected electrical circuit on your tractor is switched on.
- Ensure the light is visible to others, especially when operating in low-light conditions, on public roads, or in areas with other personnel.
- Regularly check the light's functionality before each use to ensure it is operating correctly.
6. Manutenzjoni
To ensure the longevity and optimal performance of your LED warning light, follow these maintenance guidelines:
- Tindif: Periodically clean the lens and housing with a soft cloth and mild soap and water. Avoid abrasive cleaners or solvents that could damage the plastic.
- Spezzjoni: Regularly inspect the light for any signs of damage, such as cracks in the lens or housing, loose wiring, or corrosion on the terminals.
- Wiring: Check all electrical connections for tightness and ensure insulation is intact. Repair or replace any damaged wiring immediately.
- Immuntar: Verify that the mounting hardware remains secure. Tighten any loose bolts or nuts.
7 Issolvi l-problemi
| Problema | Kawża Possibbli | Soluzzjoni |
|---|---|---|
| Id-dawl ma jixgħelx. |
|
|
| Id-dawl jitteptep jew huwa baxx. |
|
|
| Umdità ġewwa l-lenti. |
|
|
8. Speċifikazzjonijiet
| Karatteristika | Dettall |
|---|---|
| Numru tal-Mudell | Model-NXL88-Gk1053 |
| Numru tal-Parti OEM | RE250562 (Replaces RE284891, RE172010, RE199920) |
| Kompatibilità | John Deere Tractors, Sprayers, Extremity Arms (Models: 4040, 4050, 4055, 4230, 4240, 4250, 4255, 4430, 4440, 4450, 4455, 4555, 4560, 4630, 4640, 4650, 4755, 4760, 4840, 4850, 4955, 4960, 6105M, 6105R, 6110M, 6110R, 6115M, 6115R, 6120, 6120M, 6120R, 6125M, 6125R, 6130M, 6130R, 6140M, 6140R, 6145M, 6145R, 6150M, 6150R, 6150RH, 6155M, 6155R, 6155RH, 6170M, 6170R, 6175M, 6175R, 6190R, 6195M, 6210R, 6215, 6215R, 6220, 6230, 6320, 6330, 6415, 6420, 6430, 6615, 6715, 7130, 7200, 7200R, 7210, 7210R, 7215R, 7220, 7230R, 7250R, 7260R, 7270R, 7280R, 7290R, 7310R, 7320, 7400, 7410, 7420, 7430, 7510, 7520, 7530, 7600, 7610, 7630, 7700, 7710, 7720, 7730, 7800, 7810, 7820, 7830, 7920, 7930, 8100, 8100T, 8110, 8110T, 8120, 8120T, 8130, 8200, 8200T, 8210, 8210T, 8220, 8220T, 8225R, 8230, 8235R, 8245R, 8260R, 8270R, 8295R, 8295RT, 8300, 8300T, 8310, 8310R, 8310RT, 8310T, 8320, 8320R, 8320RT, 8320T, 8330, 8330T, 8335R, 8345R, 8345RT, 8360R, 8360RT, 8370R, 8370RT, 8400, 8400R, 8400T, 8410, 8410T, 8420, 8420T, 8430, 8440, 8450, 8520, 8520T, 8530, 8560, 8630, 8640, 8760, 8850, 8960, 9360R, 9410R, 9460R, 9510R, 9560R; Sprayer: 4630, R4023) |
| Finish ta 'barra | Finitura metallika |
| Manifattur | -W-P- |
| ASIN | B0DNGHFZ22 |
| L-ewwel Disponibbli | 18 ta’ Novembru, 2024 |
9. Garanzija u Appoġġ
Specific warranty information for this Generic product is not provided in the product details. For warranty claims or technical support, please contact the seller or manufacturer directly through your purchase platform. Keep your proof of purchase for any warranty inquiries.


