
SCULPFUN S9 Pro
SCULPFUN S9 Pro 10W Laser Engraver Instruction Manual
Model: S9 Pro | Brand: SCULPFUN
Prodott Overview
The SCULPFUN S9 Pro is a high-precision 10W laser engraver and cutter machine designed for versatile applications. It offers powerful engraving and cutting capabilities on a wide range of materials, including wood, leather, plastic, acrylic, and metal. With its advanced features, the S9 Pro ensures detailed and efficient results for various crafting and prototyping projects.

Figure 1: SCULPFUN S9 Pro 10W Laser Engraver, showcasing its robust frame and laser module.
Karatteristiċi Ewlenin
- Powerful 10W Laser Module: Enables precise engraving and cutting on various materials. Capable of cutting up to 20mm wood and 15mm acrylic.
- Żona ta' Ħidma Kbira: A generous 400mm x 410mm (15.75" x 16.14") area for diverse project sizes.
- Preċiżjoni Għolja: Features a 0.06mm ultra-fine laser focus and 0.01mm precision for detailed work.
- Kompatibbiltà Wiesgħa: Compatible with popular engraving software like LaserGRBL and LightBurn, supporting Windows and MAC systems. Supports various file formats including JPG, PNG, DXF, SVG, AI, G-code, NC, and BMP.
- Sigurtà Mtejba: Equipped with a laser filter cover that blocks 98% of ultraviolet light, double safety power switch, and pre-drilled holes for secure wiring. Includes a steel pad to protect surfaces and mitigate fire hazards.
Gwida ta' Setup
The SCULPFUN S9 Pro is designed for straightforward assembly. Follow these steps for initial setup:
- Spakkjar: Neħħi bir-reqqa l-komponenti kollha mill-imballaġġ. Ivverifika li l-partijiet kollha elenkati fil-lista tal-imballaġġ huma preżenti.
- Assemblaġġ tal-qafas: Assemble the main frame of the engraver. The parts are typically labeled for easy identification. Refer to the included quick-start guide for visual instructions.
- Installazzjoni tal-Modulu tal-Laser: Securely attach the laser module to the gantry. Ensure it is firmly in place.
- Wiring: Connect all necessary cables, including power and data cables, according to the provided diagrams. Ensure connections are secure.
- Installazzjoni tas-Softwer: Install the recommended engraving software (e.g., LaserGRBL or LightBurn) on your computer. Drivers may be required for proper communication.
- Kalibrazzjoni Inizjali: Perform initial calibration steps as outlined in the software or quick-start guide to ensure proper laser alignment and focus.
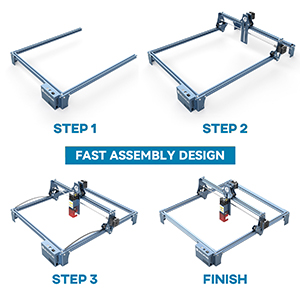
Figure 2: Visual representation of the fast assembly process for the SCULPFUN S9 Pro.

Figure 3: Diagram illustrating the 400x410mm large carving area of the engraver.
Istruzzjonijiet Operattivi
Operating the SCULPFUN S9 Pro involves preparing your design, setting up the material, and initiating the engraving or cutting process through the software.
Software Compatibility and Usage
The S9 Pro is compatible with a variety of mature engraving software, ensuring flexibility for users:
- Software appoġġjat: LaserGRBL, LightBurn, Benbox, GrblController, LiteFire.
- Sistemi Operattivi: Supports Windows (XP, 7, 8, 10) and MAC systems (with LightBurn).
- File Formati: Compatible with JPG, PNG, DXF, SVG, AI, G-code, NC, BMP, and more.

Figure 4: Illustration of the broad software compatibility, including LaserGRBL and LightBurn.
Material Preparation and Laser Focus
Proper material placement and laser focusing are crucial for optimal results.
- Tqegħid tal-Materjal: Place your material flat on the working area. Use the included steel pad to protect your work surface from laser damage and fire hazards.
- Laser Focusing: The S9 Pro features a 0.06mm ultra-fine laser focus. Adjust the laser module height to achieve the sharpest possible focus on your material. This ensures precise engraving and cutting.
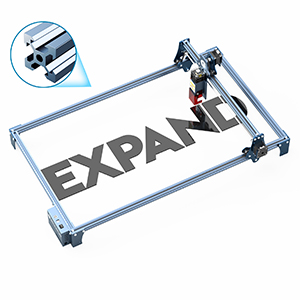
Figure 5: Demonstrating the adjustment of the laser module for optimal focus on the material.

Figure 6: Illustration of the high-density and sharp laser beam, highlighting its effective cutting range and ultra-fine focus.
Engraving and Cutting Materials
The S9 Pro is capable of processing a wide array of materials:
| Tip ta' Materjal | Kapaċitajiet | Noti |
|---|---|---|
| Injam | Engraving & Cutting (up to 20mm) | Plywood, light wood, walnut, teak. Adjust settings for different wood densities. |
| Akriliku | Engraving & Cutting (up to 15mm) | Clear and colored acrylic. |
| Ġilda | Inċiżjoni u Qtugħ | Ideal for personalized leather goods. |
| Metall | Inċiżjoni | Requires specific settings for different metal types. |
| Plastik | Inċiżjoni u Qtugħ | Test on a small area first to avoid melting or fumes. |
| Fabric/Cloth | Inċiżjoni | Suitable for denim and other textiles. |

Figura 7: Eżamples of cutting depth on various materials like plywood, MDF, light wood, acrylic, walnut, and teak.

Figura 8: Eżempju viżwaliamples of wood carving, leather carving, acrylic carving, steel carving, wood cutting, leather cutting, acrylic cutting, and cloth carving.
Manutenzjoni
Regular maintenance ensures the longevity and optimal performance of your SCULPFUN S9 Pro.
- Tindif: Regularly clean the laser lens and the working area to remove dust, debris, and residue from engraving/cutting. Use a soft, lint-free cloth and appropriate cleaning solutions if necessary.
- Sistema ta' Assistenza bl-Ajru: If using an air assist system, ensure the nozzle is clear and free from blockages to maintain efficient airflow.
- Tkessiħ: To prevent overheating and prolong laser module life, allow the laser to cool for approximately 15 minutes after every 4 hours of continuous operation.
- Laser Module Lifespan: The laser module has a finite lifespan, typically around one year with regular use. Performance may decline over time, particularly for cutting thicker materials. Replacement modules can be sourced from the manufacturer or authorized dealers.
- Lubrikazzjoni: Periodically check and lubricate the moving parts, such as the guide rails and lead screws, to ensure smooth operation.
Issolvi l-problemi
This section addresses common issues you might encounter with your SCULPFUN S9 Pro.
| Problema | Kawża Possibbli | Soluzzjoni |
|---|---|---|
| Il-lejżer mhux qed jispara jew il-ħruġ tiegħu huwa dgħajjef | Loose connection, laser module issue, incorrect software settings, dirty lens. | Check all cable connections. Verify laser power settings in software. Clean the laser lens. If issues persist, the laser module may need replacement. |
| Poor engraving/cutting quality (e.g., blurry, incomplete cuts) | Incorrect focus, wrong speed/power settings, material issues, dirty lens. | Re-focus the laser. Adjust speed and power settings based on material type and thickness. Ensure material is flat and clean. Clean the laser lens. |
| Software not connecting to engraver | Incorrect COM port, driver issues, software version incompatibility. | Verify the correct COM port is selected in the software. Reinstall drivers. Ensure software is up-to-date or compatible with your firmware. Restart both computer and engraver. |
| Machine not moving or erratic movement | Loose belts, motor issues, power supply problem, software command error. | Check and tighten timing belts. Ensure power supply is stable. Restart software and machine. Consult manufacturer support if motors are unresponsive. |
For more detailed troubleshooting, refer to the official SCULPFUN support resources or online communities for LaserGRBL and LightBurn.
Speċifikazzjonijiet
- Mudell: S9 Pro
- Qawwa tal-Ħruġ tal-Laser: 10,000mW (10W)
- Klassi tal-Laser: 4
- Engraving Precision: 0.01mm
- Fokus tal-Laser: 0.06mm ultra-fine
- Żona tax-Xogħol: 400mm x 410mm (15.75" x 16.14")
- Dimensjonijiet tal-Prodott: 22.4 x 20.4 x 3 pulzieri
- Piż tal-oġġett: 9.68 liri
- Manifattur: SCULPFUN
- Pajjiż ta' Oriġini: Iċ-Ċina
Garanzija u Appoġġ
For detailed warranty information, product support, or to purchase replacement parts (such as laser modules), please refer to the official SCULPFUN webis-sit jew ikkuntattja lis-servizz tal-konsumatur tagħhom direttament. Żomm l-irċevuta tax-xiri tiegħek bħala prova tax-xiri għal kwalunkwe talba ta' garanzija.
SCULPFUN Official Store: Visit SCULPFUN Store on Amazon
Ask a question about this manual
Ask about setup, troubleshooting, compatibility, parts, safety, or missing instructions. Manuals+ will review the question and use this page’s manual context to help answer it.