
1. Setup
1.1 Tneħħija tal-kaxxa u l-komponenti
Carefully unpack all items from the box. Ensure all components are present before proceeding with assembly.
- Unità tat-turntable
- Għata tat-trab trasparenti
- Kejbil tal-Konnessjoni
- Adapter tal-Enerġija Universali
- Protractor tal-Allinjament
- Adapter Uniku

Quddiem view of the Pro-Ject Debut EVO 2 turntable.
1.2 Installazzjoni tal-Platt u ċ-Ċinturin
- Carefully place the heavy aluminum platter onto the spindle in the center of the turntable.
- Locate the drive belt. Gently stretch the belt around the inner rim of the platter and around the motor pulley.
- Rotate the platter manually a few times clockwise to ensure the belt is properly seated.
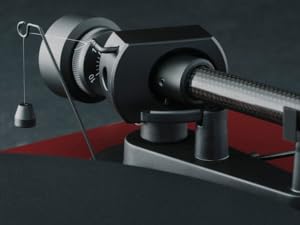
Image showing the platter with the drive belt correctly installed around the motor pulley.
1.3 Tonearm Assembly
- Żerżaq il-kontrapiż fuq wara tad-driegħ tat-tonearm.
- Attach the pre-mounted Pick it MM EVO cartridge to the tonearm headshell.

Dettaljati view of the carbon fiber tonearm and the pre-mounted Pick it MM EVO cartridge.

Diagram illustrating the TPE counterweight and premium bearing block for the tonearm.
1.4 Dustcover Installation
Carefully insert the hinges of the transparent dustcover into the corresponding slots on the turntable base.

The Pro-Ject Debut EVO 2 turntable with its transparent dustcover in place.
1.5 Leveling the Turntable
Place the turntable on a stable, level surface. Use a bubble level (not included) to ensure the turntable is perfectly horizontal. Adjust the turntable's feet as necessary to achieve a level position.
1.6 Balancing the Tonearm
This critical step ensures proper tracking force and prevents damage to your records and stylus. Follow the detailed instructions in the included manual for precise tonearm balancing and anti-skating adjustment.

Detail of the tonearm showing the anti-skating mechanism.
1.7 Konnessjoni ma' Sistema Awdjo
Qabbad it-turntable ma tiegħek amplifier or receiver using the provided connection cable. Ensure your amplifier has a phono input, or use an external phono preamplifier if necessary. Connect the ground wire to the ground terminal on your amplifier / preamp to minimize hum.
Video: Fluance Reference Turntable First Time Setup. This video provides a general guide for turntable setup, including platter, belt, tonearm, and dust cover installation, as well as leveling and balancing.
Video: How to Connect a Fluance Turntable to a Stereo Amplifier. This video offers a general guide on connecting a turntable to an amplifier, which can be helpful for the Pro-Ject Debut EVO 2.
2. Istruzzjonijiet Operattivi
2.1 Mixgħul/Mitfi u Għażla tal-Veloċità
To power on the turntable, rotate the power knob. The Debut EVO 2 features electronic speed selection for 33 and 45 RPM. Use the dedicated button to switch between these speeds. For 78 RPM records, a special stylus and pulley may be required (sold separately).
2.2 Daqq ta' Rekord
- Poġġi r-rekord tiegħek fuq il-platt.
- Select the correct playback speed (33 or 45 RPM).
- Erfa' d-driegħ bil-mod billi tuża l-lieva tal-kjuwijiet.
- Pożizzjona d-driegħ tat-tonearm fuq it-trakka mixtieqa fuq ir-rekord.
- Slowly lower the cueing lever to allow the stylus to descend onto the record groove.
- At the end of the record, lift the tonearm using the cueing lever and return it to its rest.
3. Manutenzjoni
3.1 Tindif
- Regularly clean the dustcover and turntable plinth with a soft, dry cloth.
- Use a carbon fiber brush to gently clean your records before each play to remove dust and static.
- Clean the stylus carefully with a dedicated stylus brush, moving from back to front.
3.2 Kura tal-Istilus
The stylus is a delicate component. Avoid touching it with your fingers. Replace the stylus when signs of wear appear, typically after 500-1000 hours of playback, to maintain sound quality and prevent record damage.
4 Issolvi l-problemi
4.1 Ebda Ħoss
- Check all cable connections between the turntable, preamplifier (if used), and amplifier/riċevitur.
- Kun żgur li l-input korrett huwa magħżul fuq tiegħek amplifier/riċevitur.
- Verify the stylus is properly seated in the cartridge and the tonearm is balanced.
4.2 Qbiż jew Distorsjoni
- Kun żgur li t-turntable jinsab fuq wiċċ stabbli u livellat.
- Re-check tonearm balance and anti-skating settings.
- Naddaf ir-rekord u l-istilus.
- Inspect the stylus for damage or wear.
4.3 Humming Noise
- Kun żgur li l-wajer tal-ert huwa konness sew bejn it-turntable u tiegħek amplifier / preamp.
- Check for any loose connections in the audio cables.
- Mexxi t-turntable 'il bogħod minn apparati elettroniċi oħra li jistgħu jikkawżaw interferenza.
5. Speċifikazzjonijiet
- Dimensjonijiet tal-Prodott: 1.26 x 1.63 x 0.44 pulzieri
- Piż tal-oġġett: 17.6 libbra (8 Kilogrammi)
- Numru tal-Mudell tal-Oġġett: 9120129864954
- Ditta: Pro-Ġett
- Veloċità ta' Rotazzjoni Massima: 45 RPM (supports 33 and 45 RPM electronically)
- Komponenti Inklużi: Turntable, transparent dustcover, connection cable, universal power adapter, alignment protractor, single adapter
- Karatteristika Speċjali: Adjustable 8.6" carbon tonearm, Aluminium diecast platter, Built-in speed control, Precision machined MDF plinth
- Materjal: Carbon Fibre (tonearm)
- Kulur: Satin Iswed
- Isem tal-Mudell: Debutt EVO 2
- Apparati Kompatibbli: AV Receiver, Audio Component with Analog or Digital Inputs, Integrated Amplifier, Powered Speaker
6. Garanzija u Appoġġ
6.1 Disponibbiltà ta' Spare Parts
Pro-Ject offers a 25-year spare parts availability guarantee for this turntable, ensuring its longevity and continued performance.
6.2 Appoġġ għall-Klijent
For further assistance, technical support, or warranty claims, please refer to the contact information provided in your product packaging or visit the official Pro-Ject Audio Systems websit.