1. Introduzzjoni
The MakerHawk Vision Master E290-ESP32-S3R8 is a versatile development board designed for IoT projects, integrating a 2.9-inch E-Ink display with an ESP32-S3R8 microcontroller. It supports Wi-Fi and BLE connectivity, with optional LoRa module compatibility for extended range communication, making it suitable for applications like electronic tags and identity badges. The board features ultra-low power consumption, including a deep sleep mode, allowing for prolonged operation. It is compatible with popular development frameworks such as Arduino, PlatformIO, and Micropython.
Key features include a 2.90-inch 296 x 128 pixel E-Ink display with partial refresh capabilities, an onboard SH1.25-2 battery interface with integrated lithium battery management (charge/discharge, overcharge protection, battery level detection, automatic USB/battery power switching), and a SH2.0-4P sensor interface compatible with QuickLink series sensors. A 2x20 pin female header connector ensures compatibility with Raspberry Pi.

Image 1.1: Vision Master E290 Development Board with E-Ink display, antenna, and battery connector cables.
2. Kontenut tal-Pakkett
Iċċekkja li l-oġġetti kollha elenkati hawn taħt huma inklużi fil-pakkett tiegħek:
- 1 x HT-VME290 (Vision Master E290 Development Board)
- 1 x Antenna LoRa
- 1 x SH1.25x2 Battery Connector Cable

Image 2.1: Contents of the Vision Master E290 package.
3. Prodott Aktarview
The Vision Master E290 board features a compact design with various interfaces for development. Below are diagrams illustrating the board's dimensions and key components.
3.1 Dimensjonijiet
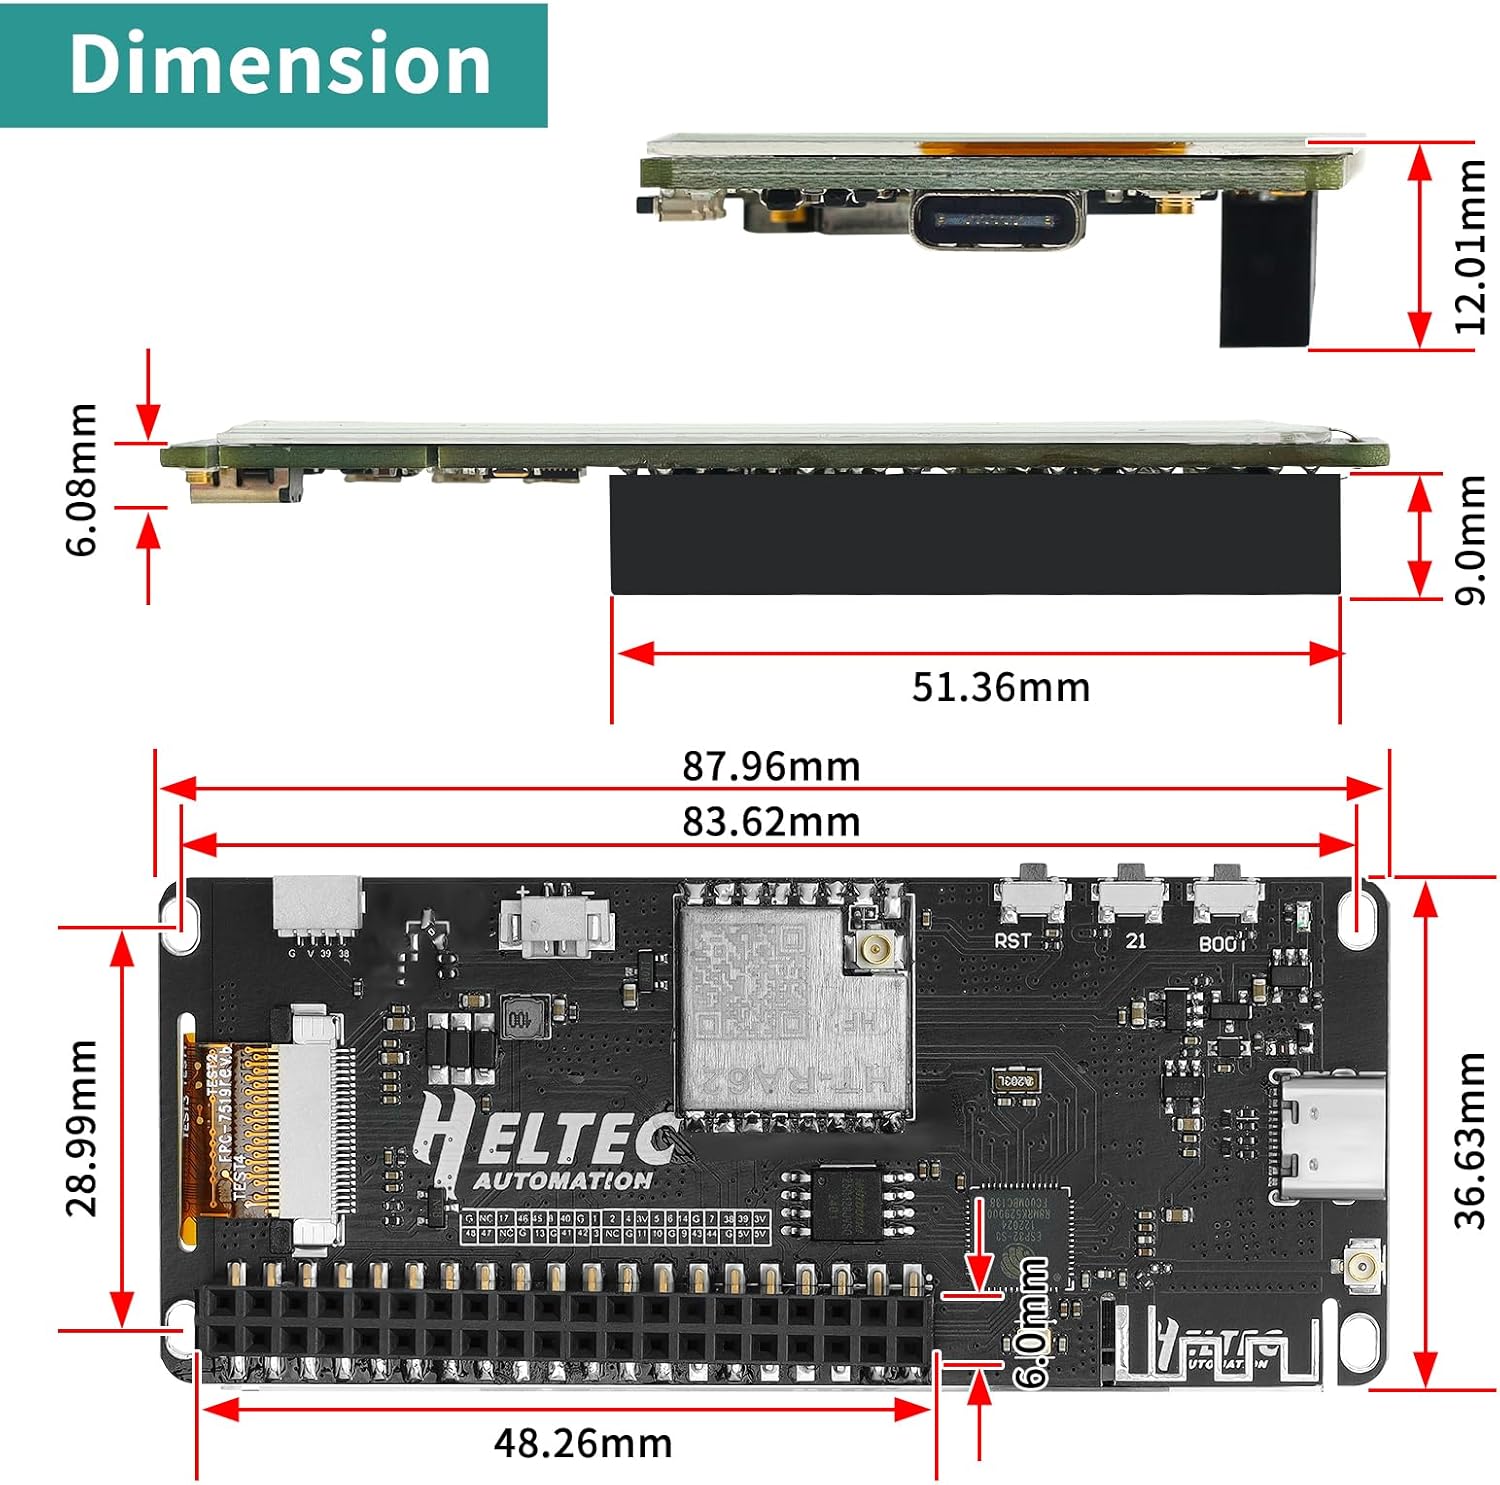
Image 3.1: Physical dimensions of the Vision Master E290 board and E-Ink display.
3.2 Identifikazzjoni tal-Komponent
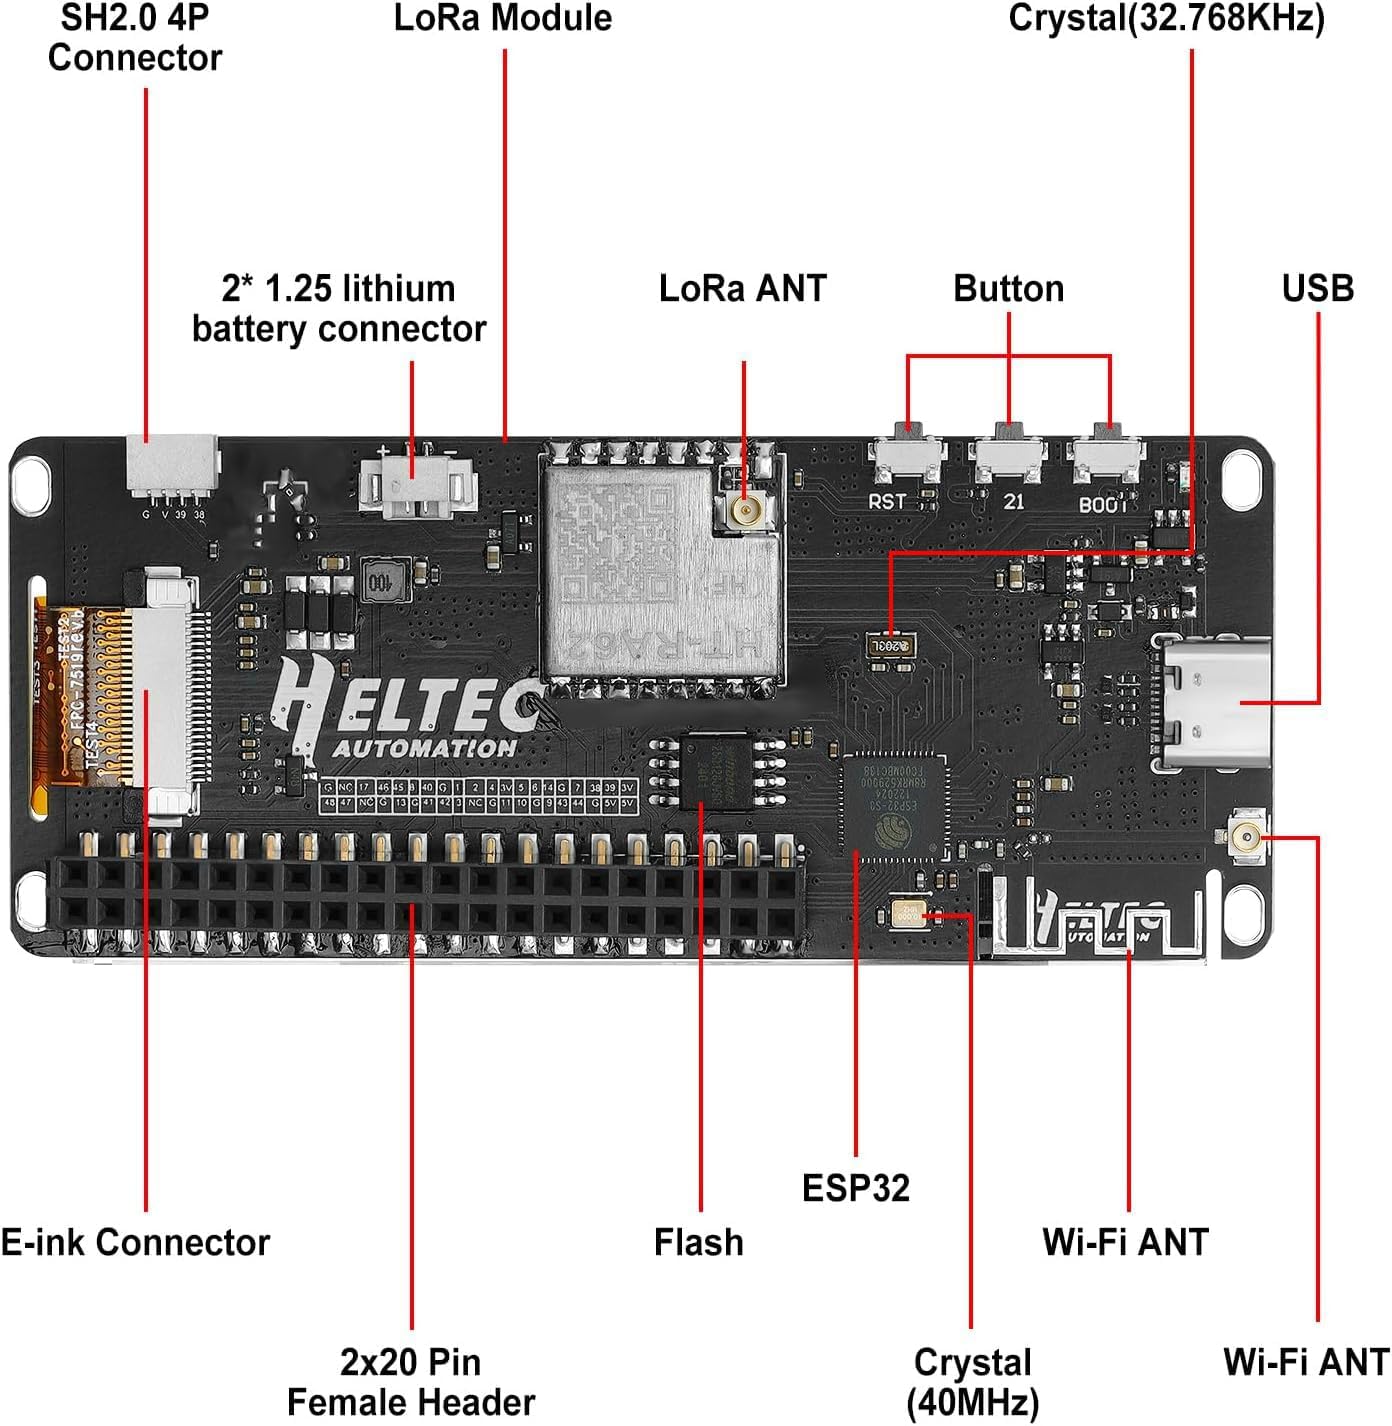
Image 3.2: Labeled components of the Vision Master E290 board, including E-Ink connector, SH2.0 4P connector, LoRa module, LoRa ANT, Wi-Fi ANT, USB-C, buttons (RST, 21, BOOT), ESP32, Flash, and 2x20 Pin Female Header.
3.3 Dijagramma tal-Pinout

Image 3.3: Detailed pinout diagram for the Vision Master E290, showing power, GND, GPIO, ADC/DAC, Serial SPI I2C, and other connections.
4. Speċifikazzjonijiet
The following table details the technical specifications of the Vision Master E290 Development Board:
| Parametru | Deskrizzjoni |
|---|---|
| Ċippa Prinċipali | ESP32-S3R8 |
| LoRa Node Chip | SX1262 |
| Frekwenza | 802 ~ 928MHz |
| Max. Tx Power | 21 ± 1dBm |
| Max. Sensittività Riċevitur | -136dBm@SF12 BW=125KHz |
| Wi-Fi | 802.11 b/g/n, sa 150Mbps |
| Bluetooth | Bluetooth 5 (LE) |
| Riżorsi tal-Hardware | 6*ADC_1, 1*ADC_2, 6*Touch, 8M*PSRAM, 3*UART, 2*I2C, 2*SPI, etc. |
| Memorja | 384KB ROM; 512KB SRAM; 16KB RTC SRAM; 8MB SIP Flash |
| Interface | Type-C USB; 2*1.25 lithium battery interface; LoRa ANT; Wi-Fi ANT; 2*20 Pin Female Header; SH2.0-4P sensor interface. |
| Batterija | 3.7V lithium battery power supply and charging |
| Temperatura operattiva | -20 ~ 70 °C |
| E-Linka | 2.90 Inch, 128(H)x296(V) Pixel, 29x67mm, Black&White (2 Grayscale) |
| Dimensjonijiet | 87.96 * 36.63 * 12mm |

Image 4.1: Visual representation of the Vision Master E290 specifications.
5. Istruzzjonijiet ta' Setup
Follow these steps to set up your Vision Master E290 Development Board:
- Qabbad l-antenna: Qabbad bir-reqqa l-antenna LoRa pprovduta mal-konnettur IPEX fuq il-bord. Kun żgur li l-konnessjoni hija sigura.
- Provvista tal-Enerġija: Connect the board to your computer using a USB-C cable. The board can also be powered via the SH1.25-2 battery interface using a 3.7V lithium battery. The integrated battery management system handles charging and power switching.
- Konfigurazzjoni tal-Ambjent tal-Iżvilupp:
- Arduino IDE: Install the Arduino IDE and add ESP32 board support. Refer to the official ESP32 Arduino documentation for detailed instructions.
- PlatformIO: Install PlatformIO IDE (e.g., as a VS Code extension) and configure it for ESP32-S3 development.
- Mikropiton: Flash Micropython firmware to the ESP32-S3R8 and use a suitable IDE for development.
- Firmware Flashing (e.g., Meshtastic): For applications like Meshtastic, you can use web-based flashers. Ensure the device is connected via USB. You may need to press and hold the BOOT button while plugging in the USB cable to enter programming mode.
For detailed documentation and resources, including schematics and datasheets, please visit the Heltec Automation websit.

Immaġni 5.1: Eż.ample of online documentation and resources available for Heltec products.
5.1 Meshtastic Setup Example
The Vision Master E290 is compatible with Meshtastic for off-grid communication. The following video demonstrates the flashing process for a similar Heltec LoRa board, which can be adapted for the E290.
Video 5.1: This video demonstrates the setup and flashing process for a Heltec LoRa V3 development board with a 915MHz antenna, including Meshtastic firmware installation and basic communication. This process is similar for the Vision Master E290.
6. Istruzzjonijiet Operattivi
Once the board is programmed with your desired firmware, its operation will depend on the specific application. General operating principles include:
- Wiri tal-linka elettronika: The 2.9-inch E-Ink display provides low-power visual output. It supports partial refresh, which can be configured in your code for faster updates, though full refreshes are slower but prevent ghosting.
- Komunikazzjoni bla fili: Utilize the ESP32-S3R8's Wi-Fi and BLE capabilities for network connectivity or short-range device communication. The integrated LoRa module (SX1262) enables long-range, low-power data transmission.
- Modi ta' Enerġija Baxxa: Leverage the ESP32-S3R8's deep sleep mode to achieve ultra-low power consumption (as low as 18uA), extending battery life significantly for battery-powered applications.
- Integrazzjoni tas-Sensor: Connect compatible sensors to the SH2.0-4P interface to expand the board's functionality for data acquisition.
- User Input: The board includes buttons (RST, 21, BOOT) that can be programmed for various user interactions depending on your application.
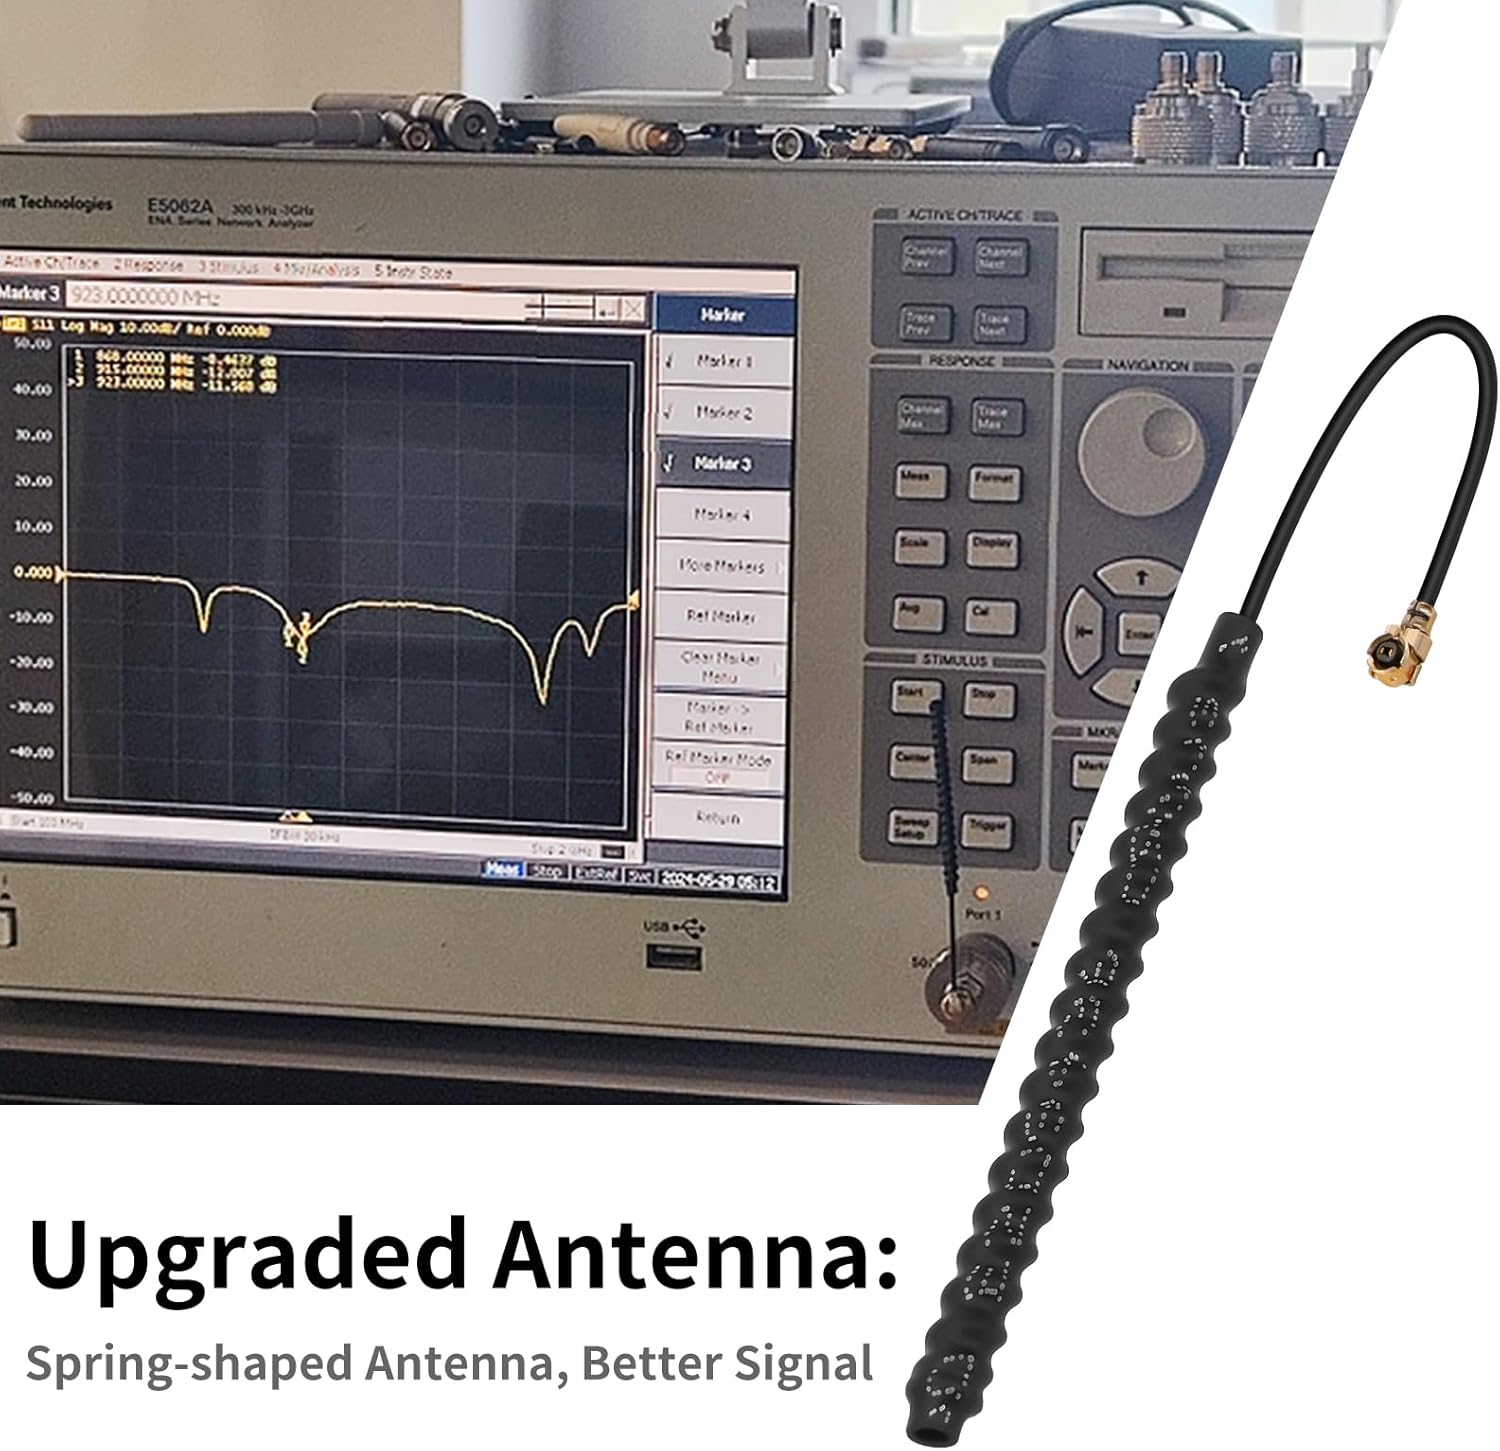
Image 6.1: The upgraded spring-shaped antenna is designed to provide better signal reception for LoRa communication.
7. Manutenzjoni
To ensure the longevity and optimal performance of your Vision Master E290 Development Board, consider the following maintenance guidelines:
- Ġestjoni tal-Enerġija: The integrated lithium battery management system provides charge/discharge management and overcharge protection. Always use a compatible 3.7V lithium battery. Avoid over-discharging or over-charging the battery.
- Kundizzjonijiet Ambjentali: Operate the board within the specified temperature range of -20 °C to 70 °C. Avoid exposure to extreme temperatures, humidity, or corrosive environments.
- Tindif: Keep the board clean and free from dust and debris. Use a soft, dry brush or compressed air for cleaning. Avoid using liquids or harsh chemicals.
- Aġġornamenti tal-Firmware: Regularly check for and apply firmware updates from the official Heltec Automation resources to benefit from bug fixes and new features.
- Immaniġġjar Fiżiku: Handle the board with care to prevent damage to components, especially the E-Ink display and connectors.
8 Issolvi l-problemi
If you encounter issues with your Vision Master E290, consider the following troubleshooting steps:
- Il-Bord Mhux Mixgħul:
- Ensure the USB-C cable is securely connected to both the board and a power source (computer or USB adapter).
- If using a battery, verify it is charged and correctly connected to the SH1.25-2 interface.
- Falliment tat-Tlugħ tal-Firmware:
- Check that the correct board is selected in your IDE (e.g., ESP32-S3 Dev Module).
- Kun żgur li jintgħażel il-port COM korrett.
- Try pressing and holding the BOOT button while plugging in the USB cable, then release BOOT and press RST to enter programming mode.
- Verify USB drivers are installed correctly.
- E-Ink Display Issues:
- Check the E-Ink display connector for proper seating.
- Ensure your code correctly initializes and updates the E-Ink display.
- If ghosting occurs, perform a full refresh of the display.
- Wireless Connectivity Problems:
- Kun żgur li l-antenni huma konnessi sew.
- Verify Wi-Fi credentials or LoRa parameters in your code.
- Check signal strength and range.
- Instabbiltà Ġenerali:
- Ensure your power supply is stable and sufficient.
- Review your code for potential bugs or memory issues.
- Consult online forums and communities for ESP32-S3 and Heltec products.
9. Appoġġ u Riżorsi
For further assistance and to access additional resources, please refer to the following:
- MakerHawk Store: Żur l-uffiċjal MakerHawk Amazon Store for product information and related items.
- Heltec Automation Documentation: Comprehensive technical documentation, schematics, and libraries are available on the Heltec Automation website for Vision Master E290.
- Forums tal-Komunità: Engage with the ESP32, Arduino, PlatformIO, Micropython, and Meshtastic communities for support and project ideas.
10. Informazzjoni dwar Garanzija
Specific warranty details for the MakerHawk Vision Master E290-ESP32-S3R8 Development Board are typically provided at the point of purchase or within the product packaging. Please refer to your purchase documentation or contact MakerHawk customer support for precise warranty terms and conditions.