
ASUS TUF Gaming B650-E WIFI
Manwal tal-Utent tal-Motherboard tal-ASUS TUF Gaming B650-E WIFI
Model: TUF Gaming B650-E WIFI
Introduzzjoni
The ASUS TUF Gaming B650-E WIFI motherboard is designed for AMD Ryzen Desktop processors, offering robust performance and reliability for gaming and productivity. This motherboard integrates essential features for the AM5 Socket platform, including DDR5 memory support, multiple M.2 slots, USB 3.2 connectivity, WiFi 6E, and 2.5Gbit LAN. It features a durable design with ASUS TUF Protection and Q-Design elements, ensuring stable operation and ease of use.

Figure 1: ASUS TUF Gaming B650-E WIFI Motherboard and its retail packaging.
Setup u Installazzjoni
Before beginning installation, ensure your system components are compatible with the ASUS TUF Gaming B650-E WIFI motherboard. Always handle the motherboard by its edges to prevent static discharge damage.
1. Komponent Aktarview
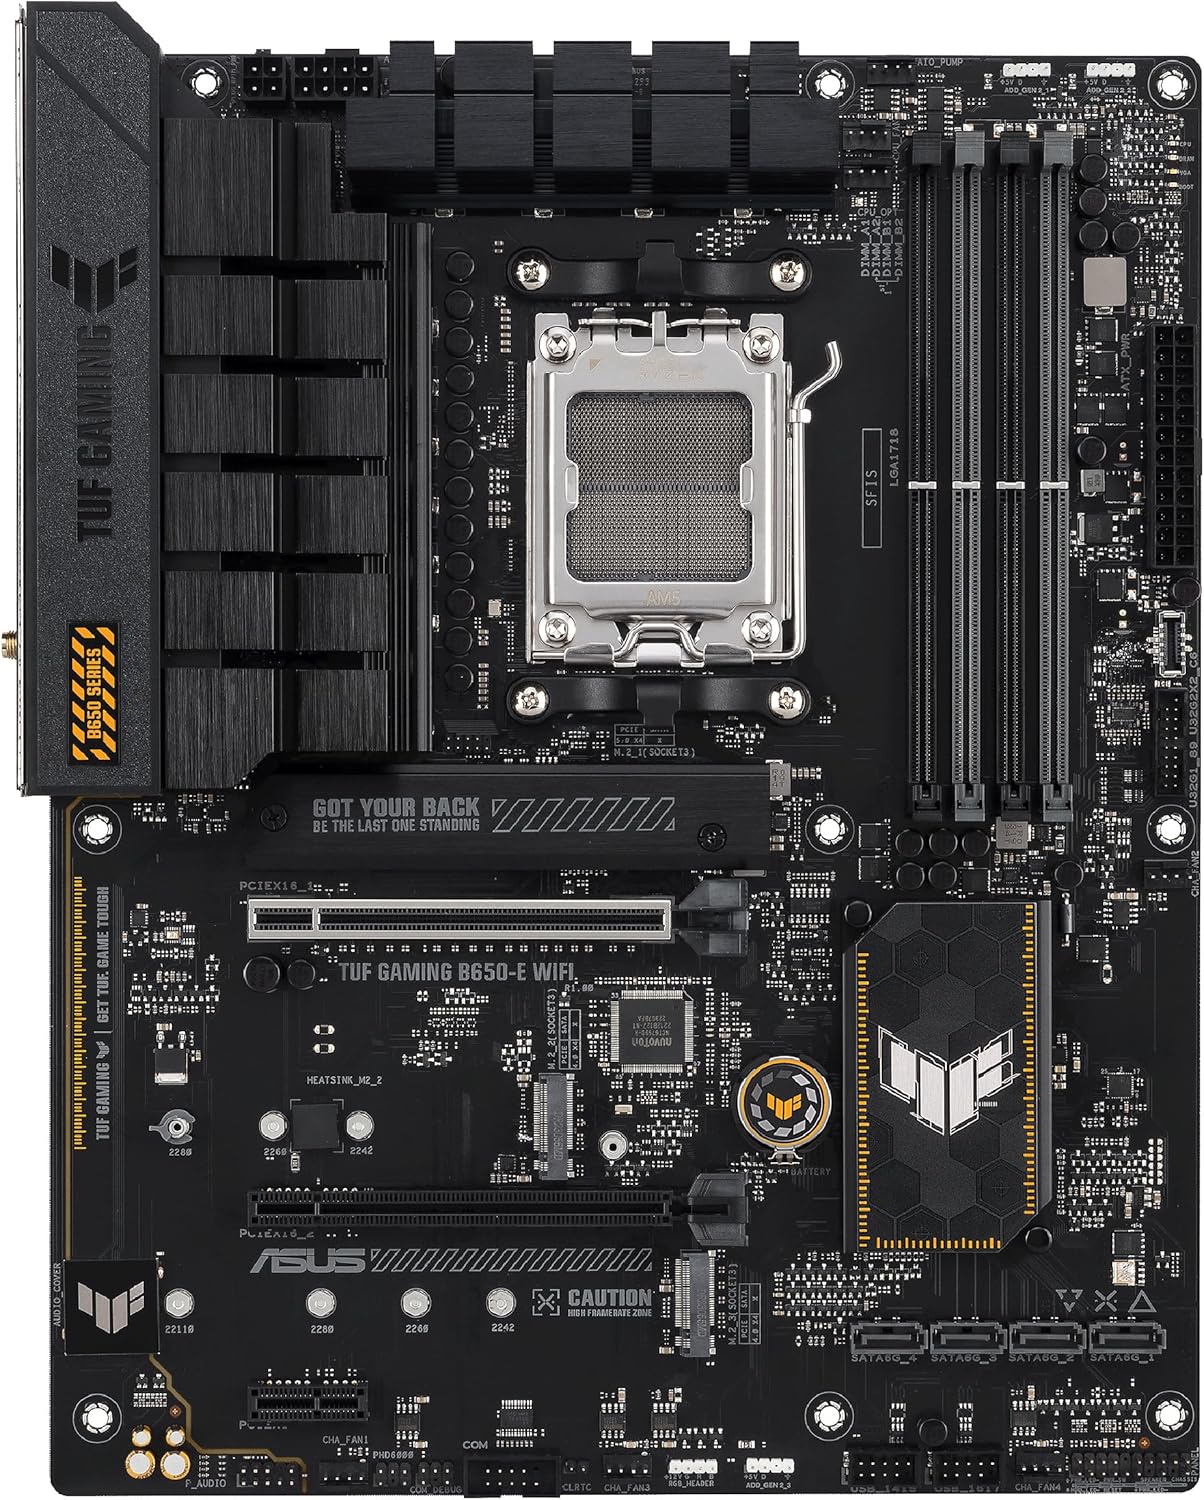
Figura 2: Minn fuq għal isfel view tal-motherboard, fejn jiġu enfasizzati l-postijiet tal-komponenti ewlenin bħas-sokit tas-CPU, is-slots tad-DIMM, u s-slots tal-M.2.
Familiarize yourself with the layout of the motherboard, including the AM5 CPU socket, DDR5 DIMM slots, PCIe slots, M.2 slots, and various headers for power and peripherals.
2. Installazzjoni tas-CPU
Carefully open the CPU socket lever. Align the triangular mark on your AMD Ryzen processor with the mark on the socket. Gently place the CPU into the socket without forcing it. Close the lever to secure the CPU.
3. Installazzjoni tar-RAM (DDR5)
Open the clips on both ends of the DDR5 DIMM slots. Align the notch on the DDR5 memory module with the key in the DIMM slot. Press down firmly on both ends of the memory module until the clips snap into place. For optimal performance, install memory modules in slots A2 and B2 first (typically the second and fourth slots from the CPU).
4. Installazzjoni tal-SSD M.2
The motherboard features multiple M.2 slots for high-speed storage. Remove the M.2 heatsink (if present) and the standoff/screw. Insert the M.2 SSD at an angle into the slot, then gently push it down and secure it with the provided screw or Q-Latch mechanism. Reattach the heatsink if applicable.
5. Installazzjoni tal-Karta tal-Grafika (GPU)
Open the retention clip on the primary PCIe x16 slot. Align your graphics card with the slot and press down firmly until it clicks into place. Ensure the retention clip is closed. Secure the card to your PC case with screws.
6. Konnessjonijiet tal-Enerġija
Connect the 24-pin ATX power connector and the 8-pin (or 4+4 pin) CPU power connector from your power supply unit (PSU) to the corresponding ports on the motherboard. Connect any necessary SATA power cables for storage drives.
7. Konnessjonijiet tal-Panel I/O ta' Wara

Figura 3: Dettaljat view of the rear input/output panel, showing various USB ports, display outputs, LAN, and audio jacks.
Connect your peripherals to the rear I/O panel. This includes USB devices, display cables (HDMI/DisplayPort), Ethernet cable for wired network, and audio devices. Attach the included WiFi antenna to the designated connectors for wireless connectivity.
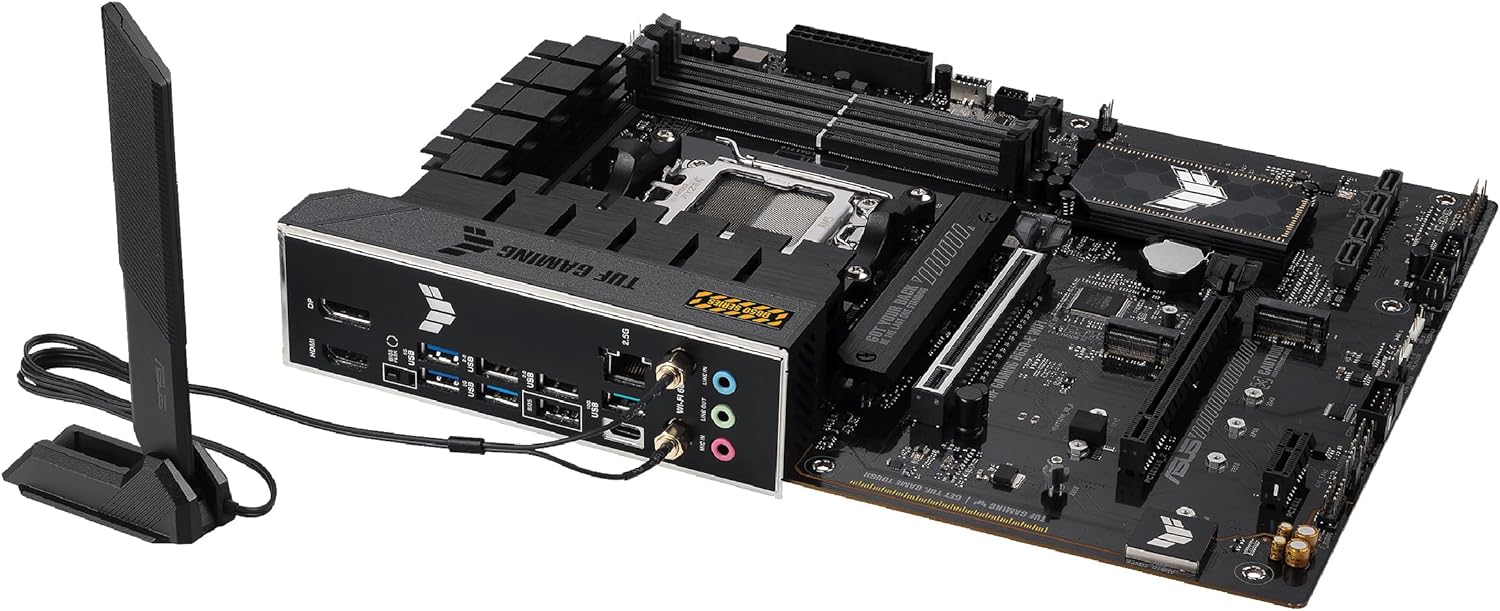
Figure 4: The motherboard with the included WiFi antenna connected to the rear I/O panel, ready for wireless communication.
8. Initial BIOS Update
It is highly recommended to update the BIOS to the latest version immediately after initial setup. This can improve compatibility, stability, and performance, especially for newer AMD Ryzen processors (e.g., X3D chips). Refer to the ASUS support website for the latest BIOS version and detailed update instructions, often utilizing the BIOS FlashBack™ feature.
Istruzzjonijiet Operattivi
1. L-Ewwel Boot u l-Installazzjoni tas-Sistema Operattiva
After all components are installed and connected, power on your system. Access the BIOS/UEFI by pressing the DEL or F2 key during startup. Configure boot order to install your operating system (e.g., Windows 10/11) from a USB drive or optical media.
2. Installazzjoni tas-sewwieq
Once the operating system is installed, install the necessary drivers for the motherboard components. ASUS provides a utility called Ċestun tal-Armerija which can automatically detect and install drivers, utilities, and manage AURA RGB lighting. Alternatively, download drivers manually from the ASUS support websit għall-mudell speċifiku tiegħek.
3. Konfigurazzjoni tal-BIOS/UEFI
The UEFI BIOS allows for advanced system configuration. Key settings include:
- EXPO Profile: Enable the EXPO (Extended Profiles for Overclocking) profile for your DDR5 memory to achieve advertised speeds and timings.
- Kontroll tal-fann: Adjust fan curves for CPU and chassis fans to optimize cooling and noise levels.
- Għażliet tal-Ibbutjar: Modify boot priorities and enable/disable fast boot.
- Konfigurazzjoni tal-Ħażna: Set SATA modes (AHCI/RAID) and manage M.2 slot configurations.
4. AURA RGB Lighting
Control the integrated AURA RGB lighting and connected RGB devices using the Armoury Crate software. Customize lighting effects, colors, and synchronization with other ASUS Aura Sync compatible components.
Manutenzjoni
Manutenzjoni regolari tgħin biex tiżgura l-lonġevità u l-prestazzjoni ottimali tal-motherboard tiegħek.
- Tneħħija tat-Trab: Naddaf it-trab mill-motherboard u l-komponenti perjodikament bl-użu ta' arja kkompressata. Kun żgur li s-sistema tkun mitfija u skonnettjata qabel ma tnaddafha.
- Aġġornamenti tal-BIOS: Iċċekkja l-appoġġ tal-ASUS website regularly for new BIOS versions. Updates can provide performance improvements, bug fixes, and support for new hardware.
- Aġġornamenti tas-sewwieq: Keep your chipset, network, audio, and other drivers updated to ensure compatibility and optimal performance with your operating system and applications.
- Ġestjoni tal-Kejbil: Kun żgur li l-kejbils interni huma mqiegħda pulit biex itejbu l-fluss tal-arja u jipprevjenu l-interferenza.
Issolvi l-problemi
If you encounter issues with your ASUS TUF Gaming B650-E WIFI motherboard, consider the following troubleshooting steps:
- Ebda Qawwa/Ebda Boot:
- Ivverifika li l-kejbils tal-enerġija kollha (24-pin ATX, 8-pin CPU) huma konnessi sew.
- Check PSU functionality.
- Ensure front panel power button cables are correctly connected to the motherboard header.
- Ebda Display:
- Ensure the monitor cable is connected to the graphics card (if dedicated GPU is used) or the motherboard's display output (if using integrated graphics).
- Erġa' poġġi l-karta grafika u l-moduli tal-memorja f'posthom.
- Ipprova boot b'RAM stick wieħed biss.
- Instabbiltà/Ħsarat tas-Sistema:
- Ensure BIOS is updated to the latest version.
- Check RAM stability (run memory diagnostic tools).
- Immonitorja t-temperaturi tas-CPU u l-GPU biex tevita li jisħnu żżejjed.
- Iċċekkja li d-drivers kollha huma aġġornati.
- Fan Control Issues:
- Ensure fans are connected to the correct headers (PWM/DC).
- Adjust fan curves in the BIOS/UEFI.
- Network/WiFi Connectivity Problems:
- Kun żgur li l-kejbil tal-LAN huwa konness sew jew li l-antenna tal-WiFi hija mwaħħla sew.
- Installa jew aġġorna d-drajvers tan-netwerk.
- Check router settings and network configuration.
For more detailed troubleshooting or persistent issues, please refer to the comprehensive user manual provided with your motherboard or visit the official ASUS support websit.
Speċifikazzjonijiet
| Karatteristika | Dettall |
|---|---|
| Brand | ASUS |
| Isem tal-Mudell | TUF Gaming B650-E WIFI |
| Socket tas-CPU | AMD Socket AM5 |
| Proċessuri Kompatibbli | Ryzen |
| Tip ta' Ċipset | AMD B650 |
| Teknoloġija tal-Memorja RAM | DDR5 |
| Veloċità tal-Arloġġ tal-Memorja | 5200 MHz (Supports up to 8000 MHz via OC) |
| Kapaċità tal-Ħażna tal-Memorja (Massima) | 64 GB |
| Apparati Kompatibbli | Kompjuter Personali |
| Pjattaforma | Windows 10 (u aktar ġodda) |
| LAN | 2.5Gbit Ethernet |
| Konnettività bla fili | WiFi 6E + Bluetooth |
| M.2 Slots | 3x M.2 slots |
| Portijiet USB | USB 3.2 (various generations) |
| Wiri Outputs | DisplayPort, HDMI |
Garanzija u Appoġġ
The ASUS TUF Gaming B650-E WIFI motherboard typically comes with a 3-year ASUS Turkey warranty. Please refer to your product's packaging or the official ASUS websit għal termini u kundizzjonijiet speċifiċi tal-garanzija applikabbli għar-reġjun tiegħek.
For technical support, driver downloads, BIOS updates, and further assistance, please visit the official ASUS support website or contact ASUS customer service directly. Keep your product's serial number handy when seeking support.
Ask a question about this manual
Ask about setup, troubleshooting, compatibility, parts, safety, or missing instructions. Manuals+ will review the question and use this page’s manual context to help answer it.