
1. Introduzzjoni
This manual provides detailed instructions for the installation, operation, and maintenance of your ASUS Prime B850M-K Gaming Motherboard. Please read this manual thoroughly before proceeding with installation to ensure proper setup and to maximize the performance and longevity of your system.

Image 1.1: The ASUS Prime B850M-K Motherboard alongside its retail packaging.
2. Karatteristiċi ewlenin
The ASUS Prime B850M-K motherboard is engineered with advanced technologies to support high-performance computing. Key features include:
- Ready for advanced AI PCs: Iddisinjat għall-futur tal-informatika tal-AI, bil-qawwa u l-konnettività meħtieġa għal applikazzjonijiet tal-AI impenjattivi.
- Sokit tal-AMD AM5: Compatible with AMD Socket AM5 for AMD Ryzen 9000, 8000, and 7000 Series Desktop Processors.
- Upgraded Power Solution: Features an 8+2+1 phase power supply design, 6-layer PCB, alloy chokes, and durable capacitors for stable power delivery.
- Konnettività ultra-veloċi: Includes a PCIe 5.0 x16 slot, PCIe 5.0 M.2 slot, Realtek 2.5Gb Ethernet, USB 10Gbps Type-A on the back, and USB 5Gbps Type-C support on the front.
- Tkessiħ komprensiv: Equipped with VRM and M.2 heatsinks, a PCH heatsink, hybrid fan headers, and Fan Xpert 2+ for efficient thermal management.
3. Prodott Aktarview
Familiarize yourself with the layout and components of the ASUS Prime B850M-K motherboard.
3.1 Layout tal-Motherboard
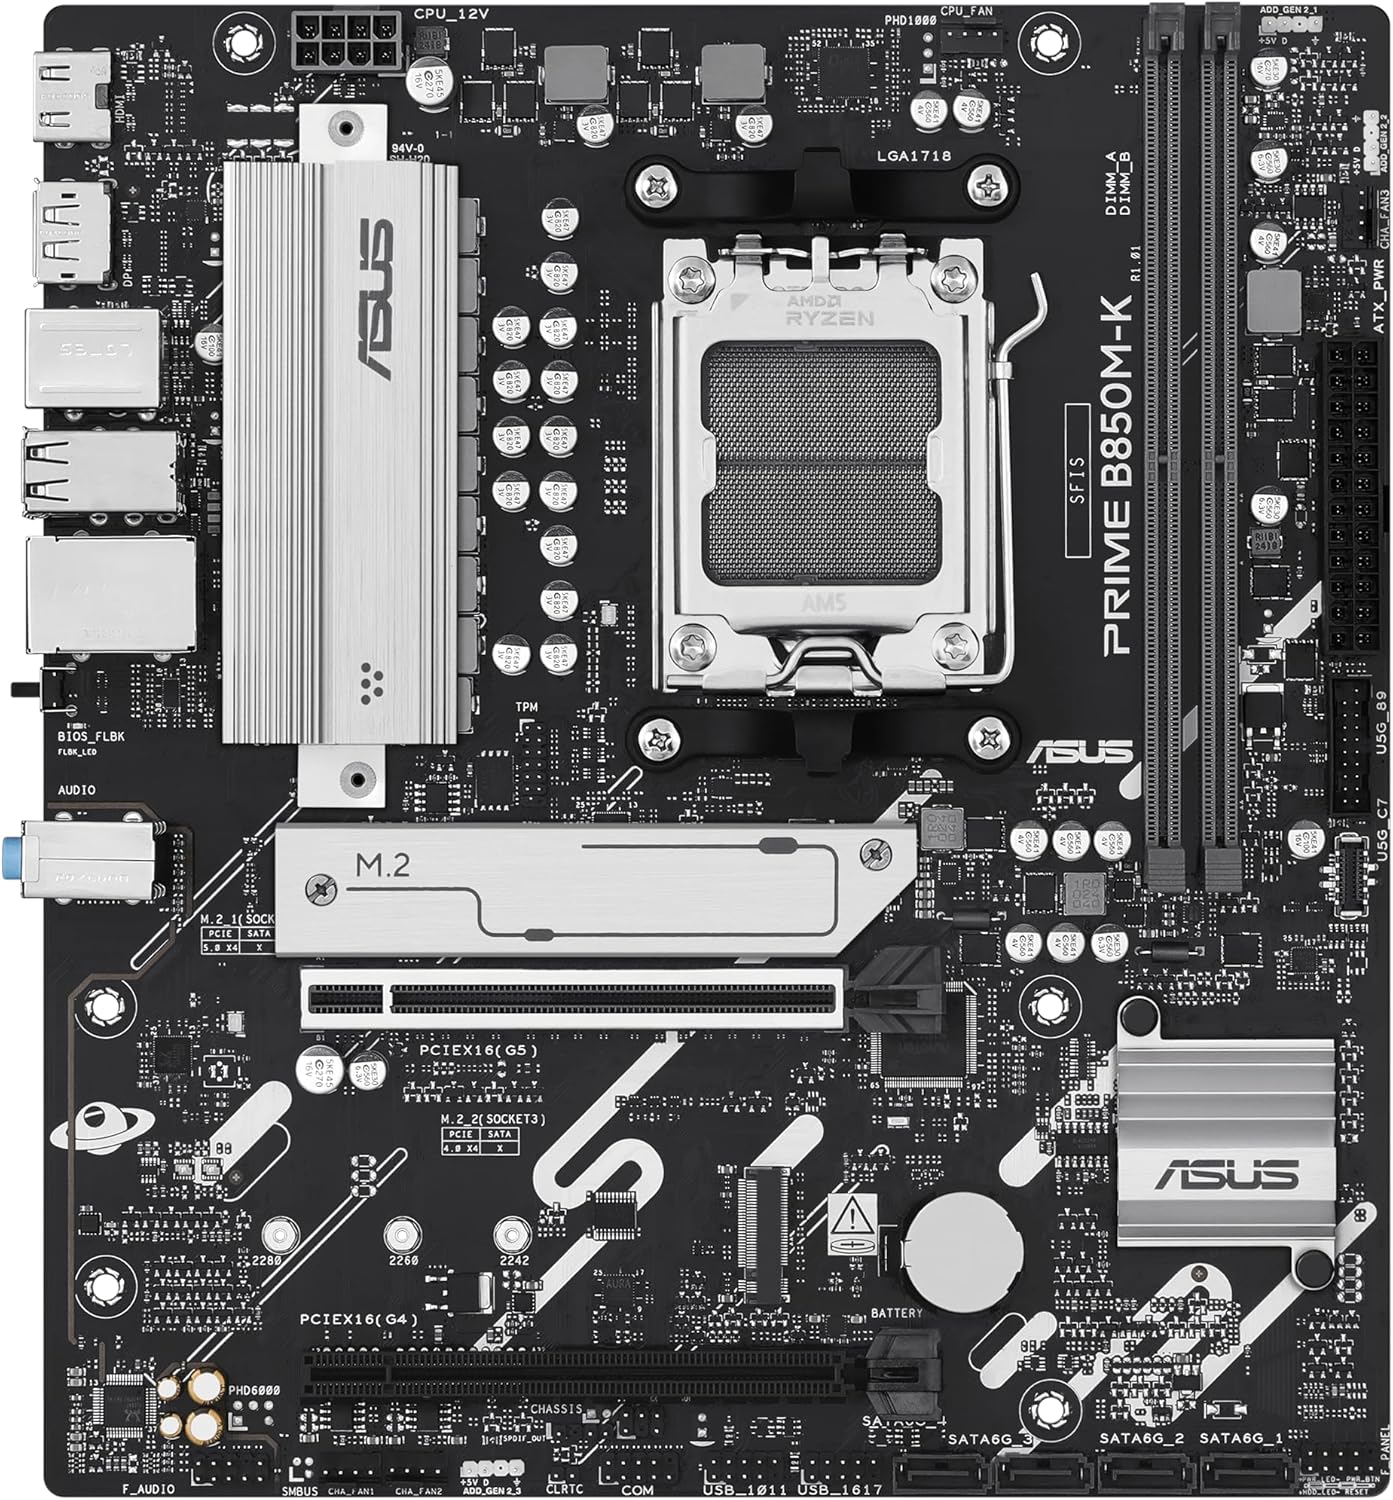
Immaġni 3.1: Minn fuq għal isfel view of the motherboard, highlighting the CPU socket, DIMM slots, PCIe slots, and M.2 slots.
This image provides a comprehensive view of the motherboard's key areas, including the AMD AM5 CPU socket, DDR5 DIMM slots, PCIe 5.0 x16 slot, and M.2 slots for storage devices. Understanding these locations is crucial for component installation.
3.2 Panel I/O ta' wara

Image 3.2: The rear input/output panel of the motherboard, showing various ports for external devices.
The rear I/O panel offers a range of connectivity options for your peripherals. It includes USB ports, Ethernet, audio jacks, and video outputs. Refer to the diagram below for specific port identification.

Image 3.3: A labeled diagram of the rear I/O panel, indicating the function of each port.
4. Setup u Installazzjoni
This section guides you through the process of installing your motherboard and its components.
4.1 Kontenut tal-Pakkett
Ivverifika li l-oġġetti kollha huma preżenti fil-pakkett tal-motherboard tiegħek:
- ASUS Prime B850M-K Motherboard
- Tarka tal-Panel I/O ta 'wara
- SATA Data Cables (2x)
- Pakkett tal-Viti M.2
- M.2 Rubber Stand-off
- Gwida Quick Start

Image 4.1: The complete contents of the ASUS Prime B850M-K motherboard package.
4.2 Lista ta 'Kontroll ta' Qabel l-Installazzjoni
- Kun żgur li l-unità tal-provvista tal-enerġija (PSU) tiegħek hija kompatibbli u tipprovdi biżżejjed ilmatage.
- Iġbor l-għodda meħtieġa: tornavit Phillips-head, ċinga tal-polz anti-statika.
- Ipprepara l-kaxxa tal-kompjuter tiegħek għall-installazzjoni tal-motherboard.
4.3 Installazzjoni tal-Motherboard
- Installa l-ilqugħ tal-I/O fil-ftuħ ta' wara tal-kaxxa tal-kompjuter tiegħek.
- Allinja bir-reqqa l-motherboard mal-istandoffs fil-kaxxa tiegħek.
- Waħħal il-motherboard bil-viti, waqt li tiżgura li tkun imwaħħla sew.
4.4 Installazzjoni tal-Komponenti
- CPU: Open the CPU socket lever, align the CPU with the triangle marker, gently place it into the socket, and close the lever.
- Cooler tas-CPU: Installa l-cooler tas-CPU skont l-istruzzjonijiet tal-manifattur tiegħu.
- RAM (DDR5): Open the DIMM slot clips, align the memory modules, and press down firmly until the clips lock into place.
- M.2 Storage: Insert the M.2 drive into the M.2 slot, secure it with the provided screw or rubber stand-off.
- Karta tal-Grafika (GPU): Insert the graphics card into the PCIe 5.0 x16 slot and secure it with the case latch and screw.
- Apparati SATA: Connect SATA data cables from the motherboard to your storage drives (HDDs/SSDs) and power cables from the PSU.
4.5 Konnessjoni tal-Enerġija u l-Periferali
- Qabbad il-konnettur tal-enerġija ATX ta' 24-pin u l-konnettur tal-enerġija tas-CPU ta' 8-pin mill-PSU tiegħek mal-motherboard.
- Connect front panel headers (power button, reset button, USB, audio) to their respective pins on the motherboard. Refer to the motherboard manual for exact pin layouts.
- Connect external peripherals (monitor, keyboard, mouse) to the rear I/O panel.
5. Istruzzjonijiet Operattivi
After successful installation, follow these steps for initial operation.
5.1 L-Ewwel Boot
- Ensure all connections are secure and the power supply is switched on.
- Agħfas il-buttuna tal-qawwa fuq il-kaxxa tal-kompjuter tiegħek.
- The system should power on and display the ASUS logo or BIOS/UEFI screen.
5.2 Konfigurazzjoni tal-BIOS/UEFI
Biex tidħol fl-utilità tas-setup tal-BIOS/UEFI, agħfas il-buttuna Ħassar or F2 key during the Power-On Self-Test (POST). Here you can configure system settings, boot order, and enable features like XMP/EXPO for memory.
5.3 Installazzjoni tas-sewwieq
After installing your operating system, install the latest drivers for your motherboard chipset, audio, LAN, and other integrated components. These can typically be found on the ASUS support websit għall-mudell speċifiku tal-motherboard tiegħek.
6. Manutenzjoni
Regular maintenance helps ensure the stability and longevity of your motherboard.
6.1 Tindif
- Periodically clean dust from the motherboard and components using compressed air.
- Kun żgur li s-sistema tkun mitfija u skonnettjata qabel ma tnaddafha.
6.2 Aġġornamenti tal-BIOS
Iċċekkja l-appoġġ tal-ASUS website for BIOS/UEFI updates. Updates can improve system stability, add support for new hardware, or fix bugs. Follow the instructions provided by ASUS carefully when performing a BIOS update.
7 Issolvi l-problemi
Din it-taqsima tindirizza kwistjonijiet komuni li tista’ tiltaqa’ magħhom.
- Ebda Qawwa: Check all power connections (24-pin ATX, 8-pin CPU, GPU power). Ensure PSU is switched on.
- Ebda Display: Verify monitor connection, ensure graphics card is properly seated and powered. Try reseating RAM modules.
- Instabbiltà/Ħsarat tas-Sistema: Check CPU and GPU temperatures. Ensure RAM is correctly installed and compatible. Update drivers and BIOS.
- Apparat tal-Ibbutjar Ma nstabx: Check SATA/M.2 connections. Verify boot order in BIOS/UEFI.
- Kwistjonijiet ta' Flashback tal-BIOS: Ensure the USB drive is formatted correctly (FAT32) and the BIOS file is renamed as specified by ASUS.
8. Speċifikazzjonijiet Tekniċi
Detailed specifications for the ASUS Prime B850M-K Motherboard.
| Karatteristika | Speċifikazzjoni |
|---|---|
| Brand | ASUS |
| Isem tal-Mudell | 90MB1LV0-M0EAY0 |
| Socket tas-CPU | Sokit AM5 |
| Proċessuri Kompatibbli | AMD Ryzen 9000, AMD Ryzen 8000, AMD Ryzen 7000 Series |
| Teknoloġija tal-Memorja RAM | DDR5 |
| Veloċità tal-Memorja | Sa 8000 MHz (OC) |
| Tip ta' Ċipset | AMD B850 |
| PCIe Slots | 1x PCIe 5.0 x16, additional PCIe slots |
| M.2 Slots | 2x M.2 slots (PCIe 5.0 support) |
| Ethernet | Realtek 2.5Gb Ethernet |
| Konnettività USB | USB 10Gbps Type-A (rear), USB 5Gbps Type-C (front header) |
| Pjattaforma | Windows 10, Windows 11 |
| Piż tal-oġġett | 1.52 liri |
9. Garanzija u Appoġġ
ASUS products are manufactured to the highest quality standards. For specific warranty terms and conditions, please refer to the warranty card included with your product or visit the official ASUS websit.
9.1 Ikkuntattja l-Appoġġ
Għal assistenza teknika, downloads ta' sewwieqa, jew aktar informazzjoni, jekk jogħġbok żur is-sit uffiċjali tal-appoġġ tal-ASUS websit: