
1. Introduzzjoni
This manual provides detailed instructions for the installation, operation, and maintenance of your DieseRC Smart Wireless Roller Shutter Controller Module. This device allows you to control your roller shutters or blinds via Wi-Fi using the Tuya/Smart Life app, RF remote control, or voice commands through Google Home and Alexa. Please read this manual thoroughly before installation and use to ensure proper function and safety.
2. Informazzjoni dwar is-Sigurtà
- Sigurtà Elettrika: Installation should only be performed by a qualified electrician or a person with a thorough understanding of electrical wiring. Always disconnect power at the circuit breaker before performing any wiring work.
- Voltage: Ensure the module's operating voltage (AC 80-250V) matches your electrical system.
- Ambjent: Tesponix il-modulu għal umdità, temperaturi estremi, jew ambjenti korrużivi.
- Tfal: Keep the device and remote controls out of reach of children.
- Użu Intenzjonat: Use this module only for controlling compatible roller shutter motors as described in this manual.
3. Prodott Aktarview
The DieseRC Smart Wireless Roller Shutter Controller Module is a compact device designed to integrate your existing roller shutters into a smart home system. It supports multiple control methods for convenience and flexibility.
Karatteristiċi ewlenin:
- Wi-Fi connectivity for app control (Tuya Smart / Smart Life).
- RF 433MHz support for remote control operation.
- Voice control compatibility with Amazon Alexa and Google Assistant.
- Compact design for easy installation behind existing switches or in junction boxes.
- Supports 4-wire AC roller shutter motors.
Module Components and Dimensions:
The module features clearly labeled terminals for input, output, and motor connections, along with a learning button for RF pairing.
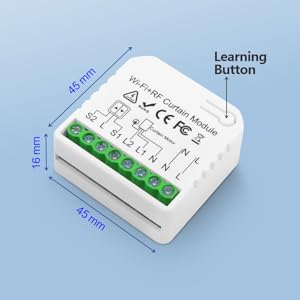
Image: DieseRC Wi-Fi+RF Curtain Module showing dimensions (45mm x 45mm x 16mm) and the learning button. The module is white with green terminal blocks.
4. Konfigurazzjoni u Installazzjoni
Follow these steps carefully for safe and correct installation of your DieseRC module.
4.1 Dijagramma tal-Wiring
Ensure the main power supply is OFF before proceeding with any wiring. This module is designed for 4-wire AC motors. The wiring diagram illustrates connections for both the module and an optional wall switch.
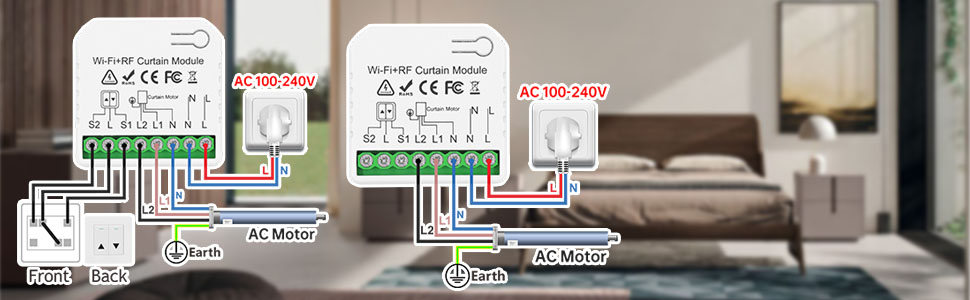
Image: Wiring diagram showing connections for the DieseRC module, an AC motor, and a wall switch, set against a bedroom background.
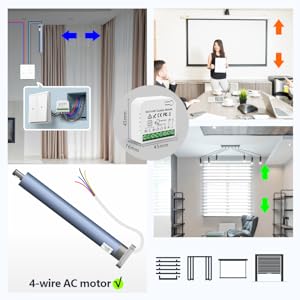
Image: Detailed technical diagram illustrating the wiring connections for a 4-wire AC motor to the DieseRC Wi-Fi+RF Curtain Module.
- Pass 1: Skonnettja l-Enerġija. Turn off the main power supply to your roller shutter circuit at the breaker.
- Step 2: Identify Wires. Locate the power supply wires (Live 'L' and Neutral 'N') and the motor wires (typically Live 1 'L1' for Up, Live 2 'L2' for Down, and Neutral 'N' for the motor). Some motors may have only two wires; in such cases, the motor's neutral connects to the module's 'N Curtain Motor' terminal if present, otherwise, it's not used.
- Step 3: Connect Power to Module. Connect the Live wire from your power supply to the 'L' terminal on the module and the Neutral wire to the 'N' terminal on the module.
- Step 4: Connect Motor to Module. Connect the motor's 'Up' wire to 'L1' on the module and the motor's 'Down' wire to 'L2' on the module. Connect the motor's Neutral wire to the 'N Curtain Motor' terminal if your motor has a separate neutral.
- Step 5: Connect Wall Switch (Optional). If using a physical wall switch, connect the switch wires to the 'S1' (Down), 'S2' (Up), and 'L' (Stop) terminals on the module. The provided wires can be used for this purpose.
- Step 6: Position Module. Place the module carefully into the wall box, ensuring it does not obstruct the learning button for initial setup.
4.2 Konfigurazzjoni tal-App (Tuya Smart / Smart Life)
The module integrates with the Tuya Smart or Smart Life application for Wi-Fi control.

Image: QR code for downloading the Tuya Smart or Smart Life application. Scan this code with your smartphone to download the app.
- Step 1: Download App. Scan the QR code above or search for "Tuya Smart" or "Smart Life" in your mobile app store and install it.
- Step 2: Create Account. Iftaħ l-app u rreġistra kont ġdid jew idħol jekk diġà għandek wieħed.
- Pass 3: Irrestawra l-Enerġija. Turn on the main power supply to the roller shutter circuit. The module should enter pairing mode (often indicated by a blinking light).
- Step 4: Add Device. In the app, tap the "+" icon in the top right corner and select "Add Device". The app should automatically detect the new device. If not, manually select "Curtain Switch" or "Curtain Module" from the device list.
- Pass 5: Qabbad mal-Wi-Fi. Follow the in-app instructions to connect the module to your 2.4GHz Wi-Fi network. Enter your Wi-Fi password when prompted.
- Step 6: Initial Calibration. Once connected, ensure the app's slider is at 0% (fully closed). Press the 'Up' button in the app. If the motor moves in the wrong direction, you can either swap the L1 and L2 wires or reverse the motor direction in the app settings (Settings -> Motor Steering Switch -> Reverse).
- Step 7: Set Travel Duration. In the app's settings, you can set the motor's travel duration (e.g., 20 seconds for a window, 30 seconds for a bay window). The default is often 120 seconds.
4.3 RF Remote Control Pairing
The module supports pairing with a 433MHz RF remote control.
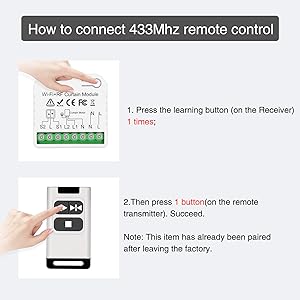
Image: Visual guide for pairing the 433MHz RF remote control with the DieseRC module. It shows pressing the learning button once, then pressing a button on the remote.
- Step 1: Select Channel. On your RF remote control, select the desired channel using the bottom button.
- Pass 2: Daħħal il-Modalità tat-Tagħlim. Press the learning button on the DieseRC module darba. The indicator light on the module will turn blue.
- Step 3: Pair Remote. Immediately after the light turns blue, press the 'Up' button (or any desired control button) on your RF remote control. The module's light should flash, indicating successful pairing.
- Nota: If you have multiple remotes or want to control multiple shutters with one channel, repeat the process for each remote/shutter, ensuring the same channel is selected on the remote.
4.4 Clearing RF Remote Control Signal
To clear all paired RF remote control signals from the module:
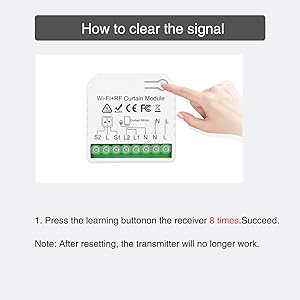
Image: Visual guide for clearing the RF signal from the DieseRC module. It shows pressing the learning button 8 times.
- Step 1: Press Learning Button. Press the learning button on the module 8 darba konsekuttivament.
- Step 2: Confirmation. The module's indicator light will flash, confirming that all paired RF signals have been cleared.
- Nota: After resetting, any previously paired RF transmitters will no longer work and will need to be re-paired.
5. Istruzzjonijiet Operattivi
Once installed and configured, you can control your roller shutters using various methods.
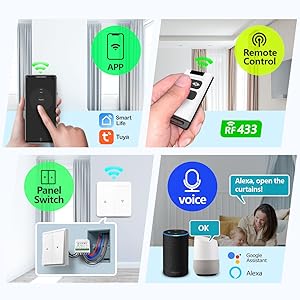
Image: Illustration of the multiple control methods available for the DieseRC Smart Curtain Module, including mobile app, RF remote, wall switch, and voice control (Alexa/Google Assistant).
Kontroll tal-App 5.1 (Tuya Smart / Smart Life)
- Iftaħ l-app Tuya Smart jew Smart Life fuq l-ismartphone tiegħek.
- Select your roller shutter device.
- Use the 'Open', 'Close', and 'Pause' buttons to control the shutter.
- Aġġusta l-perċentwalitage slider for partial opening/closing.
- Set schedules for automatic opening and closing at specific times.
- Create smart scenes to integrate with other smart home devices.
Kontroll mill-Bogħod 5.2 RF
- Use the paired RF remote control to open, close, or pause the roller shutter.
- Ensure the remote is within range of the module.
5.3 Kontroll tal-Vuċi (Alexa / Google Assistant)
- Ensure your Tuya Smart/Smart Life account is linked to your Amazon Alexa or Google Home account.
- Uża kmandi bil-vuċi bħal:
- "Alexa, open [Shutter Name]."
- "Hey Google, close [Shutter Name]."
- "Alexa, set [Shutter Name] to 50%."
5.4 Kontroll Manwali tas-Swiċċ tal-Ħajt
- If a physical wall switch is connected, you can use it to manually control the roller shutter (Up, Down, Stop).
6. Manutenzjoni
- Tindif: Imsaħ il-modulu b'ċarruta niexfa u ratba. Tużax prodotti tat-tindif likwidi jew aerosols.
- Aġġornamenti tal-Firmware: Iċċekkja l-app Tuya Smart/Smart Life perjodikament għal aġġornamenti tal-firmware disponibbli biex tiżgura prestazzjoni u sigurtà ottimali.
- Sostituzzjoni tal-batterija: If your RF remote control stops responding, replace its battery according to the remote's specific instructions.
7 Issolvi l-problemi
- Il-modulu mhux qed jirrispondi: Check power connections. Ensure the circuit breaker is on. Verify Wi-Fi connectivity in the app.
- Roller shutter moves in the wrong direction: In the Tuya Smart/Smart Life app, go to Settings -> Motor Steering Switch and select 'Reverse'. Alternatively, power off, swap the L1 and L2 wires, then restore power.
- RF remote not working: Ensure the remote has a fresh battery. Re-pair the remote with the module following the instructions in Section 4.3.
- Il-kontroll tal-vuċi mhux qed jaħdem: Verify that your Tuya Smart/Smart Life account is correctly linked to Alexa or Google Home. Check the device name in the app and use that exact name in your voice commands.
- Shutter stops prematurely or doesn't fully open/close: Adjust the motor travel duration in the Tuya Smart/Smart Life app settings.
- Ma tistax tikkonnettja mal-Wi-Fi: Ensure your Wi-Fi network is 2.4GHz. Check your Wi-Fi password. Move the module closer to your Wi-Fi router if signal is weak.
8. Speċifikazzjonijiet
| Karatteristika | Speċifikazzjoni |
|---|---|
| Numru tal-Mudell | CurtainWIFI*5+KT204S |
| Dimensjonijiet (L x W x H) | 45 x 45 x 16 mm |
| Piż | 56 gramma |
| Vol Operattivtage | AC 80-250V (Note: Product specifications listed 12V, but device marking and wiring diagrams indicate AC 80-250V) |
| Klassifikazzjoni kurrenti | 23 A |
| Qawwa | 276 Watts |
| Konnettività | Wi-Fi (2.4GHz), RF (433MHz) |
| Metodi ta' Kontroll | App, RF Remote, Voice (Alexa/Google Assistant), Manual Switch |
| Materjal | Plastik |
| Ċertifikazzjonijiet | CE, FCC, RoHS |
| Tip ta 'Immuntar | Mount Wall |
| Tip ta' Attwatur | Shutter tar-Roller |
9. Garanzija u Appoġġ
DieseRC products are designed for reliability and performance. For warranty information or technical support, please refer to the product packaging or contact DieseRC customer service through the retailer where the product was purchased. Keep your purchase receipt as proof of purchase.