
Mibro sol-me3
Manwal tal-Utent tal-Earbuds Bluetooth True Wireless Mibro 3
Model: sol-me3 | Brand: Mibro
Introduzzjoni
This manual provides comprehensive instructions for the Mibro 3 True Wireless Bluetooth Earbuds. It covers essential information regarding setup, operation, maintenance, troubleshooting, and product specifications to ensure optimal performance and longevity of your device. The Mibro 3 earbuds offer a perfect blend of style and functionality, featuring an attractive design, long battery life, an LED display, and impressive sound quality.
Prodott Overview
Familiarize yourself with the components of your Mibro 3 True Wireless Bluetooth Earbuds.
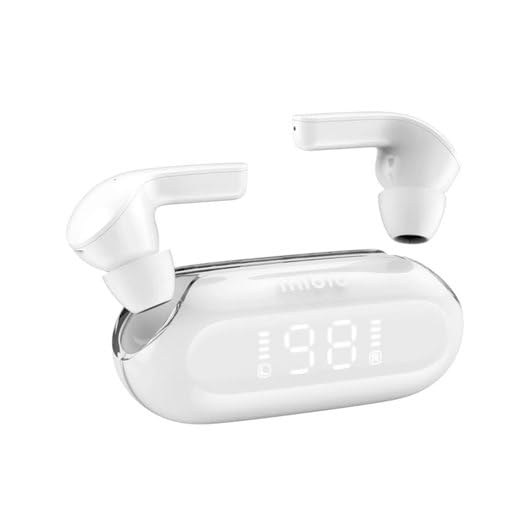
Figura 1: Mibro 3 True Wireless Bluetooth Earbuds and Charging Case. This image displays the white earbuds, one removed from the charging case and one partially visible, alongside the sleek white charging case which features a clear lid and an LED display showing '98', indicating battery percentage.
Komponenti:
- Earbuds: Left and Right True Wireless Earbuds.
- Każ tal-Iċċarġjar: Portable case for charging and storing earbuds, with an integrated LED display.
- Kejbil tal-Iċċarġjar: (Typically USB-C, though not specified) For charging the case.
- Widnejn: (Various sizes, though not specified) For comfortable fit.
Setup
1. Iċċarġjar Inizjali
- Poġġi ż-żewġ earbuds fil-kaxxa tal-iċċarġjar.
- Connect the charging cable (not included in product details, but standard) to the charging port on the case and a power source.
- Id-displej LED fuq il-kaxxa tal-iċċarġjar se jindika l-istatus tal-iċċarġjar. Kun żgur li l-kaxxa u l-earbuds huma ċċarġjati kompletament qabel l-ewwel użu.
2. Tqabbil ma' Apparat
- Open the charging case. The earbuds will automatically enter pairing mode (indicated by a flashing light on the earbuds, if applicable).
- Fuq l-apparat tiegħek (smartphone, tablet, kompjuter), attiva l-Bluetooth.
- Fittex għal "Mibro 3" or a similar name in the list of available Bluetooth devices.
- Select "Mibro 3" to connect. Once connected, a voice prompt or indicator light will confirm successful pairing.
- If pairing fails, place the earbuds back in the case, close the lid, wait a few seconds, and then repeat the steps.
Istruzzjonijiet Operattivi
Qawwa mixgħul/mitfi
- Qawwa Mixgħul: Open the charging case, and the earbuds will automatically power on and connect to the last paired device. Alternatively, press and hold the touch control area on both earbuds for 2-3 seconds.
- Itfi: Place the earbuds back into the charging case and close the lid. They will automatically disconnect and power off. Alternatively, press and hold the touch control area on both earbuds for 5 seconds.
Touch Controls (Typical Functions)
The Mibro 3 earbuds feature intuitive touch controls. Specific functions may vary slightly, but common operations include:
- Play/Pawsa: Tektek wieħed fuq kull earbud.
- Track li jmiss: Tektek darbtejn fuq il-earbud tal-lemin.
- Track preċedenti: Tektek darbtejn fuq il-earbud tax-xellug.
- Tweġiba/Tmiem Sejħa: Tektek waħda fuq kwalunkwe earbud waqt telefonata li tkun dieħla.
- Irrifjuta Sejħa: Agħfas u żomm fuq kwalunkwe earbud għal żewġ sekondi waqt telefonata li tkun dieħla.
- Attiva l-Assistent tal-Vuċi: Tektek tliet darbiet fuq kull earbud.
- Kontroll tal-Volum: (If supported) Tap and hold on the right earbud to increase volume, tap and hold on the left earbud to decrease volume.
Liebes il-Earbuds
Gently insert the earbuds into your ear canal. Rotate them slightly until they fit snugly and comfortably. Ensure the microphone is pointing towards your mouth for optimal call quality.
Manutenzjoni
Tindif
- Uża drapp artab, niexef u mingħajr suf biex timsaħ il-earbuds u l-kaxxa tal-iċċarġjar.
- Għal ħmieġ iebes, neħħi ftitampmt id-drapp bl-ilma jew cleaner ħafif u li ma jobrox.
- Tużax kimiċi ħarxa, alkoħol, jew materjali li joborxu.
- Regularly clean the eartips and the mesh covers to prevent wax buildup, which can affect sound quality.
Ħażna
- Dejjem aħżen il-earbuds fil-kaxxa tal-iċċarġjar tagħhom meta ma tkunx qed tużahom biex tipproteġihom u żżommhom iċċarġjati.
- Store the device in a cool, dry place, away from direct sunlight, extreme temperatures, and humidity.
Kura tal-batterija
- Evita li tiċċarġja l-batterija kompletament ta' spiss.
- Iċċarġja l-apparat regolarment, anke jekk ma jintużax ta' spiss, biex iżżomm il-batterija f'kundizzjoni tajba.
- Tesponix l-apparat għal sħana jew kesħa estremi, għax dan jista' jnaqqas il-prestazzjoni tal-batterija.
Issolvi l-problemi
If you encounter issues with your Mibro 3 earbuds, try the following solutions:
| Problema | Soluzzjoni Possibbli |
|---|---|
| Il-earbuds mhux qed jingħaqdu mat-tagħmir. |
|
| Earbud wieħed biss qed jaħdem. |
|
| L-ebda ħoss jew volum baxx. |
|
| Il-kaxxa tal-iċċarġjar mhux qed tiċċarġja. |
|
Speċifikazzjonijiet
Key technical specifications for the Mibro 3 True Wireless Bluetooth Earbuds:
| Karatteristika | Dettall |
|---|---|
| Numru tal-Mudell | sol-me3 |
| Brand | Mibro |
| Teknoloġija tal-Konnettività | Wireless (Bluetooth) |
| Fattur tal-Formola | Fil-widnejn |
| Kulur | Abjad |
| Materjal | Plastik |
| Piż tal-oġġett | 100 Gramm |
| Karatteristiċi Speċjali | Ħfief |
| Batterija Rikarikabbli | Iva |
| Tip ta' Kontroll | Volume Control (and touch controls for playback/calls) |
Garanzija u Appoġġ
Informazzjoni dwar Garanzija
The Mibro 3 True Wireless Bluetooth Earbuds are covered by a standard manufacturer's warranty. Please refer to the warranty card included with your purchase or visit the official Mibro websit għal termini u kundizzjonijiet dettaljati dwar il-kopertura u t-tul tal-garanzija.
Appoġġ għall-Klijent
For technical assistance, product inquiries, or warranty claims, please contact Mibro customer support. Contact information can typically be found on the official Mibro website or within the product packaging. When contacting support, please have your product model number (sol-me3) and purchase details ready.
Ask a question about this manual
Ask about setup, troubleshooting, compatibility, parts, safety, or missing instructions. Manuals+ will review the question and use this page’s manual context to help answer it.