
DinoFire X17
DinoFire Rechargeable Presentation Clicker X17 User Manual
Mudell: X17
Introduzzjoni
Thank you for choosing the DinoFire Rechargeable Presentation Clicker, Model X17. This device is designed to enhance your presentations with its wireless control, integrated laser pointer, and user-friendly features. This manual provides detailed instructions for setup, operation, maintenance, and troubleshooting to ensure optimal performance.
Kontenut tal-Pakkett
Jekk jogħġbok ivverifika li l-oġġetti kollha huma preżenti fil-pakkett tiegħek:
- DinoFire Rechargeable Presentation Clicker (X17)
- USB Receiver (stored inside the clicker)
- Mikro USB Iċċarġjar Cable
- Manwal għall-Utent (dan id-dokument)
Prodott Overview
The DinoFire X17 Presentation Clicker features an ergonomic design with intuitive controls for seamless presentation delivery. Familiarize yourself with the device's components and button functions.
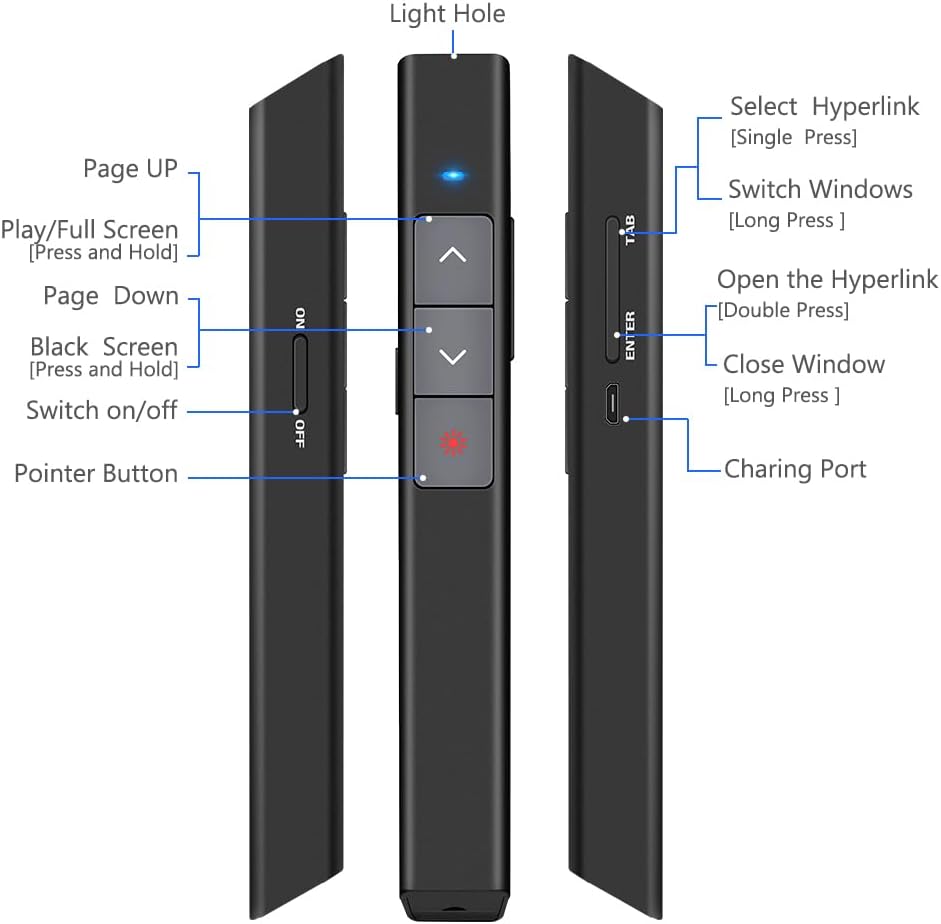
Figura 1: Dettaljati view of the DinoFire X17 Presentation Clicker showing button functions and port locations.
Funzjonijiet tal-buttuna:
- Page Up (▲): Advances to the previous slide.
- Page Down (▼): Javvanza għall-islajd li jmiss.
- Pointer Button: Jattiva l-pointer tal-lejżer aħmar.
- Play/Full Screen (Press and Hold): Jibda jew joħroġ mill-modalità ta' preżentazzjoni fuq skrin sħiħ.
- Black Screen (Press and Hold): Toggles a black screen during presentation.
- Ixgħel/itfi: Swiċċ tal-enerġija għall-apparat.
- Select Hyperlink (Single Press): Selects a hyperlink on the slide.
- Open the Hyperlink (Double Press): Opens the selected hyperlink.
- Switch Windows (Long Press): Cycles through open application windows.
- Close Window (Long Press): Closes the active window.
- Port tal-Iċċarġjar: Micro USB port for recharging the device.
- Light Hole: Location of the laser emitter.
Gwida ta' Setup
1. L-Iċċarġjar tal-Preżentatur
Before initial use, fully charge the presentation clicker. A full charge typically takes approximately one hour and provides power for over one week of use.
- Connect the provided Micro USB charging cable to the charging port on the side of the presenter.
- Qabbad it-tarf l-ieħor tal-kejbil ma' sors ta' enerġija USB (eż., port USB tal-kompjuter, adapter tal-ħajt USB).
- The charging indicator light will illuminate (refer to "Low Power Indicator" section for details).
- Ladarba tkun iċċarġjata kompletament, skonnettja l-kejbil.

Figura 2: The presentation clicker being charged via its Micro USB port, connected to a laptop.
2. Konnessjoni tar-Riċevitur USB
The USB receiver is stored magnetically within the presentation clicker for convenience and to prevent loss.
- Gently pull out the USB receiver from the bottom end of the presentation clicker.
- Daħħal ir-riċevitur USB f'port USB disponibbli fuq il-kompjuter tiegħek (laptop jew desktop).
- The system will automatically detect and install the necessary drivers. No manual driver installation is required.

Figura 3: The magnetic storage for the USB receiver, demonstrating its removal and insertion into a computer's USB port.
3. Tixgħil / Mitfi
- Locate the "Switch on/off" button on the side of the clicker.
- Slide the switch to the "ON" position to power on the device.
- Żerżaq is-swiċċ għall-pożizzjoni "OFF" meta ma tkunx qed tużah biex tikkonserva l-ħajja tal-batterija.
4. System and Software Compatibility
The DinoFire X17 is widely compatible with various operating systems and presentation software.
- Sistemi Appoġġjati: Windows 2003, XP, Windows Vista, Windows 7, 8, 10, Linux, Android, Mac OS.
- Software appoġġjat: Keynote, Prezi, MS Word, Excel, PowerPoint, ACD See, website browsers, iWork, Google Slides, etc.
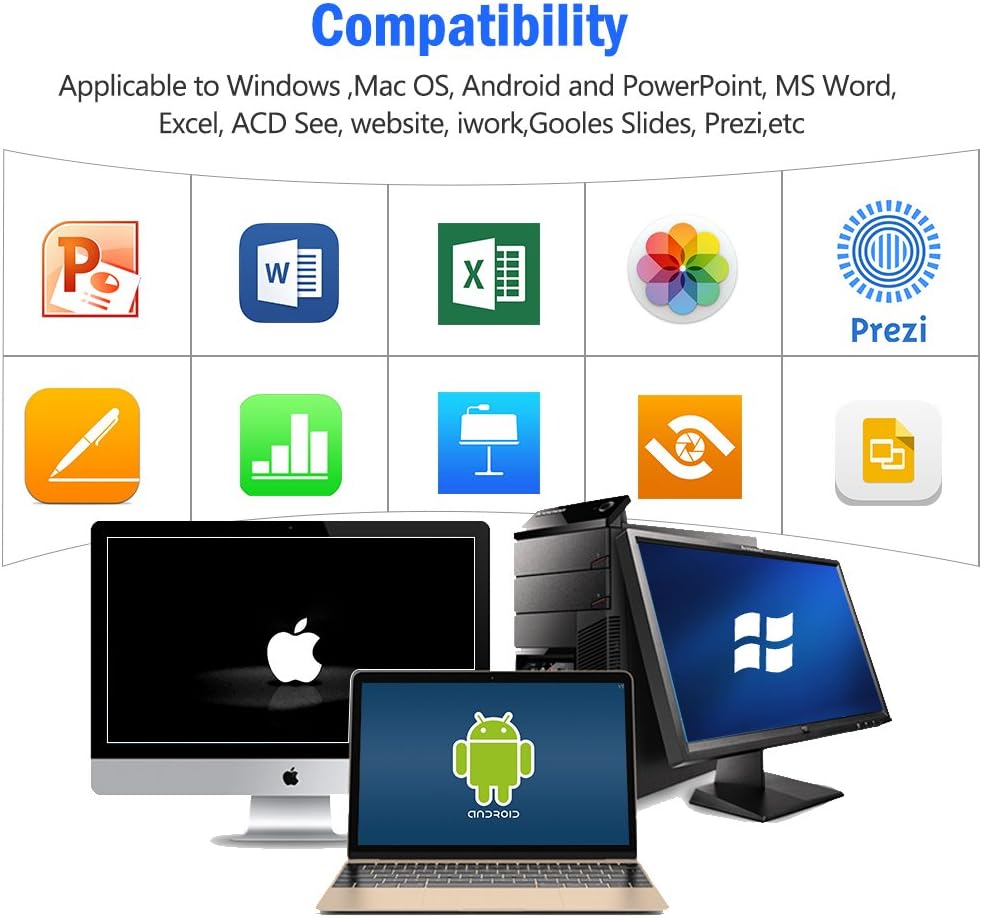
Figura 4: Visual representation of the broad compatibility of the presentation clicker with different operating systems and presentation applications.
Istruzzjonijiet Operattivi
Basic Presentation Control
- Next Slide: Press the "Page Down" (▼) button.
- Previous Slide: Press the "Page Up" (▲) button.
- Start/Exit Full Screen: Press and hold the "Page Up" (▲) button.
- Skrin Iswed: Press and hold the "Page Down" (▼) button to toggle a black screen.
Bl-użu tal-Laser Pointer
The integrated red laser pointer allows you to highlight specific content on your screen or projection.
- Press and hold the "Pointer Button" (red dot icon) to activate the laser.
- Release the button to turn off the laser.
- The laser has a range of up to 300 feet (91 meters).
- Attenzjoni: Do not point the laser directly at people's eyes or at highly reflective surfaces.

Figura 5: The red laser pointer in operation, highlighting its visibility and including a safety warning.
Funzjonijiet Avvanzati
- Select Hyperlink: Single press the "ENTER" button.
- Open Hyperlink: Double press the "ENTER" button.
- Ibdel it-Twieqi: Long press the "TAB" button to cycle through open applications.
- Agħlaq it-Tieqa: Long press the "ENTER" button to close the active window.
Firxa ta' Kontroll mingħajr Fili
The DinoFire X17 offers a wireless control range of up to 100 feet (30 meters), allowing you freedom of movement during your presentation.

Figura 6: Illustration of the presentation clicker's effective long control range in a presentation setting.
Manutenzjoni
Linji Gwida dwar l-Iċċarġjar
- Charge the device when the low power indicator flashes continuously.
- Avoid overcharging by disconnecting the cable once fully charged.
- Use the provided Micro USB cable or a certified equivalent for charging.
Ħażna tar-Riċevitur USB
Always store the USB receiver inside the magnetic compartment of the clicker when not in use to prevent loss and damage.
Tindif
Imsaħ l-apparat b'ċarruta ratba u niexfa. Tużax prodotti tat-tindif likwidi jew materjali li joborxu.
Issolvi l-problemi
| Problema | Kawża Possibbli | Soluzzjoni |
|---|---|---|
| L-apparat ma jirrispondix. | Low battery; USB receiver not connected; Device is off. | Charge the device; Ensure USB receiver is securely plugged in; Turn on the device. |
| Il-pointer tal-lejżer mhux qed jaħdem. | Low battery; Laser button not pressed correctly. | Charge the device; Press and hold the laser button firmly. |
| Firxa qasira ta' kontroll. | Obstructions; Interference; Low battery. | Ensure clear line of sight to the receiver; Move away from sources of interference; Charge the device. |
| Hyperlink function not working. | Software specific issue; Hyperlink not properly selected. | Ensure the hyperlink is active and selected (single press ENTER) before attempting to open (double press ENTER). Check software settings. |
Indikatur ta 'Qawwa Baxxa
The device features a low power indicator to alert you when charging is needed. When the indicator flashes continuously, please charge the device. The device will enter auto-sleep mode after approximately 5 minutes of inactivity to save energy.

Figura 7: Explanation of the indicator light states for working, charging, and fully charged conditions.
Speċifikazzjonijiet
- Mudell: X17
- Ditta: DinoFire
- Teknoloġija bla fili: 2.4GHz RF
- Medda ta' Kontroll: Sa 100 pied (30 metri)
- Tip ta' Laser: Laser aħmar
- Medda tal-lejżer: Sa 300 pied (91 metri)
- Tip ta 'batterija: 1 batterija tal-polimer tal-litju (inkluża)
- Ħin tal-Iċċarġjar: Madwar 1 siegħa
- Ħin ta' Użu: Over one week (on a single charge)
- Dimensjonijiet: 6.42 x 1.61 x 1.14 pulzieri (16.3 x 4.1 x 2.9 ċm)
- Piż tal-oġġett: 1.6 uqija (45 gramma)
- Sistemi Kompatibbli: Windows 2003/XP/Vista/7/8/10, Linux, Android, Mac OS
- Software kompatibbli: Keynote, Prezi, MS Word, Excel, PowerPoint, ACD See, web browsers, iWork, Google Slides
Garanzija u Appoġġ
Informazzjoni dwar Garanzija
The DinoFire Rechargeable Presentation Clicker X17 typically comes with a 3-year warranty. Please refer to your purchase documentation or the manufacturer's official websit għal termini u kundizzjonijiet speċifiċi tal-garanzija.
Appoġġ għall-Klijent
For technical assistance, troubleshooting beyond this manual, or warranty claims, please contact DinoFire customer support through their official website or the retailer where the product was purchased. Keep your purchase receipt or order number handy for faster service.
Ask a question about this manual
Ask about setup, troubleshooting, compatibility, parts, safety, or missing instructions. Manuals+ will review the question and use this page’s manual context to help answer it.