
1. Introduzzjoni
The ASUS ROG Gladius III Wireless Aimpoint Gaming Mouse is designed for precision and comfort, offering versatile connectivity and advanced features for an optimized gaming experience. This manual provides essential information for setting up, operating, maintaining, and troubleshooting your device.
Karatteristiċi ewlenin:
- ROG AimPoint Optical Sensor: Experience unparalleled accuracy with a 36,000 DPI sensor, <1% CPI deviation, 650 IPS tracking speed, and 50g acceleration.
- Konnettività Tri-Modalità: Seamlessly switch between ultrafast 2.4 GHz RF wireless, Bluetooth fast pairing (up to three devices), and wired USB modes.
- Disinn ħafif: Weighing only 79 grams, the mouse provides swift and controlled movements.
- Swiċċijiet li jistgħu jinbidlu bis-sħana: Customize click feel and extend lifespan with easily replaceable 3-pin mechanical and 5-pin optical micro switches.
- Ħajja Estiża tal-Batterija: Enjoy up to 119 hours of wireless gameplay in 2.4 GHz RF mode or up to 143 hours in Bluetooth mode.
- Disinn Ergonomiku: The classic asymmetrical shape ensures lasting comfort for various right-handed grip styles.
2. Kontenut tal-Pakkett
Ivverifika li l-oġġetti kollha huma preżenti fil-pakkett tiegħek:
- ROG Gladius III Wireless Aimpoint Mouse
- ROG mouse grip tapes
- Dongle USB
- Estensur tad-dongle tal-USB
- ROG Paracord (USB-C to USB-A cable)
- Micro switches (spare)
- ROG switch remover
- Stiker tar-ROG
- ROG Mouse Feet (spare)
- Manwal għall-utent (dan id-dokument)
- Ktejjeb tal-garanzija

Immaġni: Fuq view of the ASUS ROG Gladius III Wireless Aimpoint Gaming Mouse, showcasing its ergonomic design and scroll wheel.
3. Setup
3.1 Iċċarġjar tal-Maws
Before first use, it is recommended to fully charge the mouse. Connect the ROG Paracord cable to the USB-C port on the front of the mouse and the USB-A end to your computer or a USB power adapter. The mouse can be used while charging in wired mode.
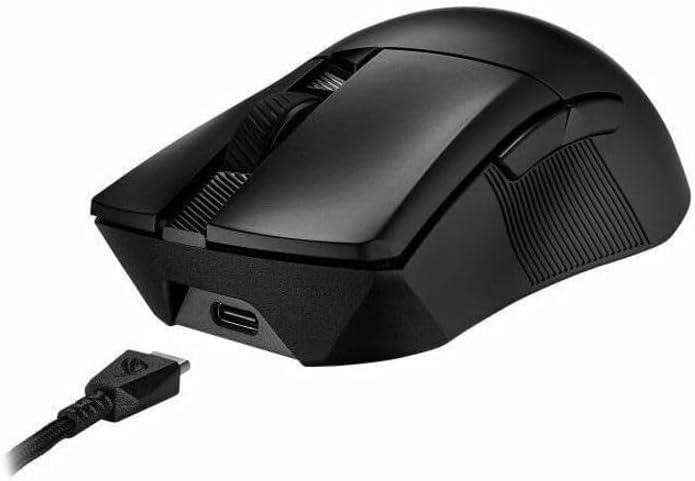
Image: The ASUS ROG Gladius III Wireless Aimpoint Gaming Mouse connected to a USB cable, illustrating wired mode and charging.
3.2 Konnessjoni tal-Maws
The ROG Gladius III Wireless Aimpoint offers three connectivity options:
- 2.4 GHz RF Wireless Mode:
- Daħħal id-dongle tal-USB f'port USB disponibbli fuq il-kompjuter tiegħek.
- Turn on the mouse and set the switch on the bottom to 2.4 GHz RF mod.
- The mouse should automatically connect. For optimal signal, use the USB dongle extender to place the dongle closer to the mouse.
- Modalità Bluetooth:
- Turn on the mouse and set the switch on the bottom to Bluetooth mod.
- Press and hold the pairing button on the bottom of the mouse until the LED indicator blinks blue.
- On your computer, go to Bluetooth settings and select the ROG Gladius III Wireless Aimpoint to pair.
- The mouse can store up to three Bluetooth profiles.
- Modalità USB bil-fili:
- Connect the ROG Paracord cable to the mouse and your computer.
- Il-maws awtomatikament jaqleb għall-modalità bil-fili u jibda jiċċarġja.

Image: The ASUS ROG Gladius III Wireless Aimpoint Gaming Mouse positioned on a desk next to a keyboard, demonstrating its wireless capability in a typical setup.
3.3 Applying Grip Tapes
The included ROG mouse grip tapes can be applied to the sides of the mouse for enhanced grip and a personalized aesthetic. Ensure the mouse surface is clean and dry before applying.

Image: The ASUS ROG Gladius III Wireless Aimpoint Gaming Mouse shown with its patterned grip tape applied to the sides, highlighting the customizable grip feature.
4. It-Tħaddim tal-Maws
4.1 Funzjonijiet tal-buttuni
- Ikklikkja fuq ix-Xellug/Lemin: Funzjonijiet standard tal-maws.
- Scroll Wheel: Skrollja 'l fuq/'l isfel, ikklikkja bil-buttuna tan-nofs.
- Buttuni tal-ġenb: Programmable for various functions, typically forward/back.
- Buttuna DPI: Located behind the scroll wheel, cycles through preset DPI levels.
- Profile Buttuna: Located on the bottom of the mouse, cycles through onboard profiles.
4.2 Aġġustament DPI
Press the DPI button to cycle through different sensitivity levels. The LED indicator will change color to indicate the current DPI setting. Default settings can be customized via the Armoury Crate software.

Image: An illustration detailing the ROG AimPoint Sensor's capabilities, including 36,000 DPI resolution, 650 inches per second maximum speed, and 50g maximum acceleration.
4.3 Software Customization (Armoury Crate)
For advanced customization of DPI settings, button assignments, lighting effects, and calibration, download and install the ASUS Armoury Crate software from the official ASUS support website. This software allows you to fine-tune the mouse to your preferences.
5. Manutenzjoni
5.1 Tindif
To maintain optimal performance, regularly clean your mouse. Use a soft, dry cloth to wipe the surface. For optical sensor, use a cotton swab lightly dampened with isopropyl alcohol. Avoid harsh chemicals or abrasive materials.
5.2 Swiċċijiet li jistgħu jinbidlu bis-sħana
The ROG Gladius III Wireless Aimpoint features hot-swappable switch sockets, allowing you to replace the micro switches without soldering. This extends the mouse's lifespan and allows for personalized click feel.
- Kun żgur li l-maws ikun mitfi.
- Carefully remove the top cover of the mouse.
- Use the included ROG switch remover tool to gently extract the existing micro switches.
- Insert new compatible 3-pin mechanical or 5-pin optical micro switches into the sockets, ensuring correct orientation.
- Ibdel il-qoxra ta' fuq.

Immaġni: Interna view of the mouse highlighting the ROG Push-Fit Switch Socket and a separate ROG Micro Switch, demonstrating the hot-swappable feature.
5.3 Mouse Feet Replacement
If the mouse feet show significant wear, they can be replaced with the spare set included in the package. Carefully peel off the old feet and apply the new ones, ensuring the surface is clean for proper adhesion.
6 Issolvi l-problemi
6.1 Il-Maws Ma Jirrispondix
- Kun żgur li l-maws ikun mixgħul u ċċarġjat kompletament.
- Check the connectivity mode switch (2.4 GHz RF, Bluetooth, or Wired) and ensure it matches your connection method.
- For 2.4 GHz RF, ensure the USB dongle is securely plugged into your computer. Try a different USB port.
- For Bluetooth, ensure Bluetooth is enabled on your computer and the mouse is paired. Try re-pairing the device.
- In wired mode, ensure the USB cable is securely connected to both the mouse and the computer.
- Ibda mill-ġdid il-kompjuter tiegħek.
6.2 Erratic Tracking or Lag
- Naddaf is-senser ottiku fil-qiegħ tal-maws.
- Kun żgur li qed tuża l-maws fuq wiċċ adattat (eż., mouse pad). Evita uċuħ li jirriflettu ħafna jew trasparenti.
- For wireless modes, ensure there are no obstructions or sources of interference (e.g., other wireless devices, large metal objects) between the mouse and the receiver/computer.
- Update mouse drivers and Armoury Crate software to the latest version.
- Try adjusting the DPI settings.
6.3 Il-Batterija Mhux Qed Tiċċarġja
- Ensure the USB cable is properly connected to both the mouse and a working USB port or power adapter.
- Ipprova kejbil USB jew port USB differenti.
- Ensure the mouse is not in an extremely hot or cold environment, which can affect charging.
7. Speċifikazzjonijiet
| Karatteristika | Speċifikazzjoni |
|---|---|
| Numru tal-Mudell | P711 ROG GIII WL AIMPOINT/BLK |
| Konnettività | Bluetooth, 2.4 GHz RF, USB 2.0 (Wired) |
| Sensor | Senser Ottiku ROG AimPoint |
| Riżoluzzjoni | 100 - 36,000 DPI |
| Veloċità Massima | 650 FPS |
| Aċċelerazzjoni massima | 50 G |
| Piż | 79 gramma (mingħajr kejbil) |
| Dimensjonijiet (LxWxH) | 4.86 x 2.68 x 0.1 pulzieri (madwar 123.4 x 68 x 40 mm) |
| Ħajja tal-batterija | Up to 119 hours (2.4 GHz RF), Up to 143 hours (Bluetooth) |
| Swiċċijiet | ROG Micro Switches (70-million-click lifespan), Hot-swappable |
| OS kompatibbli | Windows, macOS |

Immaġni: Minn fuq għal isfel view of the mouse with overlaid measurements, indicating its length of 4.86 inches and width of 2.68 inches.
8. Garanzija u Appoġġ
8.1 Informazzjoni dwar Garanzija
The ASUS ROG Gladius III Wireless Aimpoint Gaming Mouse comes with a limited warranty. Please refer to the included warranty booklet for detailed terms and conditions, including coverage period and limitations. Keep your proof of purchase for warranty claims.
8.2 Appoġġ Tekniku
For technical assistance, driver downloads, software updates, or further product information, please visit the official ASUS support websit:
You may also contact ASUS customer service directly using the contact information provided in your warranty booklet or on the support websit.