
1. Introduzzjoni
This manual provides comprehensive instructions for the installation, configuration, and operation of your ASUS TUF GAMING B650M-E AMD mATX Motherboard. Please read this manual thoroughly before installing or using the product to ensure proper functionality and to prevent damage.
The ASUS TUF GAMING B650M-E is designed to support AMD Ryzen 7000 Series processors and features an 8+2 DrMOS power solution, DDR5 memory support, PCIe 5.0, and multiple M.2 slots for high-performance storage. It is built for durability and stable performance.
2. Informazzjoni dwar is-Sigurtà
Observe the following safety precautions to prevent damage to the motherboard and injury to yourself:
- Dejjem skonnettja l-kejbil tal-enerġija mis-sokit tal-ħajt qabel ma tmiss xi komponenti interni.
- Ilbes ċinga tal-polz anti-statika jew tmiss spiss oġġett tal-metall ertjat biex teħles mill-elettriku statiku qabel ma timmaniġġja l-motherboard jew komponenti oħra.
- Immaniġġja l-motherboard mit-truf tagħha biex tevita li tmiss komponenti sensittivi.
- Ensure all cables are connected correctly and securely before powering on the system.
- Żomm il-motherboard 'il bogħod mill-umdità u minn temperaturi estremi.
3. Kontenut tal-Pakkett
Verify that all items are present in your motherboard package. If any item is damaged or missing, contact your retailer.
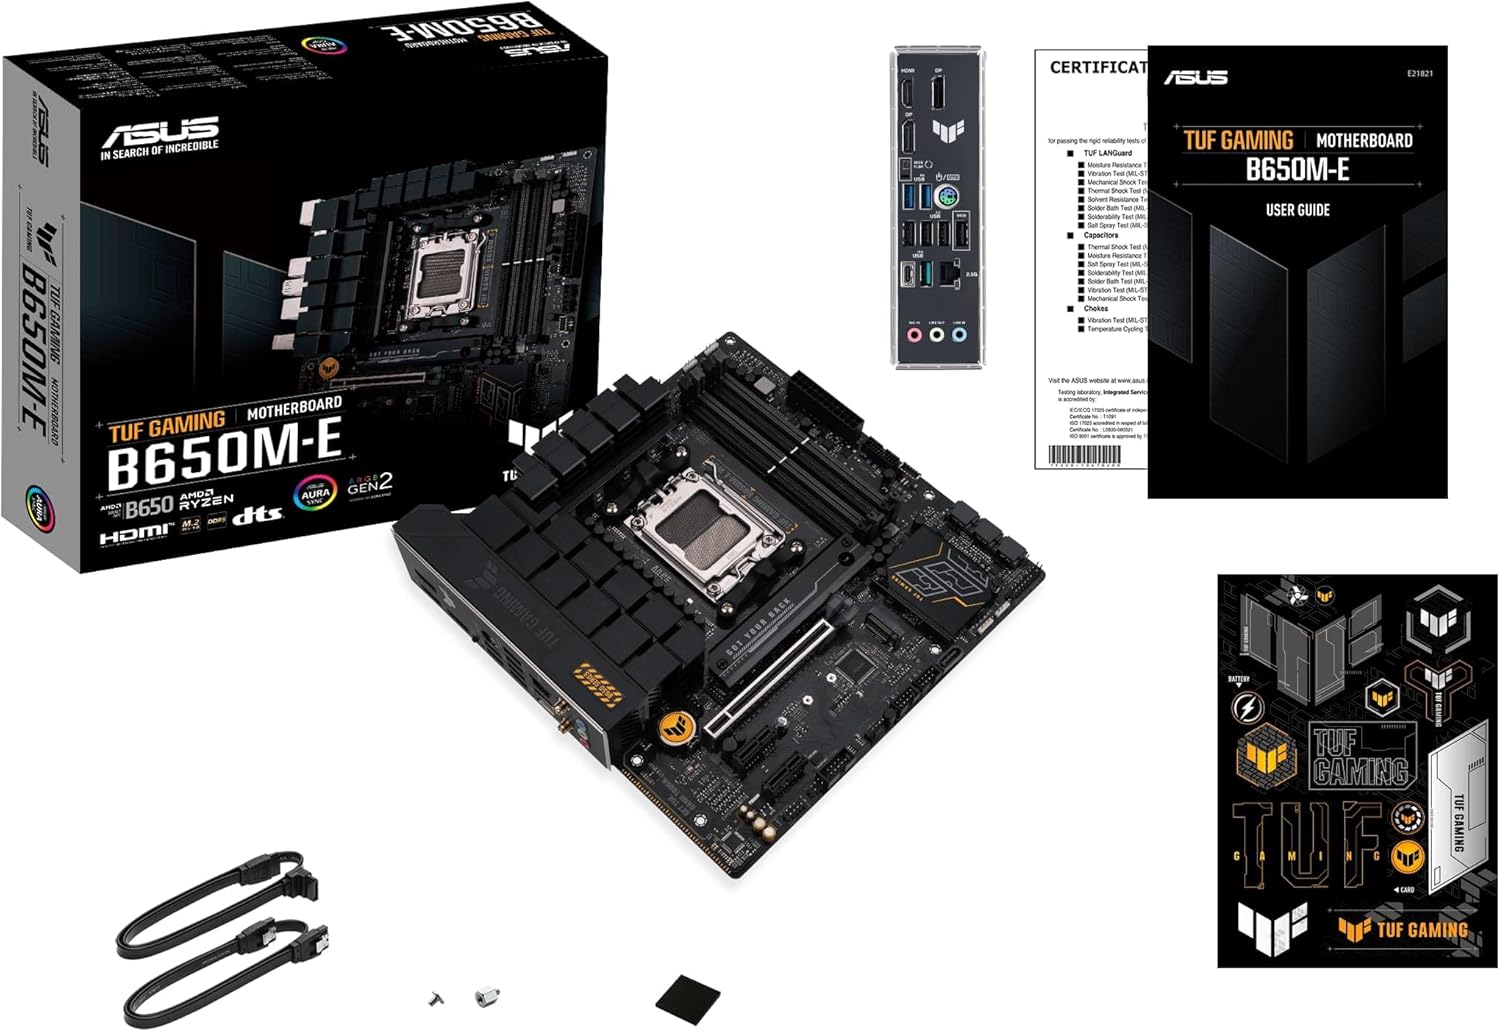
Stampa 3.1: Contents of the ASUS TUF GAMING B650M-E package. This image displays the motherboard, user guide, SATA cables, M.2 screws, and TUF Gaming stickers.
- ASUS TUF GAMING B650M-E Motherboard
- Gwida għall-Utent
- Kejbils SATA 6Gb/s
- M.2 SSD screw package
- TUF Gaming stickers
4. Layout tal-Motherboard
Iffamiljarizza ruħek mad-diversi komponenti u konnetturi fuq il-motherboard qabel l-installazzjoni.
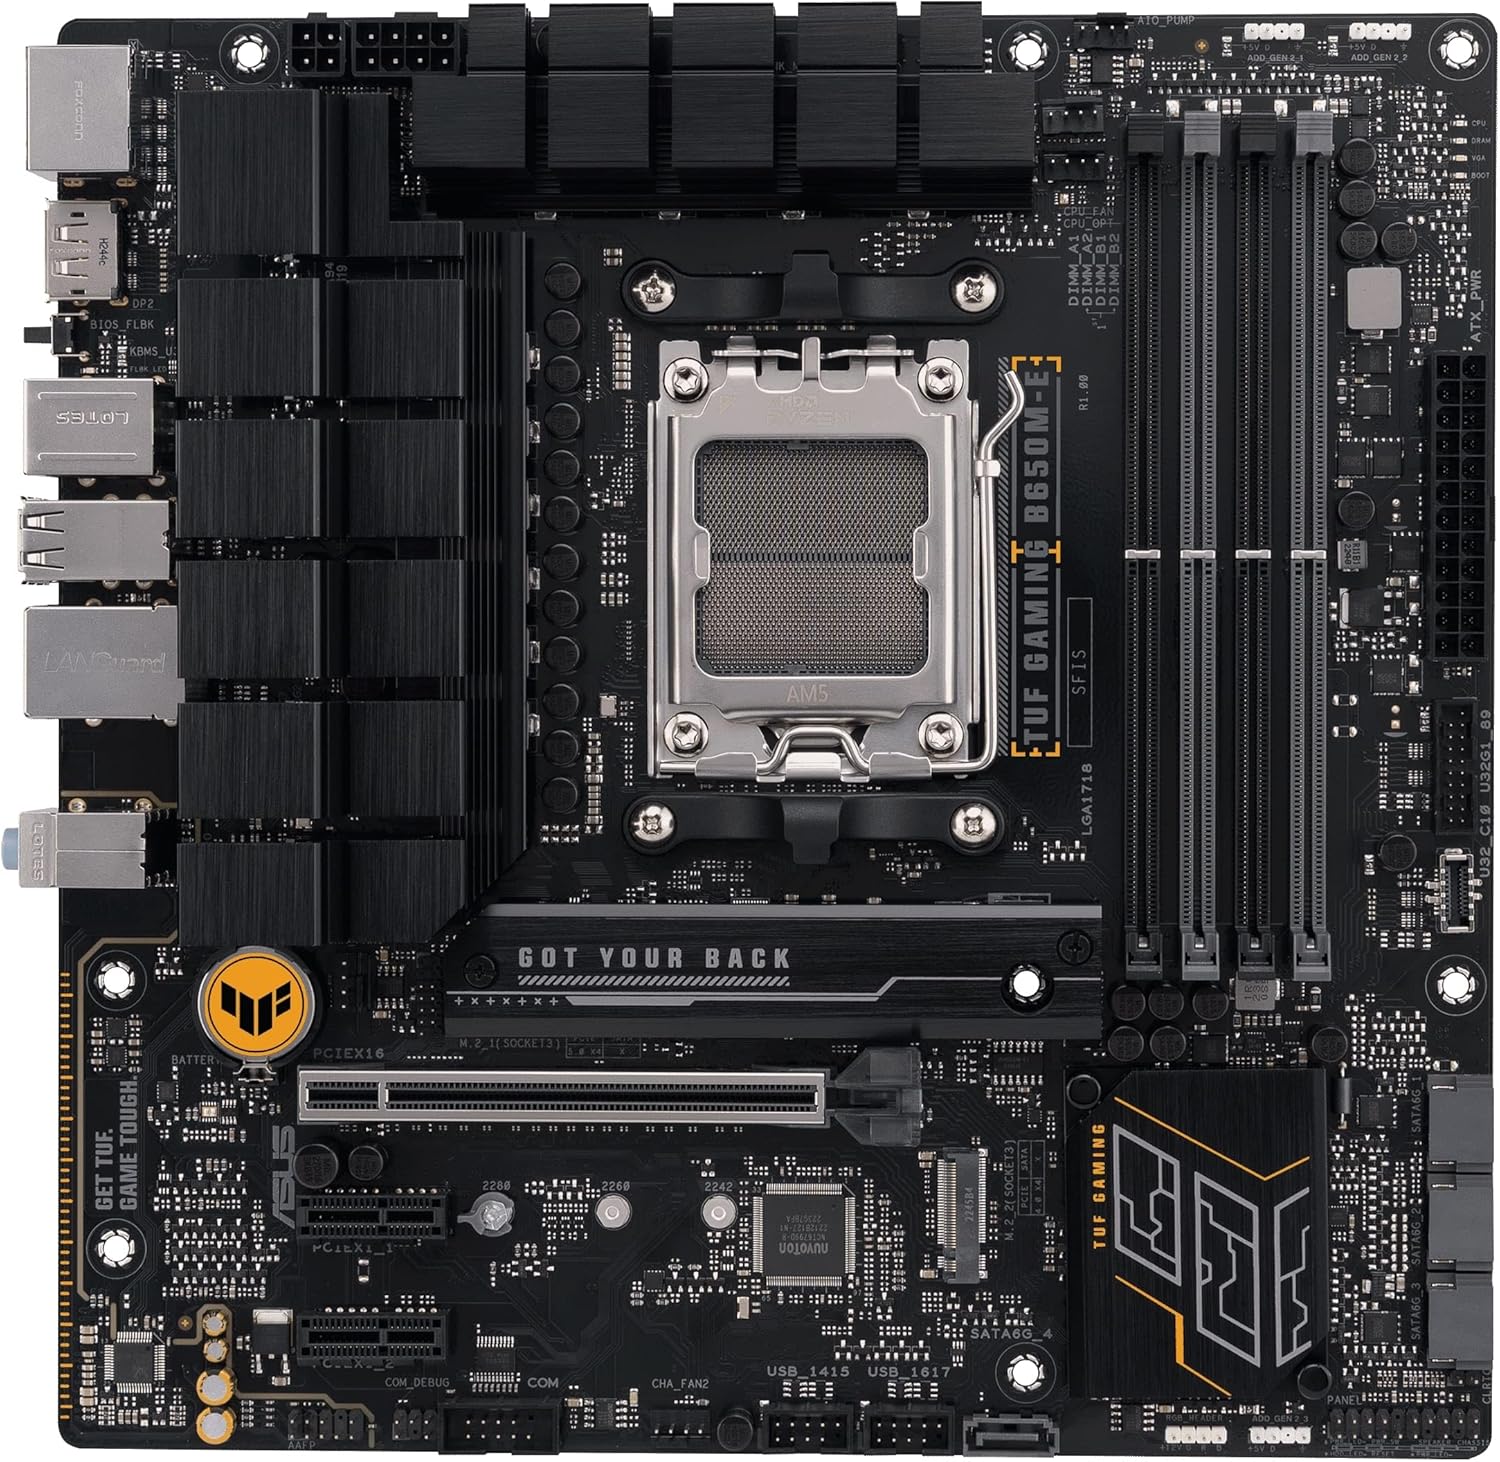
Stampa 4.1: Minn fuq għal isfel view of the ASUS TUF GAMING B650M-E motherboard, highlighting the CPU socket, DIMM slots, PCIe slots, and M.2 slots.
4.1. Il-Panel tal-I/O ta' wara
The rear I/O panel provides various ports for connecting external devices.

Stampa 4.2: Close-up view of the rear I/O panel, showing ports for USB, DisplayPort, HDMI, LAN, and audio.
- DisplayPort (DP): For connecting display devices.
- HDMI: For connecting display devices.
- Portijiet USB 2.0: Għall-konnessjoni ta' periferali.
- Portijiet USB 3.2 Ġen 1: Għall-konnessjoni ta' apparati USB b'veloċità għolja.
- Port tat-Tip Ċ tal-USB 3.2 Ġen 2: For connecting USB Type-C devices.
- 2.5 Gb Ethernet Port: Għall-konnettività tan-netwerk.
- Ġakki tal-Awdjo: For connecting audio devices (Line In, Line Out, Mic In).
- Buttuna tal-FlashBack tal-BIOS: For updating BIOS without a CPU or RAM.
5. Setup u Installazzjoni
Follow these steps to install the motherboard and its components into your PC case.
5.1. Installazzjoni tas-CPU
- Sib is-sokit tas-CPU AM5 fuq il-motherboard.
- Iftaħ il-lieva tas-sokit tas-CPU u neħħi l-għatu protettiv.
- Allinja s-CPU bir-reqqa mas-sokit, filwaqt li tiżgura li l-marka trijangulari fuq is-CPU taqbel mal-marka fuq is-sokit.
- Poġġi s-CPU bil-mod fis-sokit mingħajr ma tapplika forza.
- Agħlaq il-lieva tas-sokit biex twaħħal is-CPU.
- Installa l-cooler tas-CPU skont l-istruzzjonijiet tal-manifattur tiegħu.
5.2. Installazzjoni tal-Memorja (RAM)
Din il-motherboard tappoġġja moduli tal-memorja DDR5. Irreferi għall-QVL (Qualified Vendor List) tal-motherboard għall-memorja kompatibbli.
- Iftaħ il-klipps fiż-żewġt itruf tas-slots tad-DIMM.
- Allinja l-islott fuq il-modulu tal-memorja DDR5 maċ-ċavetta fl-islott tad-DIMM.
- Daħħal il-modulu tal-memorja sew fl-islott sakemm il-klipps jidħlu f'posthom.
- For dual-channel configuration, install modules into the recommended slots (usually A2 and B2).
5.3. Storage (M.2 and SATA) Installation
Installazzjoni SSD M.2
- Sib is-slots tal-M.2 fuq il-motherboard.
- Remove the M.2 heatsink (if present) and the standoff screw.
- Daħħal l-M.2 SSD fl-islott f'angolu ta' 30 grad.
- Imbotta bil-mod l-M.2 SSD 'l isfel u waħħalha bil-vit tal-istandoff.
- Erġa' installa l-heatsink tal-M.2 (jekk applikabbli).
SATA Device Installation
- Qabbad tarf wieħed tal-kejbil tad-dejta SATA ma' port SATA fuq il-motherboard.
- Connect the other end of the SATA data cable to your SATA storage device (HDD/SSD).
- Connect a SATA power cable from your power supply unit (PSU) to the SATA storage device.
5.4. Expansion Card (PCIe) Installation
This motherboard features PCIe 5.0 x16 and other PCIe slots for graphics cards and other expansion cards.
- Locate the desired PCIe slot.
- Neħħi l-għatu tas-slott ta' espansjoni korrispondenti mill-kaxxa tal-PC tiegħek.
- Allinja l-kard tal-espansjoni mas-slott u agħfas 'l isfel sew sakemm tkun f'postha sew.
- Waħħal il-kard b'kamin jew bil-mekkaniżmu ta' żamma tal-kaxxa.
5.5. Konnessjonijiet tal-Enerġija
Connect the power supply unit (PSU) cables to the motherboard.
- Konnettur tal-Enerġija ATX ta' 24-pin: Connect the main 24-pin power cable from the PSU.
- 8-pin + 4-pin ATX 12V Power Connectors: Connect the CPU power cables from the PSU. Ensure both are connected for stable power delivery, especially with high-end CPUs.
5.6. Konnessjonijiet tal-Panel ta' Quddiem
Connect the cables from your PC case's front panel to the corresponding headers on the motherboard.
- Front Panel Header (F_PANEL): For power button, reset button, HDD LED, and power LED. Refer to the user guide for pin assignments.
- Intestaturi USB: Connect front panel USB ports (USB 2.0, USB 3.2 Gen 1, USB 3.2 Gen 2 Type-C).
- Front Panel Audio Header (AAFP): For front panel headphone and microphone jacks.
6. Istruzzjonijiet Operattivi
6.1. Konfigurazzjoni tal-BIOS/UEFI
The BIOS (Basic Input/Output System) or UEFI (Unified Extensible Firmware Interface) is firmware that initializes hardware during the booting process and provides runtime services for the operating system. You can access the BIOS/UEFI setup utility to configure system settings.
- Aċċess għall-BIOS/UEFI: During system startup, press the Ħassar ċavetta jew F2 ċavetta ripetutament.
- Navigazzjoni: Uża l-vleġeġ biex tinnaviga u Daħħal to select. Many ASUS UEFI interfaces also support mouse input.
- Settings ewlenin:
- Ordni tal-Ibbutjar: Configure the sequence of storage devices for booting the operating system.
- Overclocking (OC) Settings: Adjust CPU and memory frequencies/voltages (use with caution).
- Kontroll tal-fann: Monitor and adjust fan speeds.
- Konfigurazzjoni tas-SATA: Set SATA mode (AHCI/RAID).
- Is-salvataġġ tal-bidliet: Always save changes before exiting the BIOS/UEFI setup.
6.2. Installazzjoni tas-sewwieq
After installing your operating system, install the necessary drivers for optimal performance and functionality. Drivers can be found on the ASUS support websit għall-mudell tal-motherboard tiegħek.
- Sewwieqa taċ-Ċipset: Essential for motherboard functionality.
- Sewwieqa tal-LAN: Għall-konnettività tan-netwerk.
- Sewwieqa tal-awdjo: For sound output and input.
- Sewwieqa tal-Grafika: If using integrated graphics or a dedicated GPU.
- Sewwieqa USB: For optimal USB device performance.
6.3. Utilitajiet tas-Softwer
ASUS provides various software utilities to enhance your user experience:
- Kaxxa tal-Armerija: A central hub for managing drivers, utilities, and Aura Sync lighting.
- Sinkronizzazzjoni tal-Aura: For customizing RGB lighting effects on compatible components.
- Tnaqqis tal-Ħsejjes AI: Ittejjeb iċ-ċarezza tal-awdjo għall-komunikazzjoni.
7. Manutenzjoni
7.1. Aġġornamenti tal-BIOS
Regularly updating your BIOS can improve system stability, compatibility, and performance. Visit the ASUS support websit għall-aħħar verżjonijiet tal-BIOS u struzzjonijiet għall-aġġornament.
- EZ Flash 3: Update BIOS directly from the UEFI interface using a USB flash drive.
- FlashBack tal-BIOS: Update BIOS without a CPU or RAM installed by using the dedicated USB port and button on the rear I/O panel.
7.2. Tindif
To ensure optimal performance and longevity, periodically clean your motherboard and PC case.
- Disconnect all power before cleaning.
- Uża arja kkompressata biex tneħħi t-trab mill-heatsinks, il-fannijiet, u komponenti oħra.
- Uża drapp artab u mingħajr suf biex timsaħ l-uċuħ bil-mod. Evita li tuża prodotti tat-tindif likwidi direttament fuq il-komponenti.
8 Issolvi l-problemi
Din it-taqsima tindirizza kwistjonijiet komuni li tista’ tiltaqa’ magħhom.
| Problema | Soluzzjoni Possibbli |
|---|---|
| Is-sistema ma tixgħel. |
|
| L-ebda output tal-wiri. |
|
| System reboots or crashes randomly. |
|
| Sistema operattiva mhux skoperta. |
|
9. Speċifikazzjonijiet
Key technical specifications for the ASUS TUF GAMING B650M-E Motherboard.
| Karatteristika | Dettall |
|---|---|
| Brand | ASUS |
| Isem tal-Mudell | TUF Gaming B650M-E |
| Socket tas-CPU | Sokit AM5 |
| Proċessuri Kompatibbli | AMD Ryzen 7000 Series (and future compatible generations) |
| Tip ta' Ċipset | AMD B650 |
| Teknoloġija tal-Memorja RAM | DDR5 |
| Veloċità tal-Arloġġ tal-Memorja | Up to 2400 MHz (JEDEC), higher with EXPO/OC |
| PCIe Slots | 1 x PCIe 5.0 x16, additional PCIe slots |
| M.2 Slots | 2 x M.2 slots |
| LAN | 2.5 Gb Ethernet |
| Output tal-vidjo | 2 x DisplayPort, 1 x HDMI |
| Portijiet USB | USB 2.0, USB 3.2 Gen 1, USB 3.2 Gen 2 Type-C |
| Fattur tal-Formola | mATX |
| Piż tal-oġġett | 2.2 liri |
10. Garanzija u Appoġġ
For detailed warranty information, please refer to the warranty card included in your product package or visit the official ASUS websit.
Appoġġ tal-ASUS: For technical assistance, driver downloads, and further information, please visit the official ASUS support websit: www.asus.com/support/
When contacting support, please have your motherboard model (TUF GAMING B650M-E) and serial number ready.