
ASUS PRIME H610M-E D4-CSM
Manwal tal-Utent tal-Motherboard tad-Desktop ASUS PRIME H610M-E D4-CSM
Model: PRIME H610M-E D4-CSM
1. Introduzzjoni
This manual provides essential information for the installation, operation, and maintenance of your ASUS PRIME H610M-E D4-CSM Desktop Motherboard. Please read this manual thoroughly before beginning installation to ensure proper setup and to prevent damage to the components. Keep this manual for future reference.
Prekawzjonijiet tas-Sigurtà:
- Dejjem skonnettja l-provvista tal-enerġija mill-kompjuter tiegħek qabel ma tinstalla jew tneħħi xi komponenti.
- Ilbes ċinga tal-polz anti-statika jew tmiss spiss oġġett tal-metall ertjat biex teħles mill-elettriku statiku qabel ma timmaniġġja l-motherboard jew komponenti oħra.
- Immaniġġja l-motherboard mit-truf tagħha biex tevita li tmiss komponenti sensittivi.
- Ensure all cables are connected correctly and securely before powering on the system.
2. Prodott Aktarview
The ASUS PRIME H610M-E D4-CSM commercial motherboard is designed to provide a stable and reliable foundation for your computing needs, featuring comprehensive system protection and an improved management suite. It supports 12th and 13th Gen Intel Core, Pentium Gold, and Celeron Processors with an LGA 1700 socket.
Karatteristiċi ewlenin:
- Sokit tal-Intel LGA 1700: Ready for 12th & 13th Gen Intel Core, Pentium Gold and Celeron Processors.
- Tkessiħ komprensiv: Features a PCH heatsink and Fan Xpert 2+ for efficient thermal management.
- Konnettività ultraveloċi: Includes a 32Gbps M.2 slot, Realtek 1 Gb Ethernet, and USB 3.2 Gen ports.
- ASUS CSM motherboard: Part of the ASUS Corporate Stable Model program, ensuring 12-month supply, EOL notice, and ECN control.
- Ċentru ta' Kontroll ASUS Express (ACCE): Facilitates efficient IT endpoint management.
Stampi tal-Prodott:

Image 2.1: The ASUS PRIME H610M-E D4-CSM motherboard alongside its retail packaging, highlighting the product and its box design.

Image 2.2: A direct top-down view of the ASUS PRIME H610M-E D4-CSM motherboard, showing the layout of components including the CPU socket, RAM slots, and PCIe slots.

Image 2.3: An angled perspective of the ASUS PRIME H610M-E D4-CSM motherboard, providing a clearer view of the various ports and connectors on the board.

Image 2.4: A different angled view of the ASUS PRIME H610M-E D4-CSM motherboard, emphasizing the heatsinks and power delivery components.
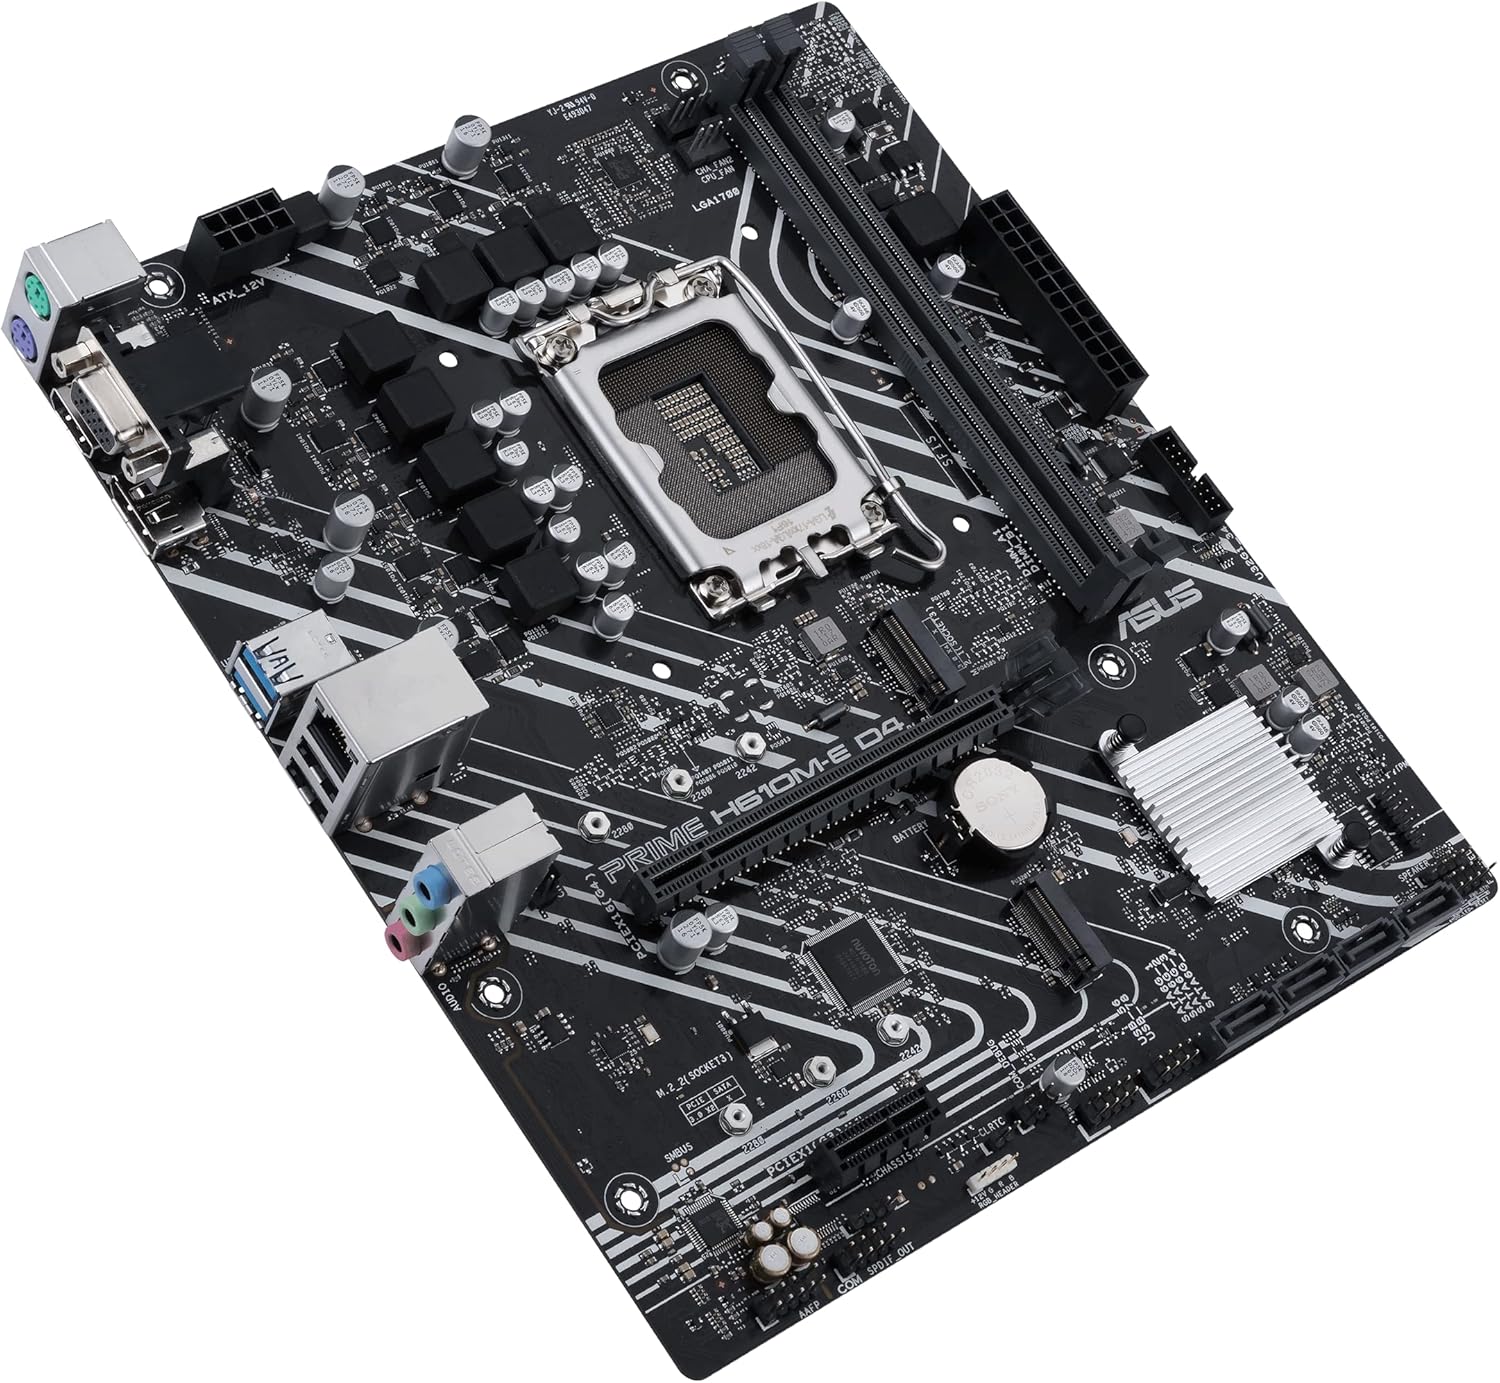
Image 2.5: A broader perspective view of the ASUS PRIME H610M-E D4-CSM motherboard, showing its overall form factor and component placement.

Immaġni 2.6: Close-up view of the rear input/output (I/O) panel of the ASUS PRIME H610M-E D4-CSM motherboard, detailing the available ports such as USB, Ethernet, and audio jacks.

Image 2.7: The rear I/O shield for the ASUS PRIME H610M-E D4-CSM motherboard, showing the cutouts for the various ports.
3. Setup u Installazzjoni
Follow these general steps for installing your motherboard. Refer to your PC case manual for specific instructions related to your chassis.
3.1 Preparazzjoni:
- Ensure you have all necessary components: CPU, CPU cooler, RAM, storage devices (M.2 SSDs, SATA drives), power supply, and graphics card (if not using integrated graphics).
- Prepare your PC case by installing standoffs in the correct positions for your motherboard's form factor.
3.2 CPU Installation:
- Iftaħ il-lieva tas-sokit tas-CPU u erfa' l-pjanċa tat-tagħbija.
- Allinja s-CPU mas-sokit bir-reqqa, filwaqt li tiżgura li t-trijangolu tad-deheb fuq is-CPU jaqbel mat-trijangolu fuq is-sokit. Tisforzax is-CPU fis-sokit.
- Lower the load plate and press down the lever to secure the CPU.
- Installa l-cooler tas-CPU skont l-istruzzjonijiet tal-manifattur tiegħu.
3.3 RAM Installation:
- Iftaħ il-klipps fuq iż-żewġt itruf tas-slots tad-DIMM.
- Allinja l-islott fuq il-modulu tal-memorja DDR4 maċ-ċavetta fl-islott tad-DIMM.
- Agħfas sew 'l isfel fuq iż-żewġt itruf tal-modulu tal-memorja sakemm il-klipps jidħlu f'posthom.
3.4 Motherboard Installation:
- Installa l-ilqugħ tal-I/O fil-ftuħ ta' wara tal-kaxxa tal-PC tiegħek.
- Poġġi l-motherboard bir-reqqa fil-kaxxa, billi tallinja t-toqob tal-viti mal-istandoffs.
- Sikura l-motherboard bil-viti.
3.5 Storage Device Installation:
- M.2 SSD: Insert the M.2 SSD into the M.2 slot at an angle, then push it down and secure it with the provided screw or latch.
- Drajvs SATA: Connect SATA data cables from your storage drives to the SATA ports on the motherboard.
3.6 Power Connections:
- Qabbad il-konnettur ewlieni tal-enerġija ATX ta' 24-pin mill-provvista tal-enerġija tiegħek mal-motherboard.
- Qabbad il-konnettur tal-enerġija tas-CPU ATX 12V ta' 8 pinnijiet (jew 4 pinnijiet) mal-motherboard.
3.7 Front Panel and Peripheral Connections:
- Connect the front panel headers (power button, reset button, HDD LED, power LED) to the corresponding pins on the motherboard. Refer to the motherboard's silkscreen labels for correct orientation.
- Connect USB and audio headers from your case to the motherboard.
- Install your graphics card into the primary PCIe x16 slot and secure it. Connect PCIe power cables from the power supply to the graphics card if required.
4. Istruzzjonijiet Operattivi
4.1 Initial Boot-Up:
- After all components are installed and connected, ensure your monitor is connected to the graphics output (either motherboard's integrated graphics port or discrete graphics card).
- Connect the power cord to the power supply and turn on the power supply switch.
- Agħfas il-buttuna tal-qawwa fuq il-kaxxa tal-PC tiegħek.
4.2 BIOS/UEFI Setup:
During the boot process, press the DEL or F2 key to enter the BIOS/UEFI setup utility. Here you can configure system settings, boot order, and monitor hardware status.
4.3 Installazzjoni tas-Sewwieq:
After installing your operating system, install the necessary drivers for your motherboard's components (chipset, audio, LAN, graphics, etc.). These can typically be found on the ASUS support websit għall-mudell speċifiku tal-motherboard tiegħek.
4.4 Operating System Installation:
Insert your operating system installation media (USB drive or DVD) and follow the on-screen prompts to install your preferred operating system (e.g., Windows 10, Windows 11).
5. Manutenzjoni
Manutenzjoni regolari tgħin biex tiżgura l-lonġevità u l-prestazzjoni ottimali tal-motherboard u s-sistema tiegħek.
- Tindif: Periodically clean dust from inside your PC case, especially from fans and heatsinks, using compressed air. Ensure the system is powered off and unplugged before cleaning.
- Aġġornamenti tal-BIOS: Iċċekkja l-appoġġ tal-ASUS website for BIOS updates. BIOS updates can improve compatibility, stability, and performance. Follow the instructions provided by ASUS carefully when updating the BIOS.
- Aġġornamenti tas-sewwieq: Żomm is-sewwieqa tiegħek aġġornati biex tiżgura prestazzjoni ottimali u kompatibilità ma' softwer u ħardwer ġdid.
- Spezzjoni Fiżika: Kultant spezzjona l-motherboard għal xi sinjali ta’ ħsara, konnessjonijiet maħlula, jew capacitors minfuħin.
6 Issolvi l-problemi
Jekk tiltaqa' ma' problemi bil-motherboard tiegħek, ikkunsidra l-passi komuni li ġejjin għas-soluzzjoni tal-problemi:
- Ebda Qawwa/Ebda Boot:
- Iċċekkja l-konnessjonijiet kollha tal-enerġija (24-pin ATX, 8-pin CPU, PCIe għall-GPU).
- Ensure the power supply is switched on and functioning.
- Ivverifika l-konnessjoni tal-buttuna tal-enerġija tal-pannell ta' quddiem.
- Ebda Display:
- Kun żgur li l-monitor huwa konness mal-output korrett tad-displej (motherboard jew graphics card).
- Erġa' poġġi l-karta grafika u l-moduli tar-RAM.
- Ipprova boot b'RAM stick wieħed biss.
- POST Code/Beep Codes:
- If your motherboard has a POST code display or emits beep codes, consult the ASUS website or the full motherboard manual for their meaning. These codes indicate specific hardware issues.
- Instabbiltà/Ħsarat tas-Sistema:
- Kun żgur li s-sewwieqa kollha huma aġġornati.
- Iċċekkja t-temperaturi tas-CPU u l-GPU biex tevita li jisħnu żżejjed.
- Mexxi għodod dijanjostiċi tal-memorja biex tiċċekkja għal problemi fir-RAM.
For more detailed troubleshooting or persistent issues, please visit the official ASUS support websit jew ikkuntattja lis-servizz tal-konsumatur tagħhom.
7. Speċifikazzjonijiet
| Karatteristika | Speċifikazzjoni |
|---|---|
| Brand | ASUS |
| Serje | PRIME H610M-E D4-CSM |
| Numru tal-Mudell tal-Oġġett | PRIME H610M-E D4-CSM |
| Socket tas-CPU | LGA 1700 |
| Proċessuri Kompatibbli | Intel Core (12th/13th Gen), Pentium Gold, Celeron |
| Tip ta' Ċipset | Intel H610 |
| Teknoloġija tal-Memorja RAM | DDR4 |
| Veloċità tal-Memorja | Sa 4600 MHz (OC) |
| Numru ta 'USB 2.0 Ports | 12 (total, inklużi l-intestaturi interni) |
| Piż tal-oġġett | 1.1 liri |
| Dimensjonijiet tal-Prodott (LxWxH) | 9.6 x 8.3 x 1.53 pulzieri |
| Pjattaforma | Windows 11, Windows 10 |
| Kulur | ISWED |
| Pajjiż ta' Oriġini | Iċ-Ċina |
| L-Ewwel Data Disponibbli | 1 ta’ Mejju, 2023 |
8. Garanzija u Appoġġ
ASUS provides a limited warranty for its products. For detailed warranty terms and conditions, including duration and coverage, please refer to the official ASUS webis-sit jew il-karta tal-garanzija inkluża mal-prodott tiegħek.
Appoġġ għall-Klijent:
For technical assistance, driver downloads, BIOS updates, and further product information, please visit the official ASUS support websit:
You can also utilize the ASUS Control Center Express (ACCE) for enhanced IT endpoint management, as mentioned in the product features.
Ask a question about this manual
Ask about setup, troubleshooting, compatibility, parts, safety, or missing instructions. Manuals+ will review the question and use this page’s manual context to help answer it.