
Flashpoint R2 XPro II
Flashpoint R2 XPro II 2.4GHz TTL Wireless Flash Trigger for Canon Cameras
Model: R2 XPro II | Brand: Flashpoint
1. Introduzzjoni u Fuqview
The Flashpoint R2 XPro II is a state-of-the-art 2.4GHz wireless flash trigger designed specifically for Canon cameras. It provides robust and reliable control over your Flashpoint R2 and Godox X-system flashes, enabling precise lighting adjustments for professional photography. This manual details the features, setup, operation, maintenance, and troubleshooting for your R2 XPro II trigger.

Image 1.1: The Flashpoint R2 XPro II Wireless Flash Trigger, showcasing id-disinn kompatt tiegħu u l-wiri LCD ċar.
2. X'hemm fil-Kaxxa
Malli tiftaħ il-pakkett, jekk jogħġbok ivverifika li l-oġġetti kollha li ġejjin huma inklużi:
- Flashpoint R2 XPro II Wireless Flash Trigger for Canon
- Manwal għall-Utent (dan id-dokument)
- USB-C Cable (for firmware updates)
Note: AA batteries are required for operation and are not included.
3. Karatteristiċi tal-prodott
The Flashpoint R2 XPro II offers a comprehensive set of features designed to enhance your flash photography:
- Reliable 2.4GHz Radio System: Ensures consistent flash firing with minimal misfires, offering a robust connection up to 300-400 feet (90-120 meters).
- Firxa ta' Trażmissjoni Estiża: Control your flashes from significant distances, ideal for complex studio setups or outdoor shoots.
- Versatile Multi-Channel Control: Features 32 channels and 5 dedicated TTL groups (A-E) plus 16 manual groups (0-9, A-F), providing extensive control and customization for multiple flash units.
- Full TTL Support: Automatically adjusts flash power for perfectly exposed images, adapting to changing light conditions with Canon cameras.
- Sinkronizzazzjoni b'Veloċità Għolja (HSS): Achieve sync speeds up to 1/8000s, allowing you to freeze fast motion or use wide apertures in bright ambient light.
- Large Dot Matrix LCD Display: Provides clear visibility of settings with adjustable backlight.
- Bluetooth inkorporat: Enables smartphone app control for convenient remote adjustments.
- Firmware Aġġornabbli: Via USB-C port for future compatibility and feature enhancements.
- Instant Flip Locking Hot Shoe: Securely attaches the trigger to your camera.
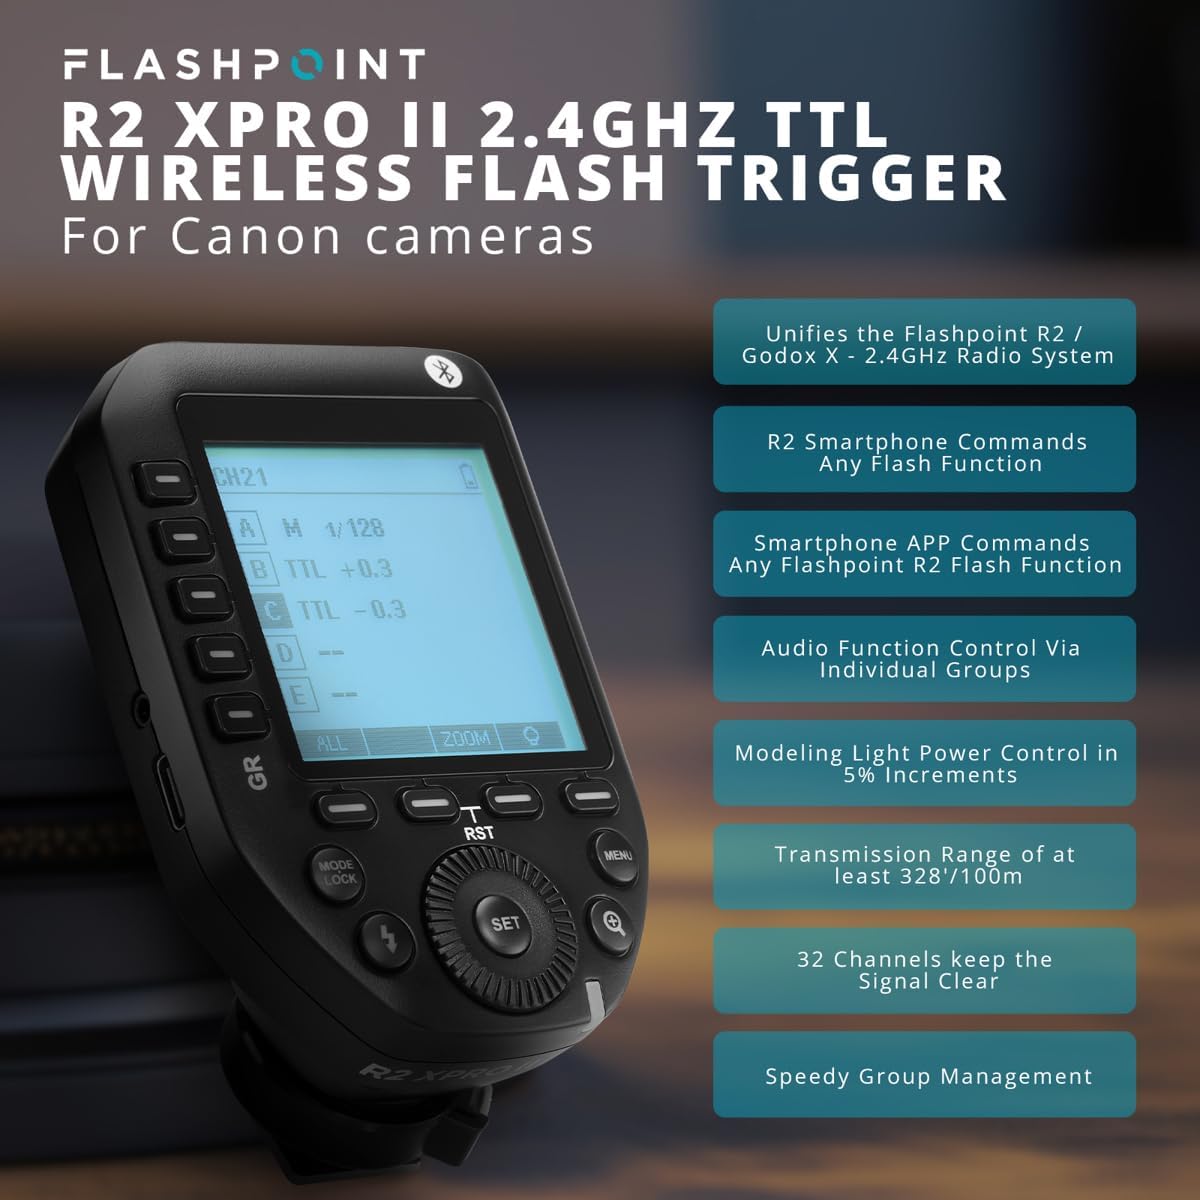
Image 3.1: Key features of the Flashpoint R2 XPro II, highlighting its capabilities.
4. Setup
4.1. Installazzjoni tal-batterija
The R2 XPro II uses two AA batteries. To install:
- Locate the battery compartment cover on the underside of the trigger.
- Żerżaq l-għatu miftuħ.
- Daħħal żewġ batteriji AA, waqt li tiżgura l-polarità korretta (+/-) kif indikat ġewwa l-kompartiment.
- Agħlaq l-għatu tal-kompartiment tal-batterija sew.

Image 4.1: Battery compartment of the R2 XPro II, ready for AA battery insertion.
4.2. Immuntar fuq il-Kamera
To mount the trigger on your camera's hot shoe:
- Ensure the trigger is powered off.
- Slide the hot shoe foot of the R2 XPro II into your camera's hot shoe.
- Push the locking lever forward to secure the trigger firmly in place.
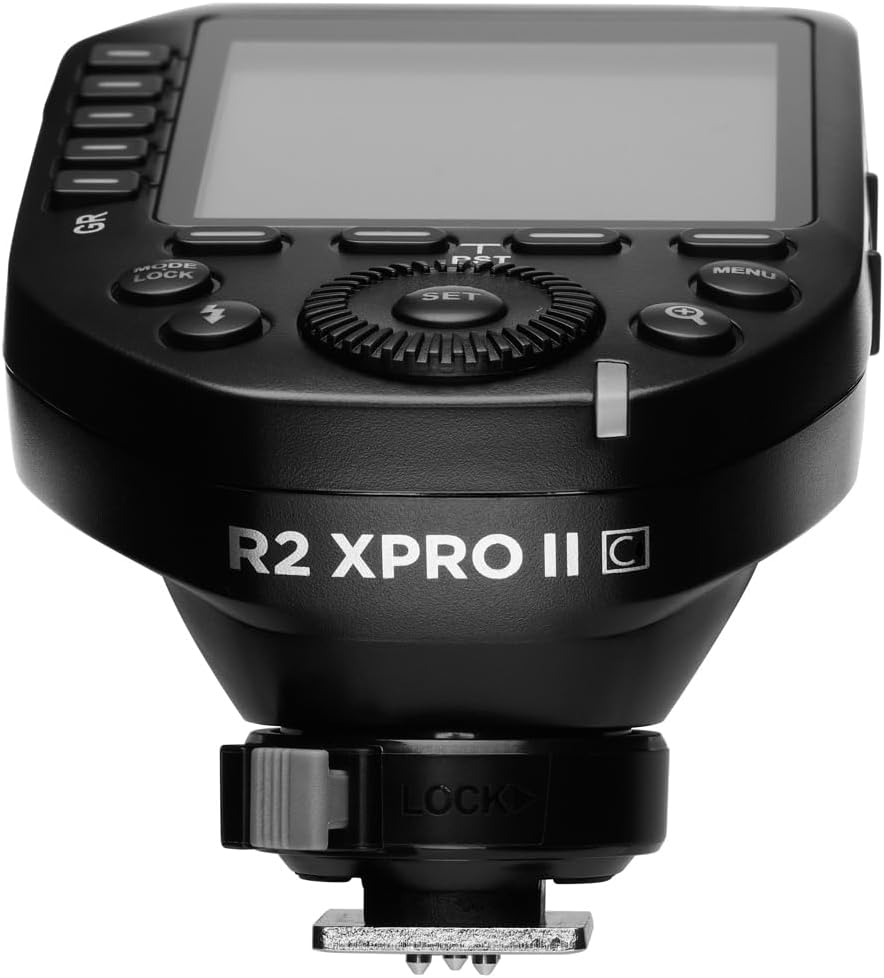
Immaġni 4.2: Il-qiegħ view of the R2 XPro II, highlighting the hot shoe and locking lever.
4.3. L-Ewwel Tixgħil u s-Settings Bażiċi
After mounting, power on the trigger using the ON/OFF switch located on the side. The LCD display will illuminate. You may need to set the channel and group to match your flash units. Refer to Section 5 for detailed operating instructions.
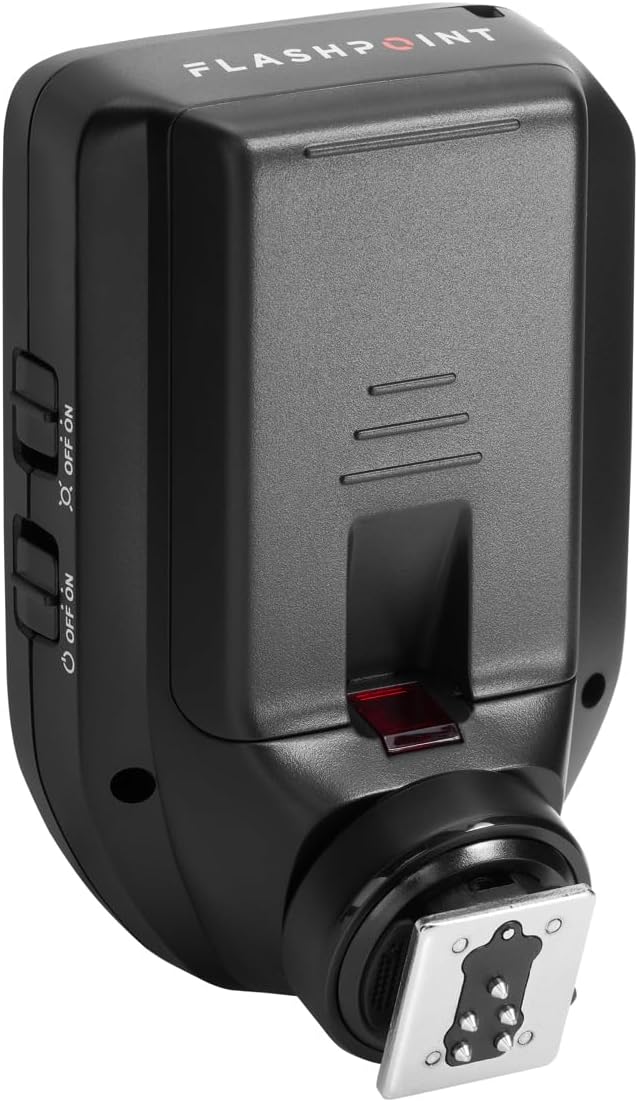
Immaġni 4.3: Ġenb view of the R2 XPro II, indicating the location of the power switch.
5. Istruzzjonijiet Operattivi
5.1. Tixgħil / Mitfi
Use the dedicated ON/OFF switch on the side of the unit to power the trigger on or off.
5.2. Navigating the Display and Controls
The R2 XPro II features a large LCD display and intuitive buttons for easy navigation.

Immaġni 5.1: Minn fuq għal isfel view of the R2 XPro II display and control layout.
- Display LCD: Shows current channel, group settings, flash mode (TTL/M/Multi), power output, and battery status.
- GR Buttons (Left Side): Used to select and adjust individual groups (A-E).
- Buttuna SET: Jikkonferma l-għażliet u jidħol fis-submenus.
- Ċempel: Rotates to change values (e.g., power output, channel number).
- MODE/LOCK Button: Cycles through flash modes (TTL, Manual, Multi) and locks/unlocks settings.
- Buttuna Flash: Test fire button.
- Buttuna MENU: Jaċċessa s-settings tas-sistema.
- Magnifying Glass Button: Zoom function for detailed group view.
5.3. Issettjar ta' Kanali u Gruppi
To ensure proper communication, the trigger and your flash units must be set to the same channel and group.
- Agħfas il- MENU button to access system settings.
- Navigate to the Channel (CH) setting using the dial and press SET.
- Rotate the dial to select the desired channel (1-32) and press SET biex tikkonferma.
- To adjust groups, press the corresponding GR button (A-E) on the left side.
- Use the dial to change the flash mode (TTL/M/Multi) or power output for the selected group.
5.4. TTL Mode Operation
In TTL (Through-The-Lens) mode, the trigger automatically adjusts flash power based on the camera's metering. This is ideal for fast-paced shooting where lighting conditions change frequently.
- Ensure your flash unit is also set to TTL mode.
- On the R2 XPro II, press the MODE/LOCK button until "TTL" is displayed for the desired group(s).
- The trigger will communicate with your camera to determine the appropriate flash output.
5.5. Operazzjoni tal-Mod Manwali
Manual mode provides precise control over flash power, allowing you to set the output from 1/1 to 1/256 in 1/3 stop increments.
- Agħfas il- MODE/LOCK button until "M" (Manual) is displayed for the desired group(s).
- Use the dial to adjust the power output for each group.
- The display will show the current power setting (e.g., M 1/128).
5.6. Sinkronizzazzjoni b'Veloċità Għolja (HSS)
HSS allows you to use flash at shutter speeds faster than your camera's native sync speed (e.g., 1/250s), up to 1/8000s. This is useful for overpowering ambient light or using wide apertures in bright conditions.
HSS is typically enabled automatically when your camera's shutter speed exceeds the normal sync speed while the trigger is in TTL or Manual mode. Ensure your flash unit also supports HSS.
5.7. Using the Test Fire Button
Agħfas iddedikat Flash button (lightning bolt icon) to test fire all active flash units. This is useful for checking flash readiness and light output before taking a picture.
5.8. Bluetooth and Smartphone App Control
The R2 XPro II features built-in Bluetooth for remote control via a smartphone application. Download the Flashpoint R2 app (or compatible Godox app) from your device's app store. Follow the app's instructions to pair your trigger and control flash settings remotely.
6. Manutenzjoni
6.1. Tindif
To clean the trigger, use a soft, dry cloth. For stubborn dirt, a slightly damp Ċarruta tista' tintuża, imma kun żgur li ma tidħolx umdità fl-apparat. Tużax kimiċi ħarxa jew prodotti tat-tindif li joborxu.
6.2. Kura tal-batterija
- Remove batteries if the trigger will not be used for an extended period to prevent leakage.
- Use high-quality AA alkaline or NiMH rechargeable batteries.
- Armi l-batteriji użati b'mod responsabbli skont ir-regolamenti lokali.
6.3. Ħażna
Store the R2 XPro II in a cool, dry place, away from direct sunlight, extreme temperatures, and high humidity. Keep it in its original packaging or a protective case to prevent damage.
6.4. Aġġornamenti tal-Firmware
Flashpoint periodically releases firmware updates to improve performance, add features, or ensure compatibility with new camera models. To update the firmware:
- Visit the official Flashpoint webis-sit għall-aħħar firmware u struzzjonijiet dwar l-aġġornament.
- Connect the R2 XPro II to your computer using the supplied USB-C cable.
- Follow the instructions provided on the Flashpoint website to complete the update process.

Immaġni 6.1: Ġenb view of the R2 XPro II, highlighting the USB-C port for firmware updates.
7 Issolvi l-problemi
If you encounter issues with your Flashpoint R2 XPro II, refer to the following common problems and solutions:
| Problema | Kawża Possibbli | Soluzzjoni |
|---|---|---|
| It-trigger mhux qed jixgħel. | Batteriji mejta jew installati ħażin. | Check battery polarity, replace with fresh AA batteries. |
| Flashes not firing. | Incorrect channel/group settings; trigger not securely mounted; flash unit issues. | Ensure trigger and flashes are on the same channel and group. Check trigger is fully seated on camera hot shoe. Verify flash units are powered on and ready. |
| Inconsistent firing or limited range. | Interference; low battery; obstructions. | Change channel. Replace batteries. Reduce distance or clear line of sight between trigger and flashes. |
| TTL exposure issues. | Flash exposure compensation set incorrectly; firmware outdated. | Check flash exposure compensation settings on both camera and trigger. Update firmware. |
| Display not working or frozen. | Problema fis-softwer; batterija baxxa. | Remove and reinsert batteries. Replace batteries. If issue persists, contact support. |
8. Speċifikazzjonijiet
| Attribut | Valur |
|---|---|
| Dimensjonijiet tal-Prodott | 5.25 x 4 x 2.8 pulzieri |
| Piż tal-oġġett | 9.3 uqija |
| ASIN | B0BZ7PQ2PB |
| Numru tal-Mudell tal-Oġġett | R2 XPro II |
| Data L-Ewwel Disponibbli | 21 ta’ Marzu, 2023 |
| Manifattur | Flashpoint |
| Frekwenza bla fili | 2.4GHz |
| Kanali | 32 |
| Gruppi | 5 TTL Groups (A-E), 16 Manual Groups (0-9, A-F) |
| Sinkronizzazzjoni Veloċità | Up to 1/8000s (High-Speed Sync) |
| Sors tal-Enerġija | 2 x Batteriji AA (mhux inklużi) |
9. Garanzija u Appoġġ
For information regarding warranty coverage and technical support for your Flashpoint R2 XPro II, please refer to the official Flashpoint webis-sit jew ikkuntattja lis-servizz tal-konsumatur tagħhom direttament. Żomm l-irċevuta tax-xiri tiegħek bħala prova tax-xiri għal talbiet ta' garanzija.
Flashpoint Official Websit: www.adorama.com/g/flashpoint
Ask a question about this manual
Ask about setup, troubleshooting, compatibility, parts, safety, or missing instructions. Manuals+ will review the question and use this page’s manual context to help answer it.