
AVARRO 0E-HDMIMX4
AVARRO 0E-HDMIMX4 HDMI Switcher User Manual
Model: 0E-HDMIMX4
1. Introduzzjoni
The AVARRO 0E-HDMIMX4 is a high-performance 4x4 HDMI matrix switcher designed to route any of four HDMI input sources to any of four HDMI output displays. It supports 4K Ultra HD resolutions, HDCP 2.2, and advanced features like Smart EDID Management and a built-in 4K-1080P downscaler. This manual provides detailed instructions for installation, operation, and troubleshooting to ensure optimal performance of your device.
2. Informazzjoni dwar is-Sigurtà
- Aqra l-istruzzjonijiet kollha bir-reqqa qabel ma tħaddem l-apparat.
- Do not expose this unit to rain, moisture, or excessive humidity.
- Do not place any objects filled with liquids on the unit.
- Twaqqafx il-fetħiet tal-ventilazzjoni.
- Uża biss l-adapter tal-enerġija pprovdut.
- Tippruvax tagħmel manutenzjoni fuq l-unità int stess. Irreferi għal kull manutenzjoni f'idejn persunal kwalifikat.
- Aċċerta ruħek li t-tagħmir kollu konness ikun hemm ertjar xieraq.
3. Kontenut tal-Pakkett
Ivverifika li l-oġġetti kollha huma preżenti qabel l-installazzjoni:
- AVARRO 0E-HDMIMX4 HDMI Switcher Unit
- Kontroll mill-bogħod IR
- Adapter tal-Enerġija DC 12V
- Manwal għall-Utent (dan id-dokument)
- Mounting Brackets (if applicable, not explicitly mentioned but common for such devices)
4. Prodott Aktarview
4.1 Panel ta 'Quddiem

Immaġni: Quddiem view of the AVARRO 0E-HDMIMX4 HDMI Switcher, showing the IR receiver and output selector buttons.
- Riċevitur IR: Jirċievi sinjali mill-kontroll remot IR.
- Output Selectors (1-4): Buttons to select the input source for each corresponding HDMI output. Each output has its own set of source selection buttons (1, 2, 3, 4).
- Indikaturi LED: Indicate the currently selected input for each output.
4.2 Panel ta 'wara
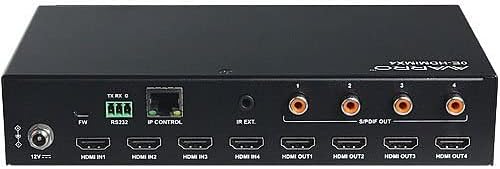
Immaġni: Wara view of the AVARRO 0E-HDMIMX4 HDMI Switcher, displaying all input/output ports and control interfaces.
- DC 12V IN: Port tad-dħul tal-enerġija.
- FW (Micro USB): Micro-USB port for firmware upgrades.
- RS232: Serial port for control via RS232 commands.
- IP CONTROL (RJ45): Ethernet port for network control and Web aċċess UI.
- IR EXT: Port for connecting an external IR receiver.
- DAĦLA HDMI (1-4): HDMI input ports for connecting source devices (e.g., Blu-ray player, game console).
- HDMI OUT (1-4): HDMI output ports for connecting display devices (e.g., TV, projector).
- S/PDIF OUT (1-4): Digital audio output ports for each HDMI output, supporting PCM 2.0/5.1, Dolby Digital, and DTS up to 5.1 Channel.
5. Setup u Konnessjoni
- Itfi l-Apparati Kollha: Before making any connections, ensure all source devices, displays, and the switcher are powered off.
- Qabbad Sorsi HDMI: Connect your HDMI source devices (e.g., media players, gaming consoles) to the HDMI IN 1-4 ports on the switcher using high-quality HDMI cables.
- Qabbad id-Displejs HDMI: Connect your HDMI display devices (e.g., TVs, projectors) to the HDMI OUT 1-4 ports on the switcher using high-quality HDMI cables.
- Connect Audio Outputs (Optional): If desired, connect external audio systems to the S/PDIF OUT ports for digital audio extraction.
- Qabbad in-Netwerk (Mhux obbligatorju): For IP control and Web UI access, connect an Ethernet cable from your network router/switch to the IP CONTROL (RJ45) port.
- Qabbad l-Enerġija: Connect the provided DC 12V power adapter to the DC 12V IN port on the switcher, then plug the adapter into a power outlet.
- Apparat ta' Qawwa: Power on the switcher, then your display devices, and finally your source devices.
Nota: For optimal performance with 4K content, use certified High-Speed HDMI cables.
6. Istruzzjonijiet Operattivi
6.1 Front Panel Control
To switch an input source for a specific output:
- Locate the "SELECTOR" buttons for the desired OUTPUT (1-4).
- Press the corresponding "SOURCE" button (1, 2, 3, or 4) below the "SELECTOR" button to route the desired input to that output. The LED indicator will illuminate to show the active input.
6.2 Kontroll mill-bogħod IR
The included IR remote control allows for convenient switching from a distance. Point the remote towards the IR receiver on the front panel of the switcher.
- Buttuni tad-Dħul (1-4): Jagħżel is-sors tad-dħul.
- Output Buttons (A-D or 1-4): Selects the output to control.
- Qlib tal-Matriċi: Typically, you would press an Output button, then an Input button to route that input to the selected output. Refer to the remote's specific layout for exact button functions.
6.3 Web Kontroll UI
Il- Web UI provides a graphical interface for advanced control and configuration.
- Ensure the switcher is connected to your network via the IP CONTROL port.
- Obtain the IP address of the switcher (refer to network settings or device documentation for default IP or discovery method).
- Iftaħ a web browser fuq kompjuter konness mal-istess netwerk.
- Enter the switcher's IP address into the browser's address bar.
- Log in using the default credentials (if prompted, refer to device documentation for default username/password).
- Uża l- Web UI to manage input/output routing, EDID settings, and other advanced features.
6.4 Kontroll RS232
The RS232 port allows for integration with control systems using serial commands. Refer to the detailed RS232 command set documentation (usually available from the manufacturer's website) for specific protocols and commands.
7. Smart EDID Management
The 0E-HDMIMX4 features Smart EDID Management to ensure compatibility between source devices and displays. EDID (Extended Display Identification Data) communicates display capabilities to the source. The switcher can automatically manage EDID or allow manual configuration via the Web UI to optimize video and audio formats for connected devices.
8. Aġġornament tal-Firmware
Firmware updates can improve performance, add new features, or resolve issues. The 0E-HDMIMX4 supports firmware upgrading via both the Micro-USB port and the Web UI
- Mikro-USB: Connect a computer to the FW (Micro USB) port and use the manufacturer's provided upgrade tool.
- Web UI: Aċċess għall- Web UI and navigate to the firmware upgrade section.
Always download the latest firmware and instructions from the official AVARRO website before attempting an upgrade.
9. Speċifikazzjonijiet
| Karatteristika | Dettall |
|---|---|
| Mudell | 0E-HDMIMX4 |
| Inputs | 4 x HDMI IN |
| Outputs | 4 x HDMI OUT, 4 x S/PDIF OUT (Digital) |
| Portijiet ta' Kontroll | 1 x RS232, 1 x IP CONTROL (RJ45), 1 x FW (Micro USB) |
| Konformità HDMI | 4K Ultra HD, HDCP 2.2 compliant |
| Appoġġ għar-Riżoluzzjoni tal-Vidjo | VESA: 800x600 to 1920x1200; SMPTE: 720x576P to 4096x2160 |
| Appoġġ HDR | HDR 10, HLG, DOLBY VISION up to 4K60 444 |
| Downscaler | Built-in 4K-1080P downscaler |
| Rata massima tad-Dejta | 18 Gbps |
| Arloġġ Pixel Massimu | 600 MHz |
| Formati Awdjo (HDMI) | PCM 2.0/5.1/7.1, Dolby TrueHD, Dolby Atmos, DTS HD Master Audio, DTS:X |
| Audio Formats (S/PDIF) | PCM 2.0/5.1, Dolby Digital, DTS up to 5.1 Channel |
| Protezzjoni ESD | ±8kV (Skarika fl-ispazju tal-arja) / ±4kV (Skarika bil-kuntatt) |
| Protezzjoni minn Surge | Voltage: ±1 Kv |
| Provvista tal-Enerġija | DC 12V 2A |
| Konsum tal-Enerġija (massimu) | 10.8W |
| Dimensjonijiet tal-Apparat (T x W x H) | 8.46 "x 4.73" x 1.65 "(21.49 cm x 12.01 cm x 4.19 cm) |
| Piż tal-Prodott | 1.19 lbs (0.54 kg) |
10 Issolvi l-problemi
Jekk tiltaqa' ma' xi problemi, jekk jogħġbok irreferi għall-problemi u s-soluzzjonijiet komuni li ġejjin:
- L-ebda Ħruġ tal-Vidjo/Awdjo:
- Kun żgur li l-kejbils HDMI kollha huma konnessi sew.
- Verify the power adapter is correctly connected and the unit is powered on.
- Check that the correct input source is selected for the desired output.
- Ittestja b'kejbils HDMI differenti.
- Bypass the switcher to confirm source and display functionality.
- Check EDID settings, especially with mixed resolution displays.
- Sinjal/Teptip Intermittenti:
- Use high-quality, certified HDMI cables, especially for longer runs or 4K content.
- Ensure cables are not excessively bent or damaged.
- Check for potential electromagnetic interference from other devices.
- Il-Kontroll mill-bogħod Mhux Jaħdem:
- Ensure there are no obstructions between the remote and the switcher's IR receiver.
- Ibdel il-batteriji tal-kontroll mill-bogħod.
- Verify the remote is pointed directly at the IR receiver.
- Web UI/IP Control Issues:
- Confirm the Ethernet cable is properly connected.
- Verify the switcher's IP address and ensure your computer is on the same network subnet.
- Check firewall settings on your computer or network.
11. Manutenzjoni
- Tindif: Uża drapp artab u niexef biex tnaddaf il-barra tal-unità. Tużax prodotti tat-tindif likwidi jew aerosols.
- Ventilazzjoni: Kun żgur li l-fetħiet tal-ventilazzjoni huma ċari u mhux imfixkla biex tevita li s-sħana tisħon iżżejjed.
- Ħażna: If storing the unit for an extended period, disconnect power and store in a cool, dry place.
12. Garanzija u Appoġġ
AVARRO products are designed for reliability and performance. For specific warranty information, please refer to the warranty card included with your product or visit the official AVARRO website. For technical support, product registration, or to download the latest drivers and firmware, please visit www.avarrus.com or contact AVARRO customer service.
Ask a question about this manual
Ask about setup, troubleshooting, compatibility, parts, safety, or missing instructions. Manuals+ will review the question and use this page’s manual context to help answer it.