
1. Prodott Aktarview
This manual provides instructions for the Tecnolite YS-100/N 1-meter black track lighting rail and the YS-I/N black straight connector. These components are designed to create flexible and customizable lighting solutions for various indoor spaces, allowing you to arrange spotlights to highlight specific areas or objects.

Immaġni 1.1: Sħiħa view of the Tecnolite YS-100/N 1-meter black track lighting rail, showcasing id-disinn eleganti tiegħu.
2. Karatteristiċi ewlenin
- Dawl personalizzabbli: The track rail system allows for creating personalized lighting layouts and extending the track to form larger circuits.
- Kostruzzjoni Durabbli: Manifatturat b'materjali ta' kwalità għolja għal prestazzjoni fit-tul.
- Dimensjonijiet Standard: 1 meter (approximately 99.4 cm) in length.
- Kompatibilità Elettrika: Operates on 100 - 240 V with a 3-wire / 1-phase system.
- Sistema espansibbli: Compatible with Tecnolite Y-200 2-meter track rails and YS-I (straight) and YS-L (L-shaped) connectors for versatile configurations.
- Spotlight Compatibility: Suitable for all Tecnolite track spotlights and most standard track spotlights available in the market. (Note: Spotlights are not included with this product.)
- Installazzjoni faċli: Features pre-drilled holes for simple and secure ceiling mounting.
- Disinn Estetiku: Available in black (and white for other models) to complement various interior designs, adding visual rhythm and elegance.

Image 2.1: Infographic highlighting key features such as suitability for track systems, 99.4 cm length, indoor installation, 100-240V voltage, robust construction, and 1-year warranty.
3. Kontenut tal-Pakkett
Il-pakkett jinkludi:
- 1 x Tecnolite YS-100/N Track Lighting Rail (1 meter, Black)
- 1 x Tecnolite YS-I/N Straight Connector (Black)
Note: Spotlights and additional connectors (e.g., L-shaped) are sold separately.

Image 3.1: The Tecnolite YS-I/N black straight connector, used to join two track rails.
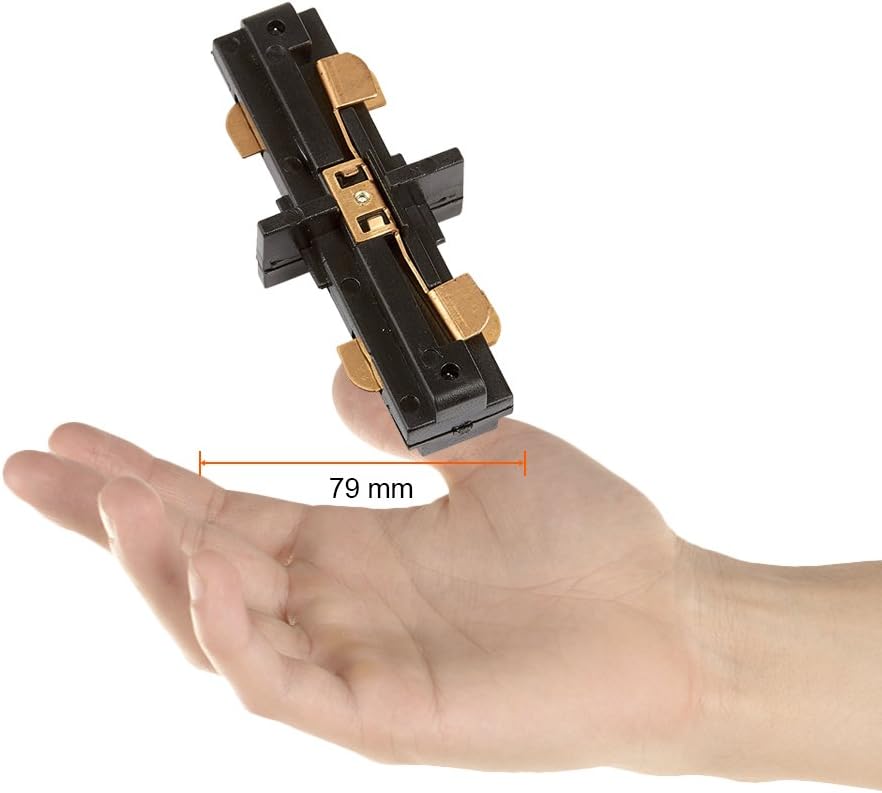
Image 3.2: A hand holding the YS-I/N straight connector, demonstrating its compact size of 79mm.

Image 3.3: Technical drawing providing precise dimensions of the YS-I/N straight connector.
4. Gwida għall-Installazzjoni
Is-Sigurtà l-Ewwel: Before beginning any installation, ensure the power supply to the installation area is turned off at the circuit breaker. If you are unsure about electrical wiring, consult a qualified electrician.
4.1. Mounting the Track Rail
- Tqassim tal-Pjan: Determine the desired layout for your track lighting system on the ceiling. Mark the positions for the track rails and any connectors.
- Trakka tal-Pożizzjoni: Hold the YS-100/N track rail against the ceiling at the marked position.
- Immarka l-Punti tat-Tħaffir: Use the pre-drilled holes on the track rail as a template to mark the drilling points on the ceiling.
- Drill toqob: Drill appropriate holes in the ceiling for mounting screws. Insert wall anchors if necessary.
- Binarju Sikur: Fasten the track rail to the ceiling using suitable screws. Ensure it is securely mounted and level.
- Konnessjoni Elettrika: Connect the track rail to the main power supply. This typically involves connecting the live, neutral, and ground wires. Ensure all connections are secure and insulated.
4.2. Connecting Multiple Track Rails (Using YS-I/N Straight Connector)
If you are extending your track system or creating specific shapes, use the YS-I/N straight connector:
- Align Rails: Position two YS-100/N track rails end-to-end where they need to be joined.
- Daħħal Konnettur: Slide the YS-I/N straight connector into the ends of both track rails. Ensure the electrical contacts align properly.
- Konnessjoni Sikura: The connector should fit snugly. Some connectors may have small screws to further secure them to the track. Tighten if applicable.
- Irrepeti: Continue this process for all additional track segments and connectors (e.g., YS-L for L-shapes) to complete your desired layout.
4.3. Installing Spotlights (Sold Separately)
Once the track system is installed and wired, you can attach compatible track spotlights:
- Align Spotlight: Align the spotlight's adapter with the track slot.
- Daħħal u Dawwar: Insert the adapter into the track and twist it to lock it into place. Ensure it makes proper electrical contact.
- Aġġusta l-Pożizzjoni: Slide the spotlight along the track to its desired position and adjust its direction as needed.
Installation Video (Similar Product)
The following video demonstrates the unboxing and general installation process for a similar track lighting rail system. While the model number may differ, the principles of installation are largely the same.
Vidjo 4.1: Il-ftuħ tal-kaxxa u l-installazzjoni lestiview for a track lighting rail (model TL-5100), provided by Illux de México (Seller). This video illustrates how to handle and prepare a track rail for installation.
5. Operazzjoni
Once the track lighting system is fully installed and spotlights are attached, restore power to the circuit. The lights can then be operated via the wall switch connected to the track system. Individual spotlights can often be adjusted in direction to illuminate specific areas.
6. Kura u Manutenzjoni
- Tindif: To clean the track rails and connectors, wipe them with a soft, dry cloth. Do not use abrasive cleaners or solvents, as these can damage the finish.
- Mitfi qabel it-Tindif: Always turn off the power to the track lighting system before cleaning or performing any maintenance.
- Iċċekkja l-Konnessjonijiet: Periodically check that all track segments and spotlights are securely connected and that mounting screws are tight.
- Sostituzzjoni tal-bozza: When replacing spotlights or bulbs (if applicable), ensure the power is off and use compatible replacements.
7 Issolvi l-problemi
| Problema | Kawża Possibbli | Soluzzjoni |
|---|---|---|
| Id-dwal ma jixegħlux. | L-ebda enerġija fiċ-ċirkwit. Konnessjoni elettrika maħlula. Faulty spotlight/bulb. | Iċċekkja circuit breaker. Verify all wiring connections are secure (power off first). Test with a known working spotlight/bulb. |
| Id-dwal jitteptep. | Loose connection at track or spotlight. Incompatible spotlight/bulb. | Ensure spotlights are properly seated and twisted into the track. Check electrical connections (power off first). Use recommended spotlights/bulbs. |
| Track segments do not connect properly. | Connector not fully inserted. Debris in track slot. | Ensure connector is fully pushed into both track ends. Inspect track slots for any obstructions and clear them. |
8. Speċifikazzjonijiet tal-Prodott
| Attribut | Dettall |
|---|---|
| Brand | Teknoloġija |
| Model (Track Rail) | YS-100/N |
| Model (Straight Connector) | YS-I/N |
| Kulur | Iswed |
| Materjal | Plastik |
| Tip Finish | Miżbugħa |
| Stil | Moderna |
| Mudell | Track + Tecnolite Straight Connector |
| Forma | Round (referring to overall system flexibility) |
| Sors tal-Enerġija | Corded Elettriku |
| Bulb Type (Compatible) | Track spotlights |
| Ipplaggja Profile | Muntatura tal-Limitu |
| Batteriji Inklużi | Nru |
| L-ewwel Disponibbli | 1 ta’ Marzu, 2023 |
9. Garanzija u Appoġġ
9.1. Informazzjoni dwar Garanzija
This Tecnolite product comes with a garanzija ta 'sena against manufacturing defects. Please retain your proof of purchase for warranty claims. The warranty covers defects in materials and workmanship under normal use.
9.2. Appoġġ għall-Klijent
For technical assistance, troubleshooting, or warranty inquiries, please contact Tecnolite customer service through their official website or the retailer where the product was purchased. Have your product model number and purchase date ready when contacting support.