
1. Introduzzjoni
This manual provides detailed instructions for the installation, operation, and maintenance of the Supermicro X13SEI-F Server Motherboard. This motherboard is designed for high-performance server applications, supporting Intel Xeon processors with an LGA4677 socket and DDR5 memory.
Please read this manual thoroughly before attempting to install or operate the motherboard to ensure proper setup and to prevent damage to the components.
2. Informazzjoni dwar is-Sigurtà
Osserva l-prekawzjonijiet ta' sigurtà li ġejjin biex tevita korrimenti u ħsara lit-tagħmir:
- Always disconnect the power cord from the power supply before installing or removing any components.
- Wear an anti-static wrist strap when handling the motherboard and other components to prevent electrostatic discharge (ESD).
- Ensure the installation environment is dry and free from static electricity.
- Tesponix il-motherboard għall-umdità jew temperaturi estremi.
- Immaniġġja l-motherboard mit-truf tagħha biex tevita li tmiss komponenti sensittivi.
- Refer to the power supply unit's manual for specific safety guidelines related to power connections.
3. Kontenut tal-Pakkett
Ivverifika li l-oġġetti kollha huma preżenti u f'kundizzjoni tajba. Jekk xi oġġetti huma bil-ħsara jew neqsin, ikkuntattja lill-bejjiegħ tiegħek.
- Supermicro X13SEI-F Server Motherboard
- Tarka I / O
- Kejbils SATA (il-kwantità tista' tvarja)
- Quick Reference Guide / User Manual (this document)
- Driver CD/DVD or USB drive (or download instructions)
4. Prodott Aktarview
The Supermicro X13SEI-F is a high-performance server motherboard featuring the LGA4677 socket, designed to support Intel Xeon Scalable processors. It offers robust memory capabilities with 8 DDR5 DIMM slots, supporting up to 4800MHz memory speed. The board also includes multiple PCIe slots for expansion.
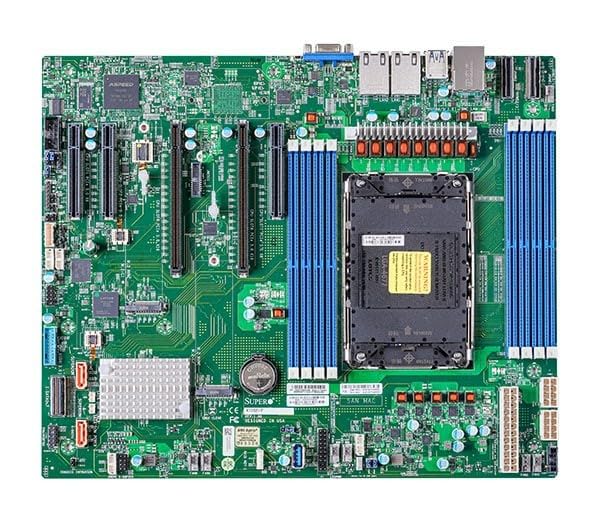
Figure 1: Supermicro X13SEI-F Server Motherboard. This image displays the overall layout of the motherboard, including the CPU socket, DIMM slots, and various connectors.
4.1 Karatteristiċi ewlenin
- Socket tas-CPU: LGA4677 for Intel Xeon Scalable Processors
- Chipset: Intel C621
- Memorja: 8x DDR5 DIMM slots, up to 4800MHz
- Slots ta' Espansjoni: Multiple PCIe slots (specific configuration depends on model variant)
- Ħażna: Support for various storage interfaces (SATA, NVMe - specific details in specifications)
- Netwerking: Integrated LAN controllers
5. Setup u Installazzjoni
Before beginning installation, ensure your system case is compatible with the motherboard's form factor and that you have all necessary components.
5.1 Installazzjoni tas-CPU (LGA4677)
- Sib is-sokit LGA4677 fuq il-motherboard.
- Carefully open the CPU socket retention mechanism according to the instructions provided with your CPU or motherboard.
- Align the CPU with the socket, ensuring the triangular mark on the CPU matches the mark on the socket. Do not force the CPU into the socket.
- Niżżel is-CPU bil-mod fis-sokit.
- Close the CPU socket retention mechanism until it locks securely.
- Installa l-cooler tas-CPU skont l-istruzzjonijiet tal-manifattur tiegħu.
5.2 RAM Installation (DDR5)
- Locate the 8 DDR5 DIMM slots on the motherboard.
- Iftaħ il-klipps taż-żamma fiż-żewġt itruf tas-slott tad-DIMM.
- Allinja l-islott fuq il-modulu tal-memorja DDR5 maċ-ċavetta fl-islott tad-DIMM.
- Insert the memory module firmly into the slot until the retention clips snap into place. Ensure both clips are closed.
- For optimal performance, refer to the motherboard's manual for recommended memory population order.
5.3 Installazzjoni tal-Karta PCIe
- Identify the appropriate PCIe slot for your expansion card (e.g., GPU, RAID card).
- Neħħi l-għatu tas-slott ta' espansjoni korrispondenti mix-chassis tiegħek.
- Align the PCIe card with the slot and press down firmly until it is fully seated.
- Secure the card with a screw or retention clip to the chassis.
5.4 Installazzjoni ta' Apparat ta' Ħażna
- Drajvs SATA: Connect SATA data cables from the motherboard's SATA ports to your SATA hard drives or SSDs. Connect power cables from the PSU to the drives.
- NVMe M.2 Drives: Locate the M.2 slots. Insert the M.2 drive at an angle, then push it down and secure it with the provided screw or retention mechanism.
5.5 Konnessjonijiet tal-Enerġija
- Qabbad il-konnettur tal-enerġija ATX ta' 24-pin mill-provvista tal-enerġija tiegħek mas-sokit prinċipali tal-enerġija fuq il-motherboard.
- Connect the 8-pin (or 4+4 pin) EPS 12V CPU power connector(s) to the corresponding sockets near the CPU.
- Kun żgur li l-konnessjonijiet kollha tal-enerġija huma siguri.
5.6 Konnessjonijiet ta' Front Panel
Connect the front panel cables (Power LED, HDD LED, Power Switch, Reset Switch, USB, Audio) from your chassis to the corresponding headers on the motherboard. Refer to the motherboard's silkscreen labels or the detailed manual for exact pin configurations.
6. Istruzzjonijiet Operattivi
6.1 L-Ewwel Boot
- After completing all hardware installations, connect the monitor, keyboard, and mouse.
- Connect the power cord to the power supply and turn on the power switch on the PSU.
- Agħfas il-buttuna tal-qawwa fuq ix-chassis tiegħek.
- The system should power on, and you should see the BIOS/UEFI POST screen.
6.2 Konfigurazzjoni tal-BIOS/UEFI
Biex tidħol fl-utilità tas-setup tal-BIOS/UEFI, agħfas il-buttuna DEL or F2 key repeatedly during the POST process. Within the BIOS/UEFI, you can configure:
- Ordni tal-ibbutjar
- Ħin u data tas-sistema
- CPU and memory settings
- Storage configurations (RAID, AHCI)
- Kontroll tal-veloċità tal-fann
- Settings tas-sigurtà
Save changes before exiting the BIOS/UEFI.
6.3 Installazzjoni tas-Sistema Operattiva
Insert your operating system installation media (USB drive or DVD) and set it as the primary boot device in the BIOS/UEFI. Follow the on-screen instructions to install your preferred operating system. After installation, install all necessary drivers from the Supermicro webis-sit jew il-midja tas-sewwieq ipprovduta.
7. Manutenzjoni
7.1 Tindif
- Regularly clean dust from the motherboard and system components using compressed air.
- Kun żgur li s-sistema tkun mitfija u skonnettjata qabel ma tnaddafha.
- Evita li tuża prodotti tat-tindif likwidi direttament fuq il-komponenti.
7.2 Aġġornamenti tal-Firmware
Iċċekkja s-Supermicro perjodikament website for updated BIOS/UEFI firmware. Firmware updates can improve system stability, performance, and compatibility. Follow the specific instructions provided by Supermicro for updating the firmware to avoid system damage.
8 Issolvi l-problemi
Din it-taqsima tipprovdi soluzzjonijiet għal kwistjonijiet komuni li tista’ tiltaqa’ magħhom.
8.1 Ebda Qawwa / Ebda POST (Test Awtomatiku tal-Power-On)
- Iċċekkja l-Konnessjonijiet tal-Enerġija: Ensure the 24-pin ATX and 8-pin EPS 12V power connectors are securely seated.
- Ivverifika l-PSU: Test the power supply unit (PSU) with another system or a PSU tester.
- Erġa' poġġi l-Komponenti: Reseat the CPU, RAM modules, and any expansion cards.
- CMOS ċar: Refer to the motherboard manual for instructions on how to clear the CMOS (Complementary Metal-Oxide-Semiconductor) settings, which can resolve boot issues.
- Konfigurazzjoni Minima: Try booting with only the CPU, one RAM stick, and the necessary power connections.
8.2 L-ebda Output tal-Wiri
- Konnessjoni tal-monitor: Ensure the monitor is properly connected to the graphics output (either integrated or discrete GPU) and is powered on.
- Karta Grafika: If using a discrete graphics card, ensure it is fully seated in its PCIe slot and has all necessary power connectors from the PSU.
- Grafika Integrata: If your CPU supports integrated graphics, try connecting the monitor to the motherboard's video output to rule out a discrete GPU issue.
8.3 Operating System Not Booting
- Ordni tal-Ibbutjar: Check the BIOS/UEFI settings to ensure the correct boot device (e.g., SSD, HDD) is selected as the primary boot option.
- Drive Connections: Verify that your storage drives are properly connected (data and power).
- Installazzjoni tas-Sistema Operattiva: If the OS is newly installed, ensure the installation process completed successfully and all drivers are installed.
9. Speċifikazzjonijiet
| Karatteristika | Dettall |
|---|---|
| Brand | Supermicro |
| Isem tal-Mudell | MBD-X13SEI-F-B |
| Socket tas-CPU | LGA 4677 |
| Proċessuri Kompatibbli | Intel Xeon Scalable |
| Tip ta' Ċipset | Intel C621 |
| Teknoloġija tal-Memorja RAM | DDR5 |
| Veloċità tal-Memorja | 4800 MHz |
| Slots tar-RAM | 8x DDR5 DIMM slots |
| Dimensjonijiet tal-Prodott (LxWxH) | 16 x 12 x 5 pulzieri |
| Piż tal-oġġett | 3.19 liri |
| L-Ewwel Data Disponibbli | 20 ta’ Jannar, 2023 |
Note: Specifications are subject to change without notice. For the most current information, please refer to the official Supermicro product page.
10. Garanzija u Appoġġ Tekniku
10.1 Informazzjoni dwar Garanzija
Supermicro products are covered by a limited warranty. For detailed warranty terms and conditions, including duration and coverage, please visit the official Supermicro website or consult the warranty card included with your product. Keep your proof of purchase for warranty claims.
10.2 Appoġġ Tekniku
For technical assistance, driver downloads, BIOS updates, and further product information, please visit the official Supermicro support websit:
https://www.supermicro.com/support
Before contacting support, please have your motherboard model number (MBD-X13SEI-F-B) and serial number ready.