
1. Introduzzjoni
This manual provides detailed instructions for the installation, operation, and maintenance of your Fractal Design Define 7 Nano Black Solid Mini ITX PC Case. Please read this manual thoroughly before beginning assembly to ensure proper installation and to maximize the performance and longevity of your system.
The Define 7 Nano is a compact Mini ITX case designed for silent operation and flexible component support, offering a balance of size and functionality for small form factor builds.

Figura 1: Naħa ta' quddiem view of the Fractal Design Define 7 Nano Black Solid Mini ITX PC Case.
2. Informazzjoni dwar is-Sigurtà
Osserva l-prekawzjonijiet ta' sigurtà li ġejjin waqt l-installazzjoni u t-tħaddim:
- Dejjem skonnettja l-provvista tal-enerġija mis-sokit tal-ħajt qabel ma tinstalla jew tneħħi xi komponenti.
- Ilbes ċinga tal-polz anti-statika biex tevita ħsara minn skarika elettrostatika (ESD) lil komponenti sensittivi.
- Handle components carefully to avoid physical damage.
- Kun żgur li jkun hemm ventilazzjoni xierqa madwar il-kaxxa tal-PC biex tevita li tissaħħan iżżejjed.
- Żomm il-kaxxa 'l bogħod minn likwidi u umdità eċċessiva.
- Do not attempt to modify the case structure, as this may void your warranty and pose safety risks.
3. Kontenut tal-Pakkett
Ivverifika li l-komponenti kollha huma preżenti fil-pakkett:
- Fractal Design Define 7 Nano PC Case
- Accessory Box (screws, zip ties, standoffs, cleaning cloth)
- Manwal għall-Utent (dan id-dokument)
- Pre-installed fans (Dynamic X2 GP-12/GP-14, quantity may vary)

Figura 2: Sploda view showing the various removable components of the Define 7 Nano case.
4. Konfigurazzjoni u Installazzjoni tal-Komponenti
4.1. Preparazzjoni
- Iftaħ il-Kaxxa: Neħħi l-kaxxa mill-imballaġġ tagħha bir-reqqa.
- Neħħi l-Panewijiet tal-Ġnub: The side panels are secured with captive thumbscrews. Loosen the thumbscrews and slide the panels backward to remove them.
- Remove Top Panel (Optional): The top panel can be removed for easier access during installation or for enhanced airflow. Press the release button at the rear of the top panel and lift it off.
- Remove Front Panel (Optional): The front panel can be carefully pulled off from the bottom for access to front fan mounts and dust filters.
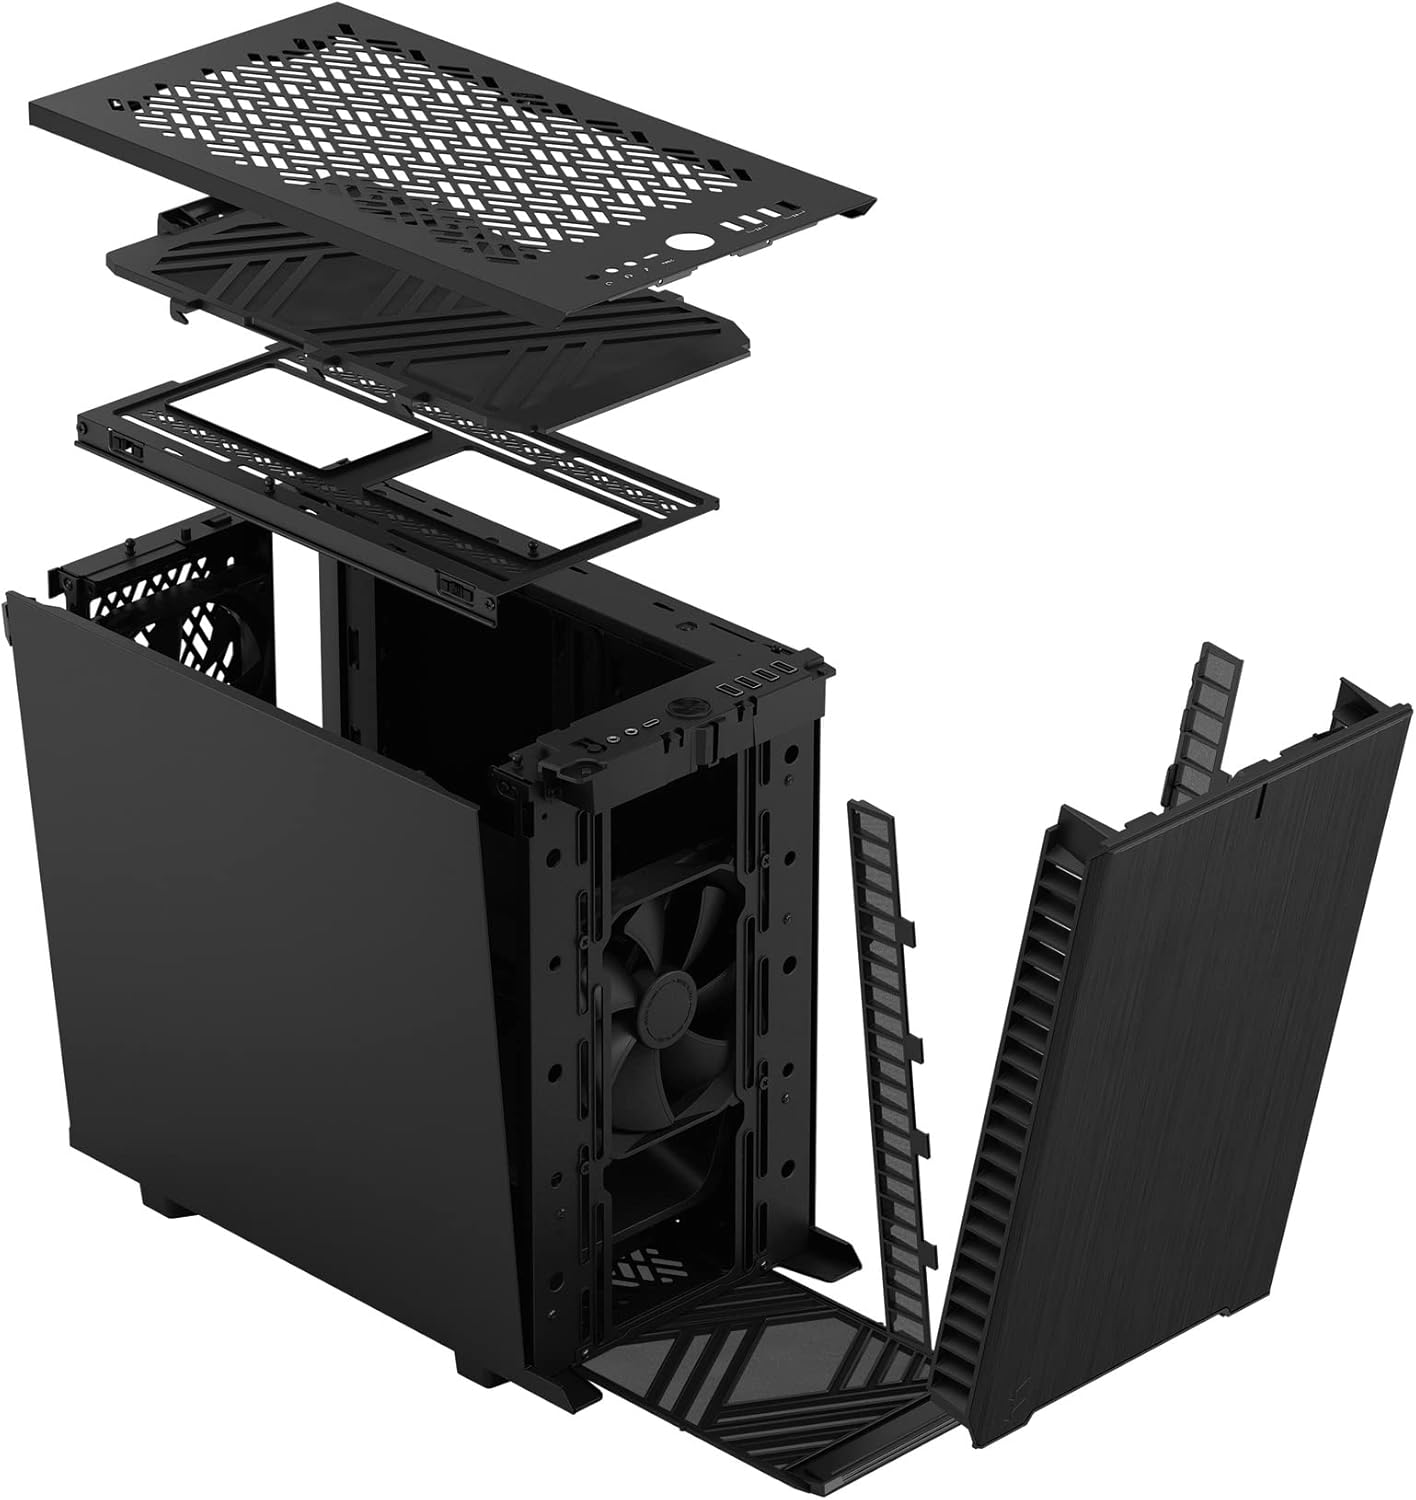
Figura 3: Sploda view illustrating the removal process for the front and top panels.
4.2. Installazzjoni tal-Motherboard
The Define 7 Nano supports Mini ITX motherboards.
- Installa l-I/O Shield: Jekk il-motherboard tiegħek teħtieġ I/O shield, installah fil-ftuħ ta' wara tal-kaxxa qabel ma twaħħal il-motherboard.
- Pożizzjoni tal-Motherboard: Align your Mini ITX motherboard with the pre-installed standoffs inside the case.
- Motherboard Sikura: Use the provided screws from the accessory box to secure the motherboard to the standoffs.
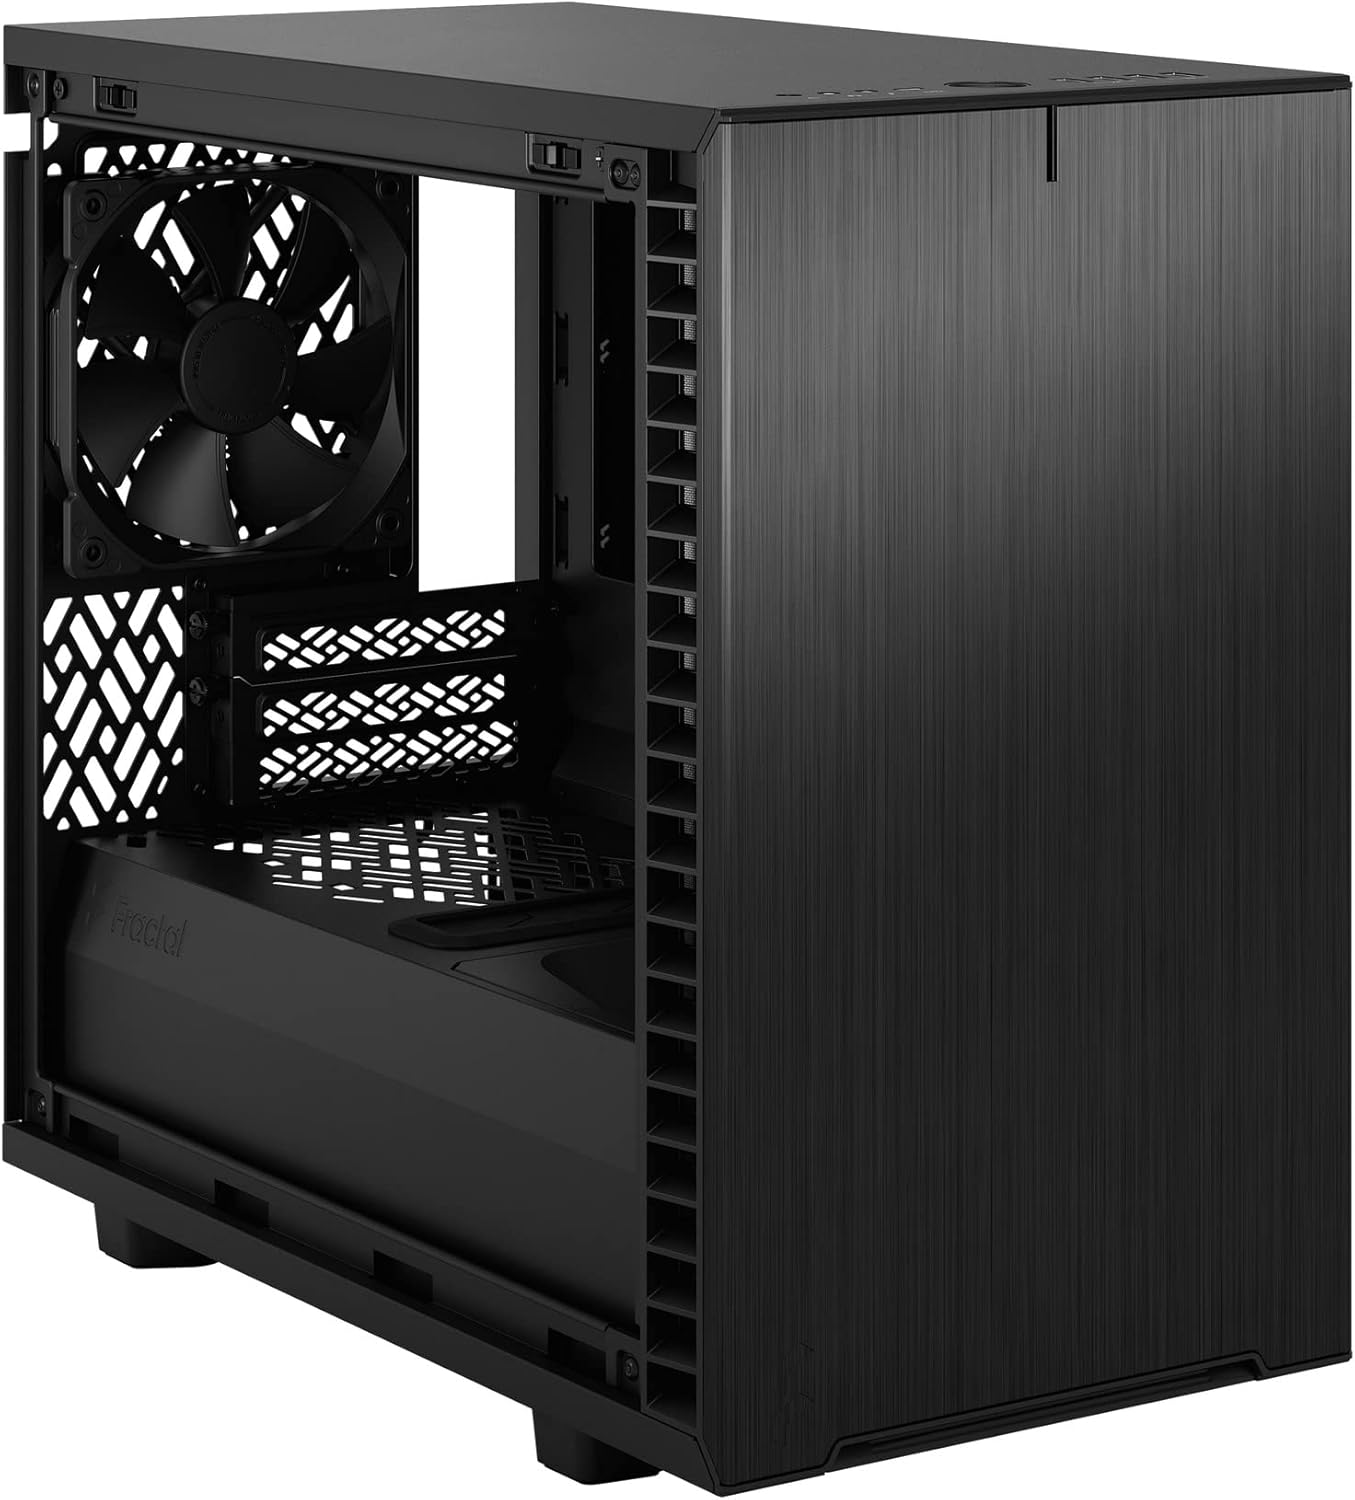
Figura 4: Intern view of the case, highlighting the motherboard mounting area and fan locations.
4.3. Installazzjoni tal-Unità tal-Provvista tal-Enerġija (PSU)
The Define 7 Nano supports ATX PSUs.
- Mount PSU Bracket: Attach the PSU mounting bracket to your power supply using the screws provided with the PSU.
- Slide PSU into Case: Slide the PSU with the attached bracket into the rear of the case.
- PSU Sikura: Secure the PSU bracket to the case using the thumbscrews.
4.4. Installazzjoni tad-Drajv tal-Ħażna
Il-kaxxa tappoġġja SSDs ta' 2.5" u HDDs ta' 3.5".
- 2.5" Drives: Mount 2.5" drives to the dedicated SSD brackets located behind the motherboard tray or on the PSU shroud. Secure with screws.
- 3.5" Drives: Install 3.5" drives into the drive cage located beneath the PSU shroud. Secure with screws.
4.5. Installazzjoni tal-Karta tal-Grafika (GPU)
- Neħħi l-Għotjien tas-Slott tal-PCIe: Neħħi l-għata meħtieġa tas-slott tal-PCIe minn wara tal-kaxxa.
- Daħħal il-GPU: Carefully insert your graphics card into the primary PCIe slot on the motherboard.
- GPU Sikura: Secure the graphics card to the case using the thumbscrews or standard screws.
4.6. Cooling System Installation (Fans/Radiators)
The Define 7 Nano offers flexible cooling options.
- Fannijiet ta' quddiem: Up to two 120/140mm fans or a 240/280mm radiator can be installed at the front.
- Fannijiet ta' Fuq: Up to two 120/140mm fans or a 240mm radiator can be installed at the top (requires removing the solid top panel and installing the ventilated top panel).
- Fann ta' wara: One 120mm fan can be installed at the rear.
- Bottom Fan: One 120mm fan can be installed at the bottom.
Ensure fans are oriented correctly for optimal airflow (intake or exhaust).
4.7. Ġestjoni tal-Kejbil
The case features routing channels and Velcro straps behind the motherboard tray for organized cable management.
- Kejbils tar-Rotot: Pass power and data cables through the rubber grommets to the back of the motherboard tray.
- Kejbils siguri: Use the pre-installed Velcro straps and included zip ties to bundle and secure cables.

Figura 5: Intern ta' wara view demonstrating the cable management system with Velcro straps.
4.8. Konnessjonijiet tal-Panel ta' Quddiem
Qabbad il-kejbils tal-pannell ta' quddiem mal-headers korrispondenti fuq il-motherboard tiegħek:
- Power Button (PWR SW)
- Reset Button (RESET SW)
- Power LED (PWR LED)
- HDD Activity LED (HDD LED)
- Header USB 3.0
- USB Type-C Header (if applicable)
- HD Audio Header
Refer to your motherboard manual for exact header locations.
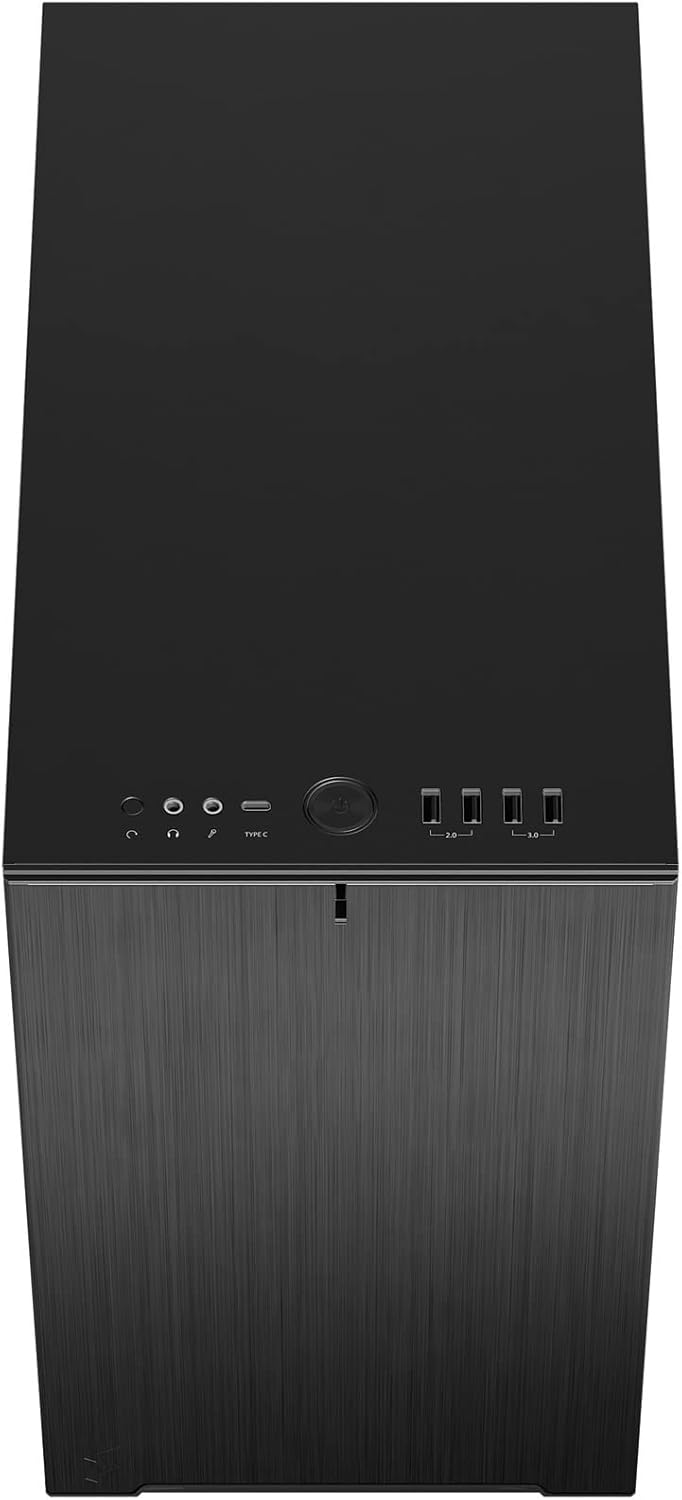
Figura 6: Minn fuq 'il quddiem view displaying the front I/O panel with USB ports, audio jacks, and power button.
5. Istruzzjonijiet Operattivi
5.1. Tixgħil / Mitfi
- Qawwa Mixgħul: Agħfas il-buttuna tal-qawwa li tinsab fuq il-pannell tal-I/O ta' quddiem.
- Itfi: Initiate a shutdown from your operating system. Alternatively, press and hold the power button for 5 seconds for a forced shutdown.
5.2. Using Front Panel Ports
Il-pannell tal-I/O ta' quddiem jipprovdi aċċess konvenjenti għal:
- Portijiet USB 3.0: Għal trasferiment ta' dejta b'veloċità għolja ma' apparati kompatibbli.
- Port USB tat-Tip Ċ: For modern devices requiring a Type-C connection.
- Ġakki tal-Awdjo: Għall-konnessjoni ta' headphones u mikrofoni.
6. Manutenzjoni
Manutenzjoni regolari tgħin biex tiżgura prestazzjoni ottimali u lonġevità tal-komponenti tal-PC tiegħek.
6.1. Tindif tal-Filtru tat-Trab
The Define 7 Nano is equipped with easily removable dust filters to prevent dust buildup inside the case.
- Filtru ta 'quddiem: Can be accessed by removing the front panel.
- Filtru ta' Fuq: Located beneath the ventilated top panel (if installed).
- Filtru tal-qiegħ: Slides out from the front of the case.
Clean filters regularly (e.g., monthly) by rinsing them with water and allowing them to dry completely, or by using a soft brush or compressed air.
6.2. Tindif Ġenerali
- Uża artab, damp cloth to wipe down the exterior surfaces of the case.
- Evita li tuża kimiċi ħarxa jew materjali li joborxu li jistgħu jagħmlu ħsara lill-finitura.
- For interior cleaning, use compressed air to remove dust from components. Ensure the system is powered off and unplugged.
7 Issolvi l-problemi
Din it-taqsima tindirizza kwistjonijiet komuni li tista’ tiltaqa’ magħhom.
7.1. Bla Enerġija / Is-Sistema Mhux Qed Tibda
- Iċċekkja l-Konnessjonijiet tal-Enerġija: Ensure the PSU is properly connected to the wall outlet and the power switch on the PSU is in the 'ON' position. Verify all internal power cables (24-pin ATX, 8-pin CPU, PCIe, SATA) are securely connected.
- Intestaturi tal-Panel ta' Quddiem: Double-check that the power button header (PWR SW) is correctly connected to the motherboard.
- Motherboard/CPU: Kun żgur li s-CPU u r-RAM huma mqiegħda sew.
7.2. Storbju Eċċessiv
- Ħoss tal-fann: Check if any fan cables are obstructing fan blades. Ensure fans are securely mounted. Consider adjusting fan speeds in your motherboard's BIOS/UEFI or operating system.
- Vibrazzjoni: Ensure all components (PSU, drives, GPU) are securely fastened to prevent rattling.
7.3. Is-sħana żejda
- Fluss tal-arja: Verify that fans are oriented correctly (intake/exhaust) and that there is adequate airflow.
- Filtri tat-Trab: Clean dust filters regularly to prevent restricted airflow.
- Pejst Termali: Ensure CPU cooler has proper thermal paste application.
8. Speċifikazzjonijiet
| Karatteristika | Speċifikazzjoni |
|---|---|
| Isem tal-Mudell | Define 7 Nano |
| Numru tal-Mudell | FD-C-DEF7N-01 |
| Tip ta' Każ | Mini-Torri |
| Kompatibbiltà tal-motherboard | Mini ITX |
| Dimensjonijiet (L x W x H) | Madwar 18.74 x 11.38 x 17.91 pulzieri (Pakkett) |
| Piż | Appross. 18.37 liri |
| Materjal | Aluminju |
| Kulur | Iswed Solidu |
| Portijiet I / O ta 'quddiem | 5x USB 3.0, Audio In/Out, Power Button |
| Drive Bays | 2.5" SSD, 3.5" HDD (specific quantities vary by configuration) |
| Metodu tat-tkessiħ | Arja |
| Fannijiet installati minn qabel | Dynamic X2 GP-12 (rear), Dynamic X2 GP-14 (front) |
9. Garanzija u Appoġġ
Fractal Design products are manufactured to the highest quality standards and come with a limited warranty. For detailed warranty information, please refer to the official Fractal Design webis-sit jew il-karta tal-garanzija inkluża mal-prodott tiegħek.
For technical support, troubleshooting assistance, or to inquire about replacement parts, please visit the official Fractal Design support page:
www.fractal-design.com/support/
Please have your product model number (FD-C-DEF7N-01) and proof of purchase ready when contacting support.