Introduzzjoni
This manual provides comprehensive instructions for the operation and maintenance of your Andoer Portable Digital Camera. Designed for ease of use, this compact camera features a 48MP image sensor, 2.7K video recording capabilities, and a 2.88-inch IPS display. It includes advanced functions such as 16X digital zoom, auto focus, self-timer, face detection, and anti-shaking technology, making it ideal for capturing high-quality photos and videos.

Figure 1: Andoer Portable Digital Camera (Pink)
This image displays the front and back of the pink Andoer Portable Digital Camera. The front shows the lens, flash, and "Andoer" branding, along with "48.0 MEGA PIXELS" and "2.7K". The back features the 2.88-inch IPS screen, which is displaying a vibrant image of a person. Also visible are the control buttons and a 32GB SD card and two batteries, indicating included accessories.
Il-karatteristiċi ewlenin jinkludu:
- 48 Megapixel still image resolution
- 2.7K reġistrazzjoni tal-vidjo
- Zoom Diġitali 16X for capturing distant subjects
- Skrin IPS ta '2.88 pulzieri għal ċar viewing
- Auto Focus for sharp images
- Sejbien tal-wiċċ u Tbissima Qbid for intelligent photography
- Support for up to 128GB Extended Memory (SD/MMC card)
- Mibnija fil- Kontra t-Tħawwid funzjoni

Figura 2: Karatteristiċi Ewlenin Aktar minnview
This image visually summarizes the main features of the camera using icons and text: 48 Mega Pixel, 2.7K Video, 16X Powerful Zoom, Anti-shaking, 2s/5s/10s Self-timer, 2.88in IPS Screen, 128GB Extended Memory, and Face Detection. The camera is shown in the foreground with a group of smiling people in the background, suggesting its use for social photography.
Setup
Before using your camera, please ensure it is properly set up. The package includes the digital camera, USB cable, strap, carrying pouch, two batteries, and a user manual.
1. Installazzjoni u Iċċarġjar tal-batterija
The camera is powered by a rechargeable lithium battery. Two batteries are included for extended use.
- Iftaħ l-għatu tal-kompartiment tal-batterija li jinsab fil-qiegħ tal-kamera.
- Insert the lithium battery, ensuring the correct polarity as indicated inside the compartment.
- Agħlaq l-għatu tal-kompartiment tal-batterija sew.
- To charge the battery, connect the camera to a computer or a power adapter (not included) using the provided USB cable. The charging indicator light will illuminate.
- Charging typically takes a few hours. The indicator light will change or turn off once charging is complete.
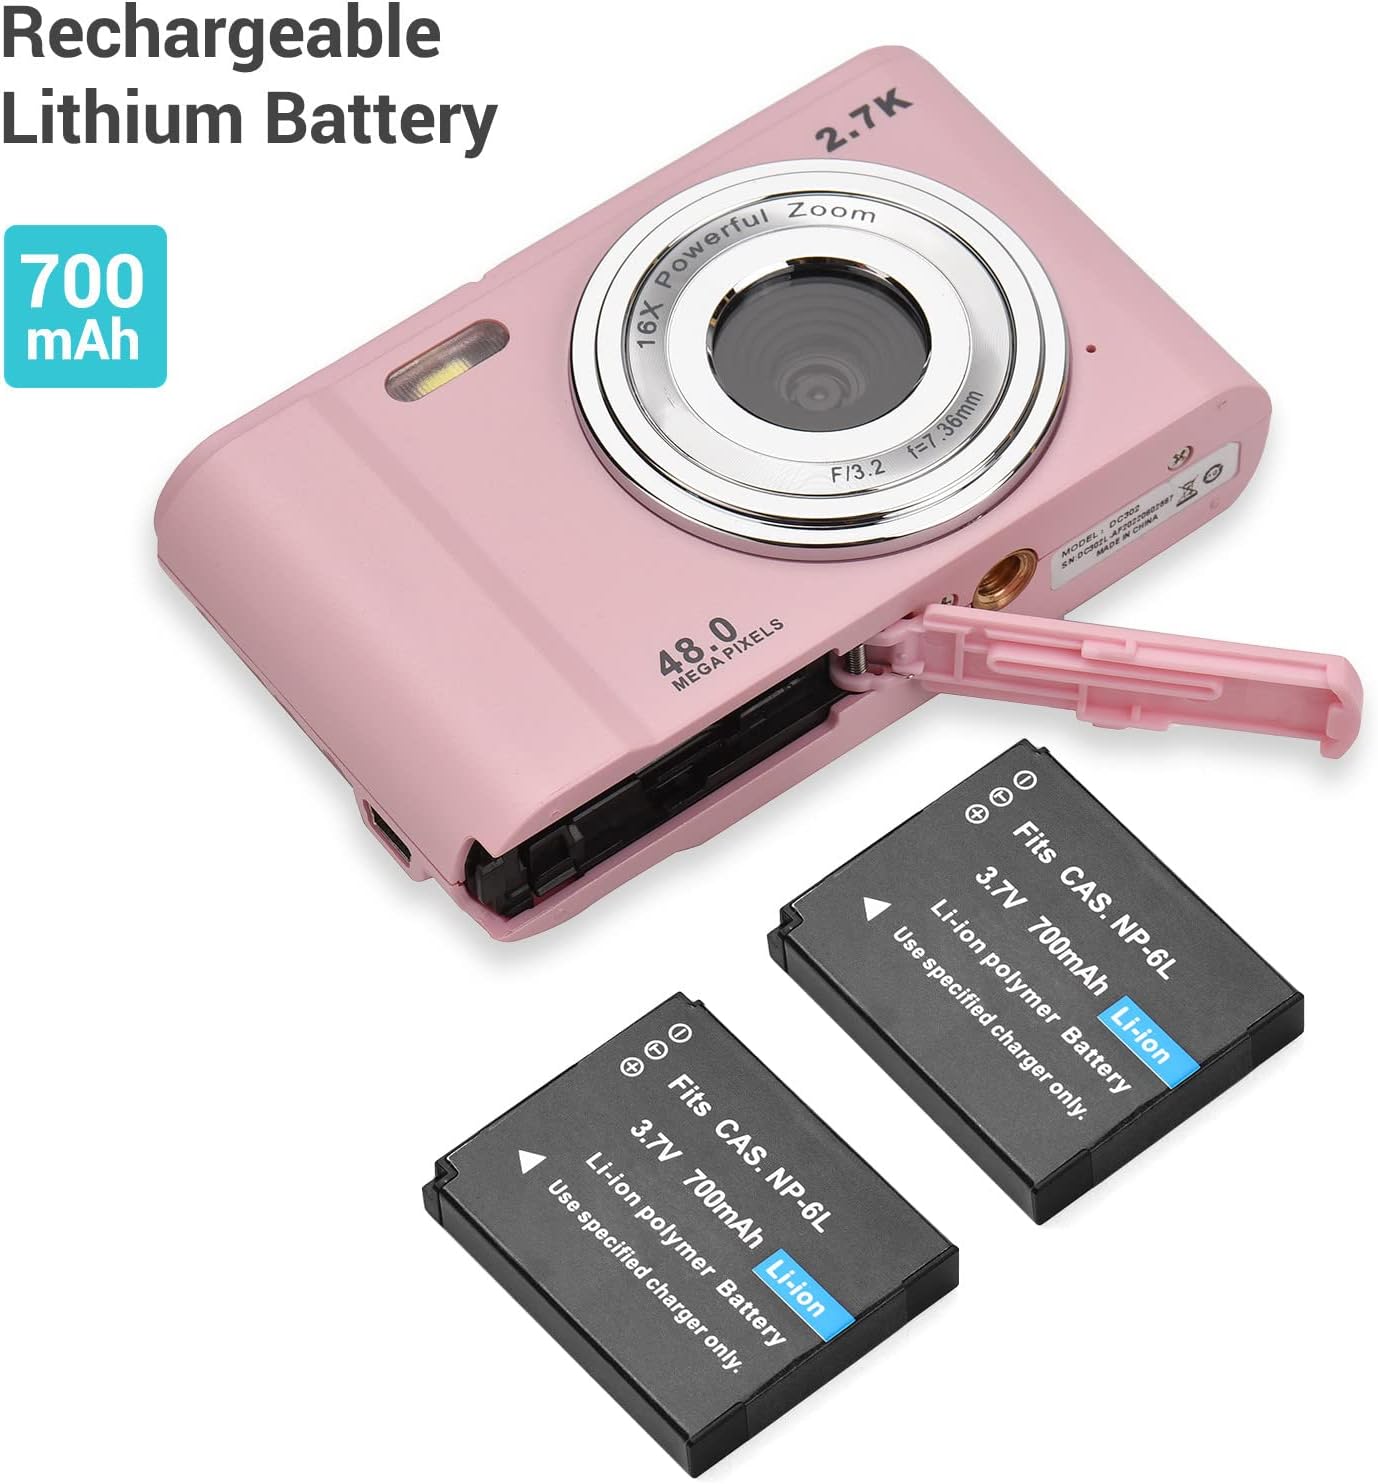
Figura 3: Installazzjoni tal-batterija
This image shows the Andoer Digital Camera with its battery compartment open, revealing the slot for the rechargeable lithium battery. Two 700mAh Li-ion batteries are displayed next to the camera, illustrating the power source and its capacity.
2. Installazzjoni tal-Kard tal-Memorja
The camera supports SD memory cards and MMC cards from 4GB to 128GB. A memory card is required to save photos and videos.
- Locate the memory card slot, usually next to the battery compartment or on the side of the camera.
- Insert the SD/MMC card into the slot with the metal contacts facing the correct direction (refer to the diagram near the slot). Push until it clicks into place.
- To remove the card, gently push it in again until it clicks, and it will spring out.
Figure 4: Memory Card and Accessories
This image highlights the camera's accessories, specifically a 32GB SD memory card and two rechargeable batteries, indicating their importance for camera operation and storage.
Istruzzjonijiet Operattivi
1. Power On/Off
- Biex tixgħel, agħfas u żomm il-buttuna Power.
- To power off, press and hold the Power button again. The camera also features an auto-off function (1min/3min/5min/No Shutdown) to conserve battery.
2. Teħid tar-Ritratti
- Ixgħel il-kamera.
- Ikkwadra r-ritratt tiegħek billi tuża l-iskrin IPS ta' 2.88 pulzieri.
- Press the Shutter button halfway down to allow the camera to auto-focus.
- Press the Shutter button fully down to capture the photo.
3. Reġistrar Vidjows
- Switch to video mode (if applicable, usually a dedicated button or menu option).
- Agħfas il-buttuna tax-Shutter biex tibda tirrekordja. Tajmer se jidher fuq l-iskrin.
- Agħfas il-buttuna Shutter għal darb'oħra biex tieqaf tirrekordja.

Figure 5: Photo and Video Capabilities
This image illustrates the camera's dual capabilities: 2.7K video recording and 48-megapixel still photography. It shows a person skiing (representing video) and a woman posing (representing photos), with the camera positioned below, emphasizing its versatility.
4. Funzjoni taż-Żum
Use the W (Wide) and T (Telephoto) buttons, typically located near the top right of the camera, to adjust the 16X digital zoom.
- Agħfas T to zoom in (telephoto).
- Agħfas W to zoom out (wide-angle).

Figure 6: 16X Powerful Zoom
This image demonstrates the camera's 16X powerful digital zoom capability. It shows a close-up shot of an insect on a leaf, contrasted with a wider view of the same scene as seen on the camera's screen, highlighting the zoom's effectiveness.
5. Self-Timer
The camera offers 2s, 5s, and 10s self-timer options for delayed shooting.
- Access the self-timer setting through the camera's menu.
- Select your desired delay (2s, 5s, or 10s).
- Press the Shutter button. The camera will count down before taking the photo.
6. Smart Detection (Face Detection & Smile Capture)
The camera can automatically detect faces and capture photos when a smile is detected.
- Enable Face Detection and Smile Capture in the camera settings.
- When enabled, the camera will automatically focus on faces and trigger the shutter when a smile is detected, ensuring well-composed and joyful portraits.

Figure 7: Smart Detection Features
This image illustrates the camera's "Smart Detection" capabilities, specifically Face Detection and Smile Capture. The camera's screen displays a family photo, and icons below represent these intelligent features, indicating the camera's ability to automatically optimize shots for portraits.
7. Konnessjoni ma' Kompjuter
You can transfer photos and videos to your computer using the provided USB cable.
- Kun żgur li l-kamera tkun mixgħula.
- Connect one end of the USB cable to the camera's USB port and the other end to your computer.
- The camera will appear as a removable disk drive on your computer. You can then access and transfer your files.
Manutenzjoni
Proper care and maintenance will extend the life of your Andoer Digital Camera.
- Tindif tal-Lenti u l-Iskrin: Use a soft, lint-free cloth specifically designed for optics. Do not use abrasive cleaners or solvents.
- Ħażna: When not in use for extended periods, remove the battery and store the camera in a cool, dry place, away from direct sunlight and extreme temperatures.
- Water and Dust: This camera is not waterproof or dustproof. Avoid exposure to water, high humidity, and dusty environments.
- Kura tal-batterija: Fully charge batteries before first use. Do not expose batteries to high temperatures or dispose of them in fire. Recycle used batteries according to local regulations.
Issolvi l-problemi
Jekk tiltaqa' ma' problemi bil-kamera tiegħek, jekk jogħġbok irreferi għall-problemi u s-soluzzjonijiet komuni li ġejjin:
| Problema | Kawża Possibbli | Soluzzjoni |
|---|---|---|
| Il-kamera ma tixgħelx. | Il-batterija mejta jew imdaħħla ħażin. | Kun żgur li l-batterija tkun iċċarġjata kompletament u mdaħħla bil-polarità korretta. |
| Ma nistax nieħu ritratti/vidjows. | Il-karta tal-memorja hija mimlija, mhux imdaħħla, jew korrotta. | Insert a memory card, delete unnecessary files, jew ifformattja l-kard (dan se jħassar id-dejta kollha). |
| L-immaġini huma mċajpra. | Lens is dirty, insufficient light, or camera shake. | Clean the lens, use flash if needed, or enable anti-shaking function. Hold the camera steady. |
| Il-kamera tiffriża. | Glitch tas-softwer jew batterija baxxa. | Remove and reinsert the battery to reset. Ensure battery is charged. |
| Computer does not recognize camera. | USB cable issue or driver problem. | Try a different USB port or cable. Ensure camera is powered on when connected. |
Speċifikazzjonijiet
Detailed technical specifications for the Andoer Portable Digital Camera:
| Karatteristika | Speċifikazzjoni |
|---|---|
| Wiri | 2.88 inches IPS LCD screen (4:3) |
| Sensor tal-Immaġni | Sensor tal-immaġni CMOS 8MP |
| Proporzjon ta' Riżoluzzjoni tal-Immaġini | Max. 48MP |
| Daqs tal-Film | 2688*1520 2.7K, 1920*1080 HD, 1280*720 HD, 640*480 |
| Distanza Fokali | f=7.36mm |
| Apertura | F/3.2 |
| Zoom Diġitali | 16X |
| Appoġġ tal-Kard tal-Memorja | SD memory card and MMC card (4GB to 128GB) |
| File Format | JPG, AVI |
| Self-timer | 2s / 5s / 10s |
| Bilanċ abjad | Auto/ Daylight/ Cloudy/ Fluorescent/ Tungsten |
| Kumpens ta' Espożizzjoni | -3.0~+3.0 |
| Port USB | USB 2.0 |
| Mitfi awtomatikament | 1min/ 3min/ 5min/ No Shutdown |
| Qawwa | Batterija tal-litju rikarikabbli 700mAh |
| Rekwiżit tas-Sistema Operattiva | Compatible with Windows XP/ Vista/ 7/ 8/ 10; Mac10.2 (Include and later) |
| Dimensjonijiet | 9.6 * 5.6 * 2.5cm / 3.78 * 2.2 * 0.98in |
| Piż Nett | 93g / 3.28oz (with Battery) |
| Immuntar | 1/4 inch thread at the bottom for tripod/monopod |

Figura 8: Dimensjonijiet tal-Prodott
Din l-immaġni tipprovdi deskrizzjoni dettaljata view of the Andoer Digital Camera's dimensions, including its length (9.6cm / 3.78in), width (5.6cm / 2.2in), and thickness (2.5cm / 0.98in). It also highlights the 2.88-inch IPS screen, offering a clear understanding of the camera's compact size.

Figure 9: Universal 1/4 Thread Mounting
This image illustrates the camera's universal 1/4 inch thread mounting point located at its bottom, allowing it to be easily attached to tripods or monopods for stable shooting. The camera is shown mounted on a small tripod, with a close-up inset of the mounting screw hole.
Appoġġ
For further assistance, technical support, or warranty information, please visit the official Andoer store or contact customer service.
Official Andoer Store: Andoer Store on Amazon