
1. Introduzzjoni
This manual provides essential information for the safe and efficient operation of your TechniSat DIGITRADIO 370 IR. Please read these instructions carefully before using the device and retain them for future reference.
2. Istruzzjonijiet tas-Sigurtà
- Tesponix l-apparat għax-xita jew għall-umdità biex tevita nar jew xokk elettriku.
- Do not block ventilation openings. Ensure adequate space around the device for proper airflow.
- Uża biss l-adapter tal-enerġija fornut mal-apparat.
- Evita li tpoġġi l-apparat ħdejn sorsi tas-sħana bħal radjaturi, reġistri tas-sħana, stufi, jew apparat ieħor (inkluż amplifiers) li jipproduċu sħana.
- Ipproteġi l-korda tad-dawl milli timxi fuqha jew maqrusa, partikolarment fil-plakek, ir-reċipjenti tal-konvenjenza, u l-punt fejn joħorġu mill-apparat.
- Aqla’ dan l-apparat waqt maltempati tas-sajjetti jew meta ma jintużax għal perjodi twal ta’ żmien.
- Irreferi l-manutenzjoni kollha lil persunal tas-servizz kwalifikat. Is-servizz huwa meħtieġ meta l-apparat ikun ġie bil-ħsara b'xi mod, bħal korda tal-provvista tal-enerġija jew plagg ikun bil-ħsara, likwidu jkun inxtered jew oġġetti jkunu waqgħu fl-apparat, l-apparat ikun ġie espost għax-xita jew umdità, ma jaħdimx b'mod normali , jew twaqqgħet.
3. Kontenut tal-Pakkett
Ivverifika li l-oġġetti kollha huma preżenti fil-pakkett:
- TechniSat DIGITRADIO 370 IR (Black)
- Kontroll mill-bogħod
- Adapter tal-Enerġija
- Manwal għall-Utent (dan id-dokument)
4. Kontrolli u Konnessjonijiet

Figura 4.1: Il-Panel ta' Quddiem Fuqview
The image above displays the front panel of the DIGITRADIO 370 IR, featuring the central display, volume and tuning/OK rotary knobs, and various control buttons such as Power, Mode, Preset, Scan, and Back.
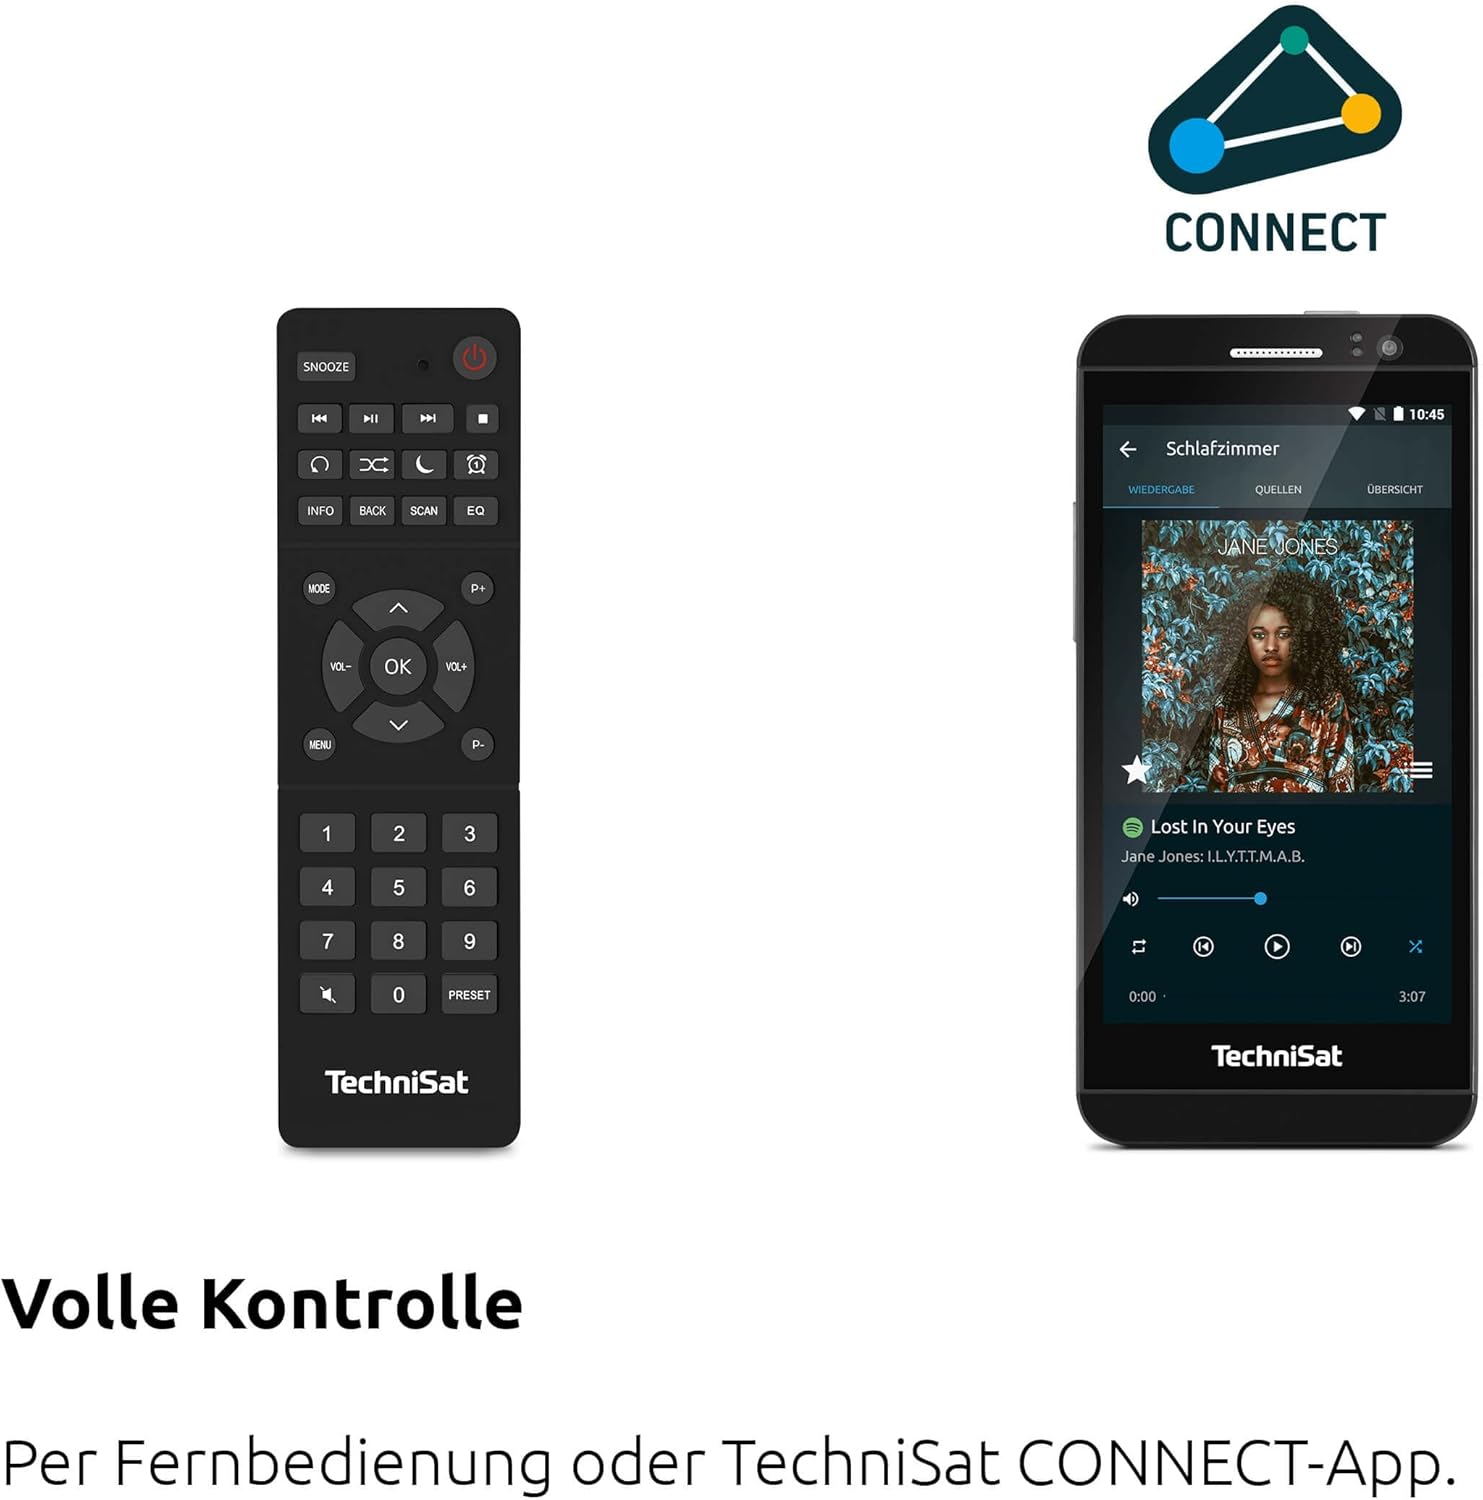
Figure 4.2: Remote Control and App Interface
This image shows the included remote control with buttons for power, snooze, mode, info, scan, EQ, preset numbers, volume, and navigation. It also illustrates the TechniSat CONNECT app interface on a smartphone, providing an alternative control method.
Kontrolli tal-Panew ta' Quddiem:
- Buttuna tal-Qawwa: Ixgħel/itfi l-apparat.
- Buttuna tal-Modalità: Switches between DAB+, FM, Internet Radio, Bluetooth, AUX, and USB modes.
- Buttuna Issettjata minn qabel: Accesses stored radio station presets.
- Buttuna tal-Volum: Jaġġusta l-livell tal-ħruġ tal-awdjo.
- Tuning/OK Knob: Jinnaviga l-menus u jikkonferma l-għażliet.
- Buttuna tal-iskannjar: Initiates station scanning in radio modes.
- Buttuna Lura: Jirritorna għall-menu jew l-iskrin preċedenti.
- Wiri: 2.4-inch TFT color display for information and menu navigation.
Konnessjonijiet tal-Panew ta' wara:
- Input ta' Enerġija: Qabbad l-adapter tal-enerġija fornut.
- AUX-IN: Jack ta' 3.5mm għall-konnessjoni ta' apparati awdjo esterni.
- Jack tal-headphone: Jack ta' 3.5mm għal smigħ privat.
- Port USB: For MP3 playback from USB drives and charging external devices.
5. Setup
5.1 Qawwa Inizjali
- Place the DIGITRADIO 370 IR on a stable, flat surface.
- Extend the telescopic antenna for optimal DAB+ and FM reception.
- Connect the power adapter to the DC IN port on the rear of the radio and then to a wall outlet.
- Press the Power button on the front panel or remote control to turn on the device.
- Segwi l-istruzzjonijiet fuq l-iskrin għas-setup inizjali, inkluż l-għażla tal-lingwa u l-konfigurazzjoni tan-netwerk.
5.2 Network Configuration (WLAN)
To access Internet Radio and app control, the device must be connected to a Wi-Fi network.
- Navigate to the 'Settings' menu using the Tuning/OK knob.
- Agħżel 'Netwerk' u mbagħad 'Setup tal-Wi-Fi'.
- The radio will scan for available networks. Select your desired network from the list.
- Enter the Wi-Fi password using the on-screen keyboard and the Tuning/OK knob.
- Ikkonferma l-konnessjoni. Ladarba tkun konnessa, l-ikona tal-Wi-Fi tidher fuq id-displej.
6. Istruzzjonijiet Operattivi

Figure 6.1: Radio Diversity
This image highlights the multiple radio reception options available: DAB+ Digital Radio, Internet Radio via WLAN, and UKW/FM analog radio.
Radju 6.1 DAB+
- Press the 'Mode' button until 'DAB+' is selected.
- The radio will automatically scan for available DAB+ stations during the first use. To initiate a scan manually, press the 'Scan' button.
- Use the Tuning/OK knob to scroll through the list of available stations. Press the knob to select a station.
- To save a station as a preset, press and hold the 'Preset' button, then select a preset number and confirm.
6.2 Radju FM
- Press the 'Mode' button until 'FM' is selected.
- Press the 'Scan' button to automatically search for and store FM stations.
- Alternatively, use the Tuning/OK knob to manually tune to a frequency.
- To save a station as a preset, press and hold the 'Preset' button, then select a preset number and confirm.
6.3 Radju bl-Internet
Kun żgur li r-radju huwa konness ma' netwerk Wi-Fi (ara t-Taqsima 5.2).
- Press the 'Mode' button until 'Internet Radio' is selected.
- Tista' tfittex l-istazzjonijiet skont il-post, il-ġeneru, jew tfittex stazzjonijiet speċifiċi.
- Use the Tuning/OK knob to navigate and select stations.
- To save a station as a preset, press and hold the 'Preset' button, then select a preset number and confirm.
6.4 Streaming tal-Awdjo Bluetooth

Figure 6.2: Bluetooth Audio Streaming
This image demonstrates a smartphone wirelessly streaming music to the radio via Bluetooth, indicating the device's capability for wireless music enjoyment.
- Press the 'Mode' button until 'Bluetooth' is selected. The radio will enter pairing mode.
- Fuq l-ismartphone tiegħek jew apparat ieħor Bluetooth, attiva l-Bluetooth u fittex apparati disponibbli.
- Select 'DIGITRADIO 370 IR' from the list to pair.
- Once paired, you can play audio from your device through the radio.
6.5 Daqq u Iċċarġjar tal-USB

Figure 6.3: USB Playback and Charging Function
This image illustrates the dual functionality of the USB port: connecting USB storage devices for MP3 playback and using the port to charge compatible devices like smartphones.
- Daħħal USB flash drive li jkun fih MP3 files fil-port USB fuq wara tar-radju.
- Press the 'Mode' button until 'USB' is selected.
- Use the Tuning/OK knob to navigate through folders and select tracks for playback.
- The USB port can also be used to charge compatible smartphones and other devices. Connect your device's charging cable to the USB port.
6.6 Iċċarġjar bla fili

Figure 6.4: Wireless Charging Function
This image shows a hand placing a smartphone on the top surface of the radio, demonstrating the wireless charging capability for compatible smartphones.
The DIGITRADIO 370 IR features a wireless charging surface on its top panel.
- Ensure your smartphone or device supports Qi wireless charging.
- Place your compatible device centrally on the designated wireless charging area on top of the radio.
- The device should indicate that charging has begun.
6.7 Alarm Clock, Sleep Timer, and Snooze
The radio includes an alarm clock, sleep timer, and snooze function.
- Arloġġ ta 'allarm: Set up to two independent alarms with customizable sources (buzzer, DAB+, FM, Internet Radio) and volume. Access via the 'Settings' menu.
- Timer ta 'l-Irqad: Allows the radio to turn off automatically after a set period (e.g., 15, 30, 60 minutes). Access via the 'Settings' menu.
- Tnaqqis When an alarm sounds, press the 'Snooze' button on the remote control to temporarily pause the alarm.
6.8 App Control (UNDOK App)
The DIGITRADIO 370 IR can be controlled via the UNDOK app on your smartphone or tablet.
- Download the 'UNDOK' app from your device's app store.
- Kun żgur li l-ismartphone/tablet tiegħek u r-radju huma konnessi mal-istess netwerk Wi-Fi.
- Open the UNDOK app; it should automatically detect your DIGITRADIO 370 IR.
- You can now control all major functions of the radio, including mode selection, station tuning, volume, and presets, directly from the app.
7. Manutenzjoni
7.1 Tindif
- Dejjem aqla’ l-apparat mill-plagg tal-elettriku qabel ma tnaddaf.
- Uża drapp artab u niexef biex timsaħ l-uċuħ ta’ barra.
- Do not use liquid cleaners, aerosol cleaners, or strong chemical solvents, as these may damage the finish.
7.2 Ħażna
If storing the device for an extended period, unplug it from the power source and store it in a cool, dry place, away from direct sunlight and extreme temperatures.
8 Issolvi l-problemi
| Problema | Kawża Possibbli | Soluzzjoni |
|---|---|---|
| Ebda qawwa | Kejbil tal-enerġija mhux imqabbad; Sokit tal-enerġija difettuż | Iċċekkja l-konnessjoni tal-kejbil tal-enerġija; Ipprova sokit tal-enerġija differenti. |
| L-ebda ħoss | Volum baxx wisq; Mute attivat; Sors mhux korrett magħżul | Increase volume; Check if mute is active; Select the correct input source (DAB+, FM, Internet, Bluetooth, USB, AUX). |
| Riċeviment tar-radju fqir (DAB+/FM) | Antenna not extended; Weak signal; Interference | Fully extend the telescopic antenna; Reposition the radio; Avoid placing near other electronic devices. |
| Internet Radio not working | No Wi-Fi connection; Incorrect Wi-Fi password; Router issue | Check Wi-Fi connection in settings; Re-enter Wi-Fi password; Restart your Wi-Fi router. |
| Tqabbil Bluetooth falla | Radio not in pairing mode; Device too far; Bluetooth off on source device | Ensure radio is in Bluetooth mode; Move devices closer; Enable Bluetooth on your source device. |
| Iċċarġjar bla fili ma jaħdimx | Device not Qi-compatible; Device not placed correctly; Phone case too thick | Verify device supports Qi charging; Adjust device position on charging pad; Remove thick phone cases. |
9. Speċifikazzjonijiet
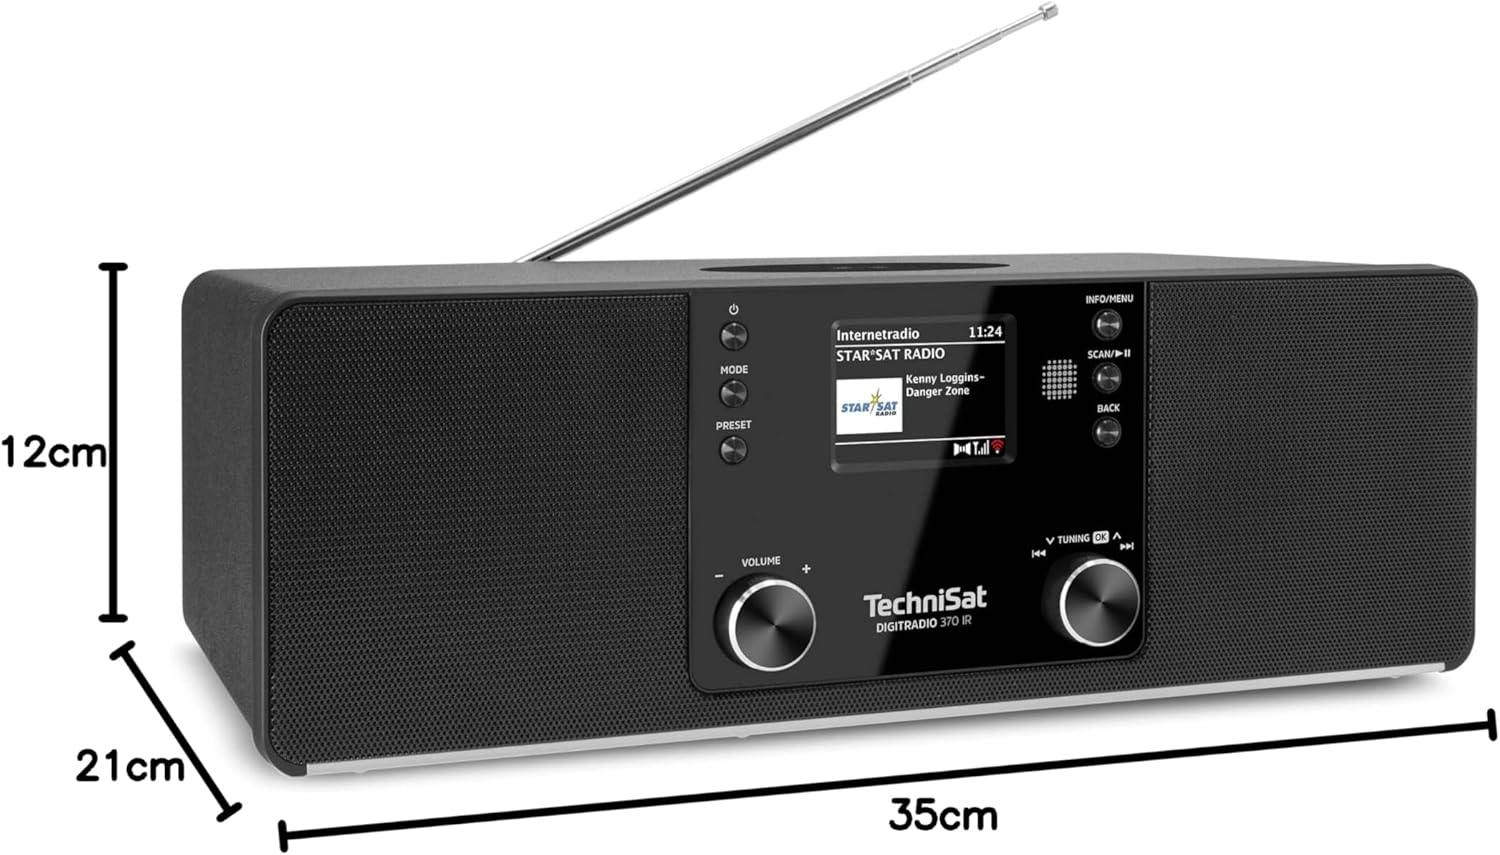
Figura 9.1: Dimensjonijiet tal-Prodott
This image provides a visual representation of the radio's dimensions: 35 cm (length), 12 cm (height), and 21 cm (depth).
| Karatteristika | Dettall |
|---|---|
| Numru tal-Mudell | 0000/3971 |
| Brand | TechniSat |
| Baned tar-Radju Appoġġjati | DAB+, FM, Radju tal-Internet |
| Teknoloġija tal-Konnettività | Bluetooth, USB, Wireless-Charging, WLAN (2.4 GHz & 5 GHz) |
| Karatteristiċi Speċjali | Wireless Charging, Bluetooth Audio Streaming, USB Playback & Charging, Alarm Clock, Sleep Timer, Snooze, App Control (UNDOK) |
| Modalità tal-Ħruġ tal-Awdjo | Stereo |
| Qawwa tal-Ħruġ tal-Ispeaker | 2 x 5 Watts RMS (10 Watts total) |
| Tip ta 'Wiri | LCD tal-Kulur TFT ta '2.4 pulzieri |
| Sors tal-Enerġija | Electric Cord (230 Volts, 60 Hz) |
| Dimensjonijiet (L x W x H) | 35 x 21 x 12 ċm |
| Piż | 2.7 Kilogrammi |
| Materjal tad-Djar | Injam |
| Apparati Kompatibbli | Smartphone, MP3 player, tablet, laptop, headphones |
| Interfaces | 3.5 mm Audio (AUX-IN), USB 2.0, 3.5 mm Headphone |
10. Garanzija u Appoġġ
10.1 Informazzjoni dwar Garanzija
This product comes with a 2-year warranty (Gewährleistung) from the date of purchase. Please retain your proof of purchase for any warranty claims. The warranty covers manufacturing defects and malfunctions under normal use. It does not cover damage caused by misuse, accidents, unauthorized modifications, or normal wear and tear.
10.2 Appoġġ għall-Klijent
For technical assistance, troubleshooting beyond this manual, or warranty inquiries, please contact TechniSat customer support. Refer to the TechniSat official websit għal dettalji ta' kuntatt speċifiċi għar-reġjun tiegħek.
Riżorsi onlajn: Visit the official TechniSat website for updated manuals, FAQs, and support information.


