
ASUS 90MB1C80-M0EAY0
Manwal tal-Utent tal-Motherboard ASUS Prime H610M-A WIFI D4
Model: PRIME H610M-A WIFI D4 | Brand: ASUS
Introduzzjoni
The ASUS Prime H610M-A WIFI D4 is a Mic-ATX motherboard designed to support 12th Generation Intel Processors with the LGA 1700 socket. It features DDR4 memory support, PCIe 4.0, dual M.2 slots, Intel 1Gb Ethernet, WIFI 5, and a variety of display outputs including DisplayPort, HDMI, and D-Sub. This manual provides essential information for setting up, operating, and maintaining your motherboard.

Figure 1: ASUS Prime H610M-A WIFI D4 Motherboard, retail packaging, and included Wi-Fi antenna.
Karatteristiċi ewlenin:
- Sokit tal-Intel LGA 1700: Ready for 12th Gen Intel Processors.
- Tkessiħ Komprensiv: VRM heatsink, PCH heatsink and Fan Xpert 2+.
- Konnettività Ultra-Veloċi: 32Gbps M.2 slot, Intel 1Gb Ethernet, WIFI 5 and USB 3.2 Gen 2 ports.
- Aura Sync RGB: Onboard addressable Gen 2 headers for RGB LED strips, easily synchronized with Aura Sync compatible hardware.
Gwida ta' Setup
This section provides step-by-step instructions for installing your ASUS Prime H610M-A WIFI D4 motherboard and its components into a PC chassis.
1. Motherboard Overview
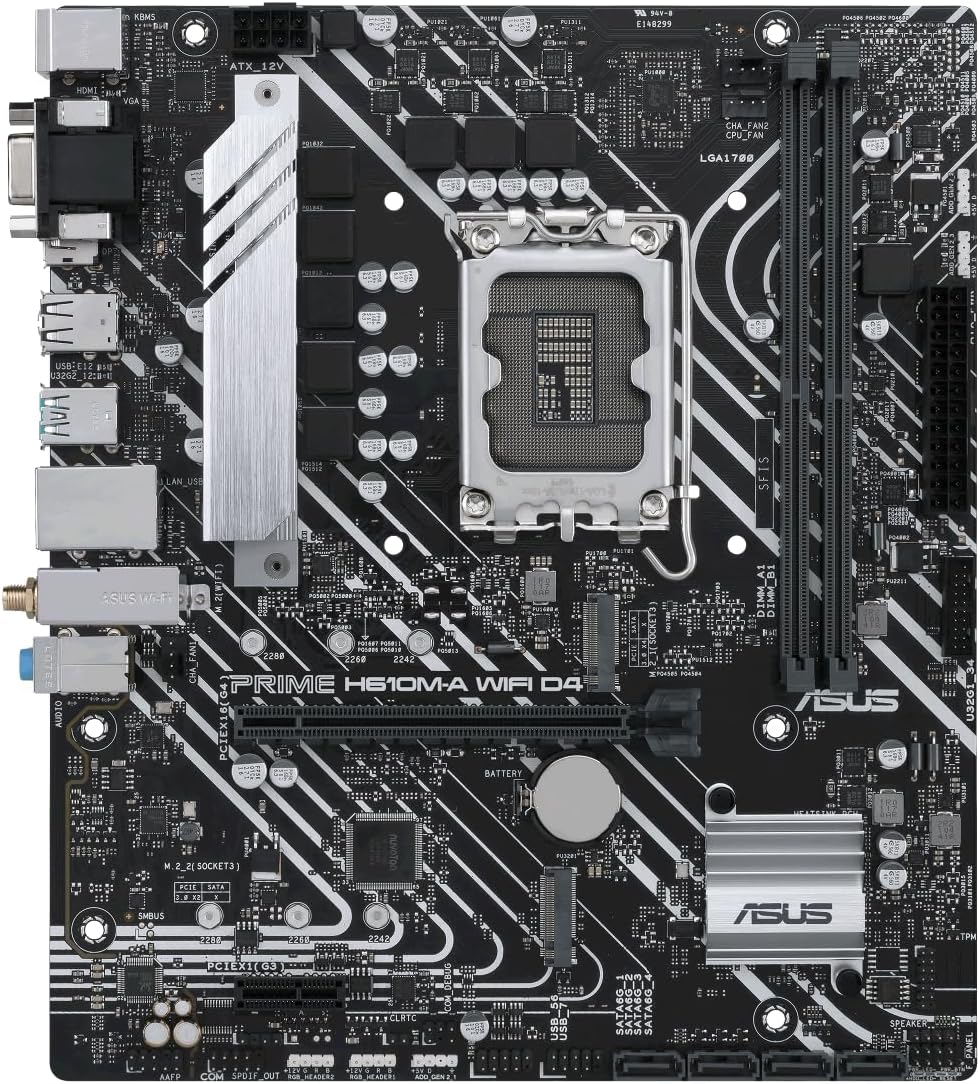
Figure 2: Component layout of the ASUS Prime H610M-A WIFI D4 Motherboard.
Familiarize yourself with the layout of the motherboard, including the CPU socket, DDR4 memory slots, M.2 slots, PCIe slots, and various headers for power and peripherals.
2. Installazzjoni tas-CPU (LGA 1700)
- Carefully open the CPU socket retention lever.
- Allinja l-marka trijangulari fuq is-CPU mal-marka fuq is-sokit.
- Poġġi s-CPU bil-mod fis-sokit mingħajr ma tisforzah.
- Agħlaq il-lieva taż-żamma biex twaħħal is-CPU.
- Applika l-pejst termali u installa l-cooler tas-CPU skont l-istruzzjonijiet tal-manifattur tiegħu.
3. Installazzjoni tal-Memorja (RAM)
- Iftaħ il-klipps fuq iż-żewġt itruf tas-slots tal-memorja DDR4.
- Allinja l-islott fuq il-modulu tal-memorja maċ-ċavetta fl-islott.
- Agħfas sew 'l isfel fuq iż-żewġt itruf tal-modulu tal-memorja sakemm il-klipps jidħlu f'posthom.
4. Installazzjoni tal-SSD M.2
- Sib l-islott(ijiet) tal-M.2 fuq il-motherboard.
- Daħħal l-M.2 SSD fl-islott f'angolu.
- Imbotta bil-mod l-SSD 'l isfel u waħħalha bil-vit M.2 provdut.
5. Installazzjoni tal-Karta PCIe
- Allinja l-karta grafika tiegħek jew karta oħra ta' espansjoni PCIe mas-slott PCIe xieraq.
- Agħfas 'l isfel sew sakemm il-kard tkun imwaħħla sew fl-islott u l-klipp taż-żamma jidħol f'postu.
- Waħħal il-kard max-chassis b'kamin.
6. Konnessjonijiet tal-Enerġija
- Connect the 24-pin ATX power cable from your power supply to the main power connector on the motherboard.
- Connect the 8-pin (or 4+4 pin) CPU power cable to the CPU power connector near the CPU socket.
7. Konnessjonijiet tal-Panel I/O ta' Wara

Figure 3: Rear I/O Panel of the ASUS Prime H610M-A WIFI D4 Motherboard.
Qabbad il-periferali tiegħek mal-portijiet xierqa fuq il-pannell tal-I/O ta' wara:
- Portijiet USB: Għat-tastiera, il-maws, u apparati oħra tal-USB.
- Wiri Outputs: Connect your monitor to DisplayPort, HDMI, or D-Sub.
- Port Ethernet: Connect your network cable for wired internet.
- Ġakki tal-Awdjo: For speakers, headphones, and microphones.
- Konnetturi tal-antenna Wi-Fi: Attach the included Wi-Fi antenna for wireless connectivity.
Istruzzjonijiet Operattivi
Once all components are installed and connected, you can proceed with the initial boot-up and software setup.
1. L-Ibbutjar Inizjali u s-Setup tal-BIOS/UEFI
- Ixgħel is-sistema tiegħek.
- Agħfas il- DEL ċavetta jew F2 ċavetta waqt l-istartjar biex tidħol fl-utilità tas-setup tal-BIOS/UEFI.
- Configure boot order, system time, and other essential settings as needed.
- Issejvja l-bidliet u oħroġ mill-BIOS/UEFI.
2. Installazzjoni tas-Sistema Operattiva
Insert your Windows 10/11 installation media (USB drive or DVD) and follow the on-screen prompts to install your operating system.
3. Installazzjoni tas-sewwieq
After OS installation, install the necessary drivers for your motherboard components. These can typically be found on the ASUS support website for your specific model:
- Sewwieqa taċ-Ċipset
- Intel Graphics Drivers (if using integrated graphics)
- Sewwieq Intel LAN
- Wi-Fi Driver
- Sewwieqa tal-Awdjo
- Sewwieqa USB
4. Konnettività tan-Netwerk
- Wajer: Connect an Ethernet cable to the Intel 1Gb Ethernet port.
- Wireless: Ensure the Wi-Fi antenna is connected. Configure Wi-Fi settings within your operating system.
5. Aura Sync RGB Configuration
If you have Aura Sync compatible RGB LED strips connected to the onboard addressable Gen 2 headers, you can control their lighting effects using the ASUS Aura Sync software, available for download from the ASUS websit.
Manutenzjoni
Manutenzjoni xierqa tiżgura l-lonġevità u l-prestazzjoni ottimali tal-motherboard tiegħek.
- Tneħħija tat-Trab: Naddaf it-trab mill-motherboard u l-komponenti regolarment bl-użu ta' arja kkompressata. Kun żgur li s-sistema tkun mitfija u skonnettjata qabel ma tnaddafha.
- Aġġornamenti tal-BIOS: Iċċekkja l-appoġġ tal-ASUS website periodically for BIOS updates. BIOS updates can improve stability, compatibility, and performance. Follow the instructions provided by ASUS carefully when updating the BIOS.
- Aġġornamenti tas-sewwieq: Żomm is-sewwieqa tiegħek aġġornati biex tiżgura kompatibilità u prestazzjoni ottimali ma' softwer u ħardwer ġdid.
- Kontrolli tal-Konnessjoni: Periodically check all cable connections (power, data, peripherals) to ensure they are secure.
Issolvi l-problemi
Din it-taqsima tindirizza kwistjonijiet komuni li tista’ tiltaqa’ magħhom.
- Ebda Qawwa/Ebda Boot:
- Kun żgur li l-kejbils tal-enerġija kollha (24-pin ATX, 8-pin CPU) huma konnessi sew mal-motherboard u l-provvista tal-enerġija.
- Verify the power supply is switched on.
- Iċċekkja l-konnessjonijiet tal-buttuna tal-enerġija tal-pannell ta' quddiem mal-motherboard.
- Ebda Display:
- Ensure your monitor is connected to the correct display output on the motherboard or graphics card.
- Verify the graphics card (if installed) is properly seated in its PCIe slot and has adequate power.
- Ipprova erġa' poġġi l-moduli tar-RAM f'posthom.
- Instabbiltà/Ħsarat tas-Sistema:
- Check CPU and GPU temperatures. Ensure cooling solutions are functioning correctly.
- Iċċekkja li l-moduli tar-RAM huma installati b'mod korrett u kompatibbli.
- Aġġorna l-BIOS u d-drivers għall-aħħar verżjonijiet.
- Kwistjonijiet ta' Konnettività tan-Netwerk:
- For wired connections, check the Ethernet cable and router/modem.
- For Wi-Fi, ensure the antenna is securely attached and Wi-Fi drivers are installed.
- Erġa' ibda r-router/modem tiegħek.
- Irrisettjar tal-BIOS:
If you encounter issues after changing BIOS settings, you can reset the BIOS to default settings. This can typically be done by:
- Entering the BIOS and selecting the "Load Optimized Defaults" option.
- Clearing the CMOS by briefly removing the CMOS battery (with the system powered off and unplugged) or using the CLRTC jumper on the motherboard (refer to your motherboard diagram for location).
For more detailed troubleshooting or persistent issues, please refer to the comprehensive user manual available on the official ASUS support webis-sit jew ikkuntattja l-appoġġ għall-klijenti tal-ASUS.
Speċifikazzjonijiet
| Karatteristika | Dettall |
|---|---|
| Brand | ASUS |
| Isem tal-Mudell | PRIME H610M-A WIFI D4 |
| Socket tas-CPU | LGA 1700 |
| Proċessuri Kompatibbli | 12th Gen Intel Processors |
| Tip ta' Ċipset | Intel H610 |
| Teknoloġija tal-Memorja RAM | DDR4 |
| Veloċità tal-Arloġġ tal-Memorja | 2133 MHz (Jappoġġja frekwenzi ogħla permezz ta' XMP) |
| Kapaċità tal-Ħażna tal-Memorja (Massima) | 64 GB |
| Dimensjonijiet tal-Prodott | 10.24 x 2.03 x 10.63 pulzieri |
| Piż tal-oġġett | 2.2 liri |
| Pjattaforma | Windows 10 (Windows 11 Ready) |
| Konnettività | Intel 1Gb Ethernet, WIFI 5, USB 3.2 Gen 2 |
| Ħażna | Dual M.2 Slots (32Gbps), SATA 6Gbps |
| Output tal-Grafika | DisplayPort, HDMI, D-Sub |
Garanzija u Appoġġ
ASUS provides comprehensive support for its products. For warranty information, technical assistance, or to download the latest drivers and BIOS updates, please visit the official ASUS support websit.
Appoġġ ASUS Websit: www.asus.com/support/
Please have your product model number (PRIME H610M-A WIFI D4) and serial number ready when contacting support.
Ask a question about this manual
Ask about setup, troubleshooting, compatibility, parts, safety, or missing instructions. Manuals+ will review the question and use this page’s manual context to help answer it.