Introduzzjoni
This manual provides comprehensive instructions for the setup, installation, operation, and maintenance of your Lorex 2K Wireless Smart Video Doorbell, Model B463AJD-E. Please read this manual thoroughly before using the product to ensure proper functionality and safety.
X'hemm fil-Kaxxa

Image: All components included in the Lorex 2K Wireless Smart Video Doorbell package.
- Qanpiena tal-Batterija 2K
- Bracket tal-Immuntar
- Horizontal 15° Wedge
- Vertical 5° Wedge
- Kejbil tal-Enerġija USB
- Wajer ta 'Estensjoni
- Connecting Wires (2)
- Tappijiet tal-Wajer (3)
- Rilaxx Pin
- Anchors and Screws (2 each)
- 1/4 pulzier Drill Bit
Prodott Overview
Quddiem View

Immaġni: Quddiem view of the doorbell highlighting the camera, IR lights, PIR sensor, light sensor, microphone, and smart security call button.
- Kamera: Captures 2K video.
- Dwal IR: Dwal infra-aħmar għall-viżjoni bil-lejl.
- Sensor PIR: Sensor infra-aħmar passiv għad-detezzjoni tal-moviment.
- Sensor tad-Dawl: Jidentifika l-livelli tad-dawl ambjentali.
- Mikrofonu: Għal komunikazzjoni awdjo bidirezzjonali.
- Smart Security Call Button: Initiates a call to your smartphone and activates smart security features.
Lura View

Immaġni: Wara view of the doorbell showing the release tab, charging port, power terminals, and QR code.
- Release Tab: Used to detach the doorbell from the mounting bracket.
- Port tal-Iċċarġjar tal-USB: Għall-iċċarġjar tal-batterija interna.
- Terminali tal-Enerġija: For optional wired power connection.
- Kodiċi QR: For device pairing with the Lorex Home app.
Ġenb View

Immaġni: Ġenb view of the doorbell showing the reset button and microSD card slot.
- Buttuna Irrisettja: Used to reset the device and initiate pairing.
- Slott tal-Karta MicroSD: For local video storage (32GB card pre-installed).
Setup
1. Iċċarġjar tal-Qanpiena tal-Bieb
Before initial use, fully charge your doorbell using the included USB power cable. A 5V 2A power adapter (not included) is recommended for optimal charging. Charging may take up to 3 hours. The call button will turn solid blue when fully charged.

Image: The Lorex doorbell connected to a USB cable for charging.
2. Downloading the Lorex Home App
Download the Lorex Home app from your device's app store (App Store for iOS or Google Play Store for Android). This app is essential for setting up and managing your doorbell.
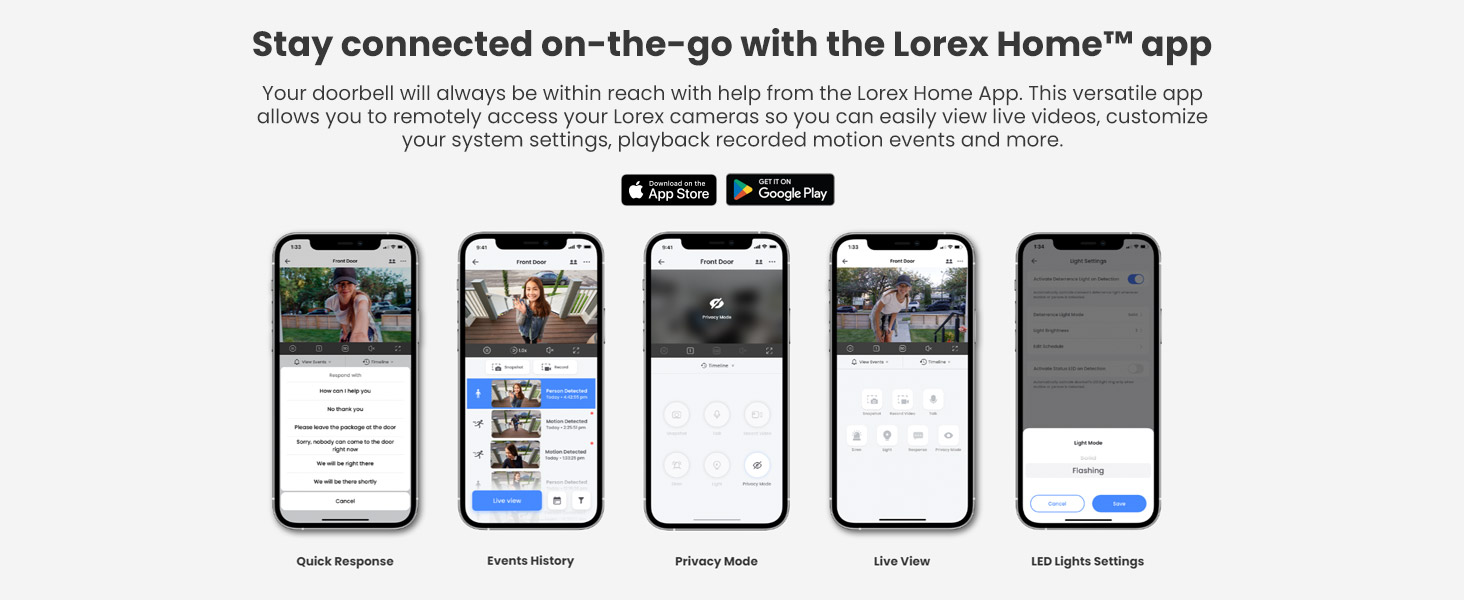
Image: Multiple screenshots of the Lorex Home app interface, showing various features like Quick Response, Events History, Privacy Mode, Live View, and LED Lights Settings.
3. Tqabbil mal-App
Open the Lorex Home app and follow the in-app instructions to add your doorbell. You will need to press the reset button on the side of the doorbell to initiate the onboarding process. Wait for the audio prompts, and the call button will flash blue, indicating it's ready for pairing.
Installazzjoni
Video: Official installation guide for the Lorex 2K Battery Camera Doorbell.
1. Choosing the Best Location and Angle
Use the live view feature in the Lorex Home app to determine the optimal mounting location and angle for your doorbell. This helps ensure maximum coverage and effective motion detection.

Image: A smartphone displaying the live view from the Lorex doorbell, showing a person at the front door.
2. Using Angled Wedges (Optional)
If needed, use the included horizontal 15° or vertical 5° wedges to adjust the doorbell's viewing angle for optimal coverage. Align the chosen wedge to the mounting bracket according to the desired direction. Ensure the "UP" arrow on the mounting bracket is correctly oriented.
3. Immuntar tal-Bracket
Secure the mounting bracket (and wedge, if used) to your desired surface using the included screws. For concrete, stucco, or brick surfaces, use the provided 1/4 inch drill bit to drill pilot holes and insert the anchors before securing with screws.
4. Securing the Doorbell
Once the mounting bracket is secure, place the doorbell into the bracket. You will hear a click when it is properly secured.

Image: A hand securing the Lorex doorbell onto its mounting bracket on a wooden surface.
5. Removing the Doorbell
To remove the doorbell from the bracket, hold the doorbell firmly and insert the release pin into the hole on the top of the mounting bracket until the release tab is reached. This will disengage the doorbell from the bracket.
Operating the Doorbell
2K Video Resolution and Night Vision
The doorbell provides optimal video image quality with 2K Video Resolution (HDR) and a 4:3 aspect ratio. It features both Color Night Vision (requires ambient light) and IR Night Vision (high-quality black and white video in dark settings) to ensure clear visibility day and night.

Image: A split image demonstrating the difference between Infrared Night Vision (black and white) and Color Night Vision (color, with ambient light) captured by the doorbell.
Motion Detection and Smart Security Lighting
Utilize Person Detection to receive instant notifications on the Lorex Home app when a person is detected. The Nightlight feature can be programmed to turn on automatically when motion is detected in the dark, or activated manually to deter unwanted visitors.

Image: A smartphone displaying a notification from the Lorex Home app, indicating "There is a person at your Front Door."
Two-Way Audio and Quick Response
Engage in full-duplex 2-Way audio with noise cancellation to speak directly through the doorbell to anyone at your front door. If you are busy, use the Quick Response feature to have pre-set or personalized voice messages answer for you.

Image: A woman speaking into her smartphone, demonstrating the two-way audio feature of the Lorex doorbell.
Local Storage and Privacy
Your video recordings are kept private and in your control with the pre-installed 32GB MicroSD card. This eliminates recurring monthly fees for cloud storage. The storage is upgradable to 256GB.

Image: A hand inserting a microSD card into the dedicated slot on the Lorex doorbell, emphasizing local storage.
Manutenzjoni
Ħajja tal-batterija
The doorbell is battery-powered with a built-in 6200mAh battery. Battery life can vary significantly based on factors such as the number of events or notifications, recording length, camera location, ambient temperature, and specific settings on the camera. For continuous power, the doorbell can be hardwired to existing doorbell wiring.
Tindif
To maintain optimal performance, regularly clean the camera lens and the PIR sensor area with a soft, damp drapp. Evita li tuża kimiċi ħarxa jew materjali li joborxu li jistgħu jagħmlu ħsara lill-apparat.
Ġestjoni tal-Karta MicroSD
The pre-installed 32GB MicroSD card stores your recordings. You can manage and clear recordings directly from the Lorex Home app. Ensure the card is properly seated in its slot for continuous recording.
Issolvi l-problemi
- Slow Notifications: Ensure your Wi-Fi connection is strong and stable. Check the Lorex Home app settings for notification delays and ensure background app refresh is enabled for the app.
- Kwistjonijiet ta' Konnettività: Verify your doorbell is within range of your Wi-Fi router. Ensure your phone is connected to a 2.4GHz Wi-Fi network during initial setup, as the doorbell operates on this frequency. If issues persist, try resetting the doorbell and re-pairing it with the app.
- Batterija Mhux Iċċarġja: Confirm the USB cable and power adapter are functioning correctly. Ensure the charging port is clean and free of debris. If hardwired, check the wiring connections.
- Ineżattezzi fid-Detezzjoni tal-Mozzjoni: Adjust the motion detection zones and sensitivity settings within the Lorex Home app to minimize false alerts from car lights or other non-relevant movements.
- Doorbell Not Ringing on Phone: Check your phone's notification settings for the Lorex Home app. Ensure notifications are enabled and not silenced. The app typically sends a notification rather than a traditional phone ring.
- Viżjoni fqira bil-lejl: Ensure the camera lens is clean. For Color Night Vision, verify there is sufficient ambient light. If using IR Night Vision, ensure no obstructions are blocking the IR lights.
Speċifikazzjonijiet
| Karatteristika | Speċifikazzjoni |
|---|---|
| Isem tal-Mudell | B463AJD-E |
| Riżoluzzjoni tal-vidjo | 2K (HDR) |
| Teknoloġija tal-Konnettività | Wireless (Wi-Fi) |
| Kapaċità tal-batterija | 6200mAh |
| Viżjoni bil-lejl | Color Night Vision (ambient light required), IR Night Vision (10 meters) |
| Awdjo | Full Duplex 2-Way Audio with Noise Cancellation |
| Sejbien tal-Moviment | Person Detection, Motion Activated Nightlight |
| Ħażna Lokali | 32GB MicroSD (pre-installed, upgradable to 256GB) |
| Użu fuq ġewwa/barra | Barra |
| Klassifikazzjoni li ma jgħaddix ilma minnha | IP541 |
| ViewIng Angolu | 150 Grad |
| Sors tal-Enerġija | Battery / Wired (8V-24V ~ 50/60Hz, 0.7A) |
| Dimensjonijiet | 2 x 4 x 1 pulzieri |
Garanzija u Appoġġ
For warranty information, technical support, and additional resources, please visit the official Lorex website or contact Lorex customer service. You can also find more information on the Ħanut Lorex fuq Amazon.