1. Introduzzjoni
This manual provides detailed instructions for the installation, operation, and maintenance of the ASUS TUF Gaming B660M-PLUS WiFi motherboard. This motherboard is designed to support 12th Generation Intel Core processors and DDR5 memory, offering a robust foundation for personal computer systems.
Please read this manual thoroughly before beginning the installation process to ensure proper setup and to prevent damage to components.
2. Informazzjoni dwar is-Sigurtà
- Dejjem skonnettja l-korda tal-enerġija mis-sokit tal-ħajt qabel ma tmiss xi komponenti interni.
- Ilbes ċinga tal-polz anti-statika jew tmiss spiss oġġett tal-metall ertjat biex teħles mill-elettriku statiku qabel ma timmaniġġja l-komponenti.
- Immaniġġja l-komponenti mit-truf tagħhom biex tevita li tmiss ċirkwiti sensittivi.
- Kun żgur li jkun hemm ventilazzjoni xierqa fil-kaxxa tal-kompjuter biex tevita li jisħon iżżejjed.
- Żomm il-motherboard 'il bogħod mill-umdità u minn temperaturi estremi.
- Refer to the CPU and memory manufacturer's guidelines for specific installation instructions.
3. Kontenut tal-Pakkett
Ivverifika li l-pakkett tiegħek fih l-oġġetti li ġejjin. Jekk xi oġġett ikun bil-ħsara jew nieqes, ikkuntattja lill-bejjiegħ tiegħek.
- ASUS TUF Gaming B660M-PLUS WiFi Motherboard
- I/O Shield (if not pre-mounted)
- Kejbils tad-Data SATA
- Pakkett tal-Viti M.2
- Wi-Fi Antenna
- Support DVD/USB Drive (containing drivers and utilities)
- Manwal għall-Utent u Gwida ta' Bidu Mgħaġġel
4. Layout tal-Motherboard
Iffamiljarizza ruħek mal-komponenti u l-konnetturi ewlenin fuq il-motherboard.

Figura 4.1: Minn fuq għal isfel view of the ASUS TUF Gaming B660M-PLUS WiFi motherboard, showing the CPU socket, DIMM slots, PCIe slots, and heatsinks.
4.1 CPU Socket (LGA 1700)
The LGA 1700 socket supports 12th Generation Intel Core processors. Ensure the CPU is correctly oriented before installation.

Figure 4.2: Close-up of the LGA 1700 CPU socket on the motherboard, ready for processor installation.
4.2 DDR5 DIMM Slots
This motherboard features four DDR5 DIMM slots, supporting up to 128GB of system memory with speeds up to 6000MHz (OC).
4.3 Slots PCIe
Includes a PCIe 5.0 x16 slot for graphics cards and multiple PCIe 4.0 M.2 slots for high-speed storage.
4.4 Portijiet SATA
Four SATA 6Gb/s ports are available for connecting traditional hard drives and SSDs.
4.5 Panel I/O ta' wara
The rear I/O panel provides various connectivity options.

Figura 4.3: Dettaljat view of the rear I/O panel, showing USB ports, HDMI, DisplayPort, 2.5G Ethernet, Wi-Fi antenna connectors, and audio jacks.
- Portijiet USB: Multiple USB 2.0, USB 3.2 Gen 1, USB 3.2 Gen 2, and USB 3.2 Gen 2x2 Type-C ports.
- Outputs tal-Vidjo: HDMI, DisplayPort.
- Netwerk: 2.5G Ethernet port, Wi-Fi 6 antenna connectors.
- Awdjo: Audio jacks for speakers, microphone, and line-in.
- Ħruġ S/PDIF: Optical S/PDIF digital audio output.
5. Setup u Installazzjoni
Segwi dawn il-passi għall-installazzjoni xierqa tal-motherboard u l-komponenti tiegħek.
5.1 Installazzjoni tas-CPU
- Iftaħ il-lieva tas-sokit tas-CPU u erfa' l-pjanċa tat-tagħbija.
- Allinja s-CPU bir-reqqa mas-sokit, filwaqt li tiżgura li l-marka trijangulari fuq is-CPU taqbel mal-marka fuq is-sokit.
- Poġġi s-CPU bil-mod fis-sokit mingħajr ma tisforzah.
- Agħlaq il-pjanċa tat-tagħbija u imbotta l-lieva 'l isfel sakemm tissakkar f'postha.

Figura 5.1: Minn fuq għal isfel view of the motherboard with a CPU installed in the LGA 1700 socket.
5.2 Installing RAM (DDR5)
- Iftaħ il-klipps fiż-żewġt itruf tas-slott tad-DIMM.
- Allinja l-islott fuq il-modulu tal-memorja DDR5 maċ-ċavetta fl-islott tad-DIMM.
- Daħħal il-modulu tal-memorja sew fl-islott sakemm il-klipps jidħlu f'posthom.
- For optimal performance, install memory modules in the recommended dual-channel configuration (refer to the motherboard manual for specific slot pairing).
5.3 Installazzjoni ta' Apparati tal-Ħażna
Installazzjoni SSD M.2:
- Sib is-slots tal-M.2 fuq il-motherboard. Xi slots jista' jkollhom heatsinks li jeħtieġ li jitneħħew l-ewwel.
- Daħħal l-M.2 SSD fl-islott f'angolu ta' 30 grad.
- Push the SSD down and secure it with the provided M.2 screw or Q-Latch mechanism.
- Jekk applikabbli, erġa' waħħal il-heatsink tal-M.2.
Installazzjoni tad-Drajv SATA:
- Qabbad tarf wieħed ta' kejbil tad-dejta SATA ma' port SATA fuq il-motherboard.
- Qabbad it-tarf l-ieħor tal-kejbil tad-dejta SATA mal-hard drive SATA jew SSD tiegħek.
- Qabbad kejbil tal-enerġija SATA mill-provvista tal-enerġija tiegħek mad-drajv.
5.4 Installing the Graphics Card
- Iftaħ il-lukkett fuq is-slott PCIe 5.0 x16.
- Align your graphics card with the slot and press it down firmly until it clicks into place and the latch closes.
- Waħħal il-karta grafika mal-kaxxa tal-kompjuter bil-viti.
- Qabbad kwalunkwe kejbil tal-enerġija PCIe meħtieġ mill-provvista tal-enerġija tiegħek mal-karta grafika.
5.5 Konnessjoni tal-Provvista tal-Enerġija
- Qabbad il-konnettur tal-enerġija ATX ta' 24-pin mill-provvista tal-enerġija tiegħek mal-header korrispondenti fuq il-motherboard.
- Connect the 8-pin and 4-pin (or 8-pin only, depending on your CPU power requirements) ATX 12V power connectors to the motherboard.
5.6 Connecting Front Panel Headers
Connect the cables from your computer case's front panel (power button, reset button, USB ports, audio jacks, LED indicators) to the corresponding headers on the motherboard. Refer to the motherboard diagram for exact locations.
5.7 Konnessjoni tal-Periferali
Connect your monitor, keyboard, mouse, and other peripherals to the appropriate ports on the rear I/O panel.
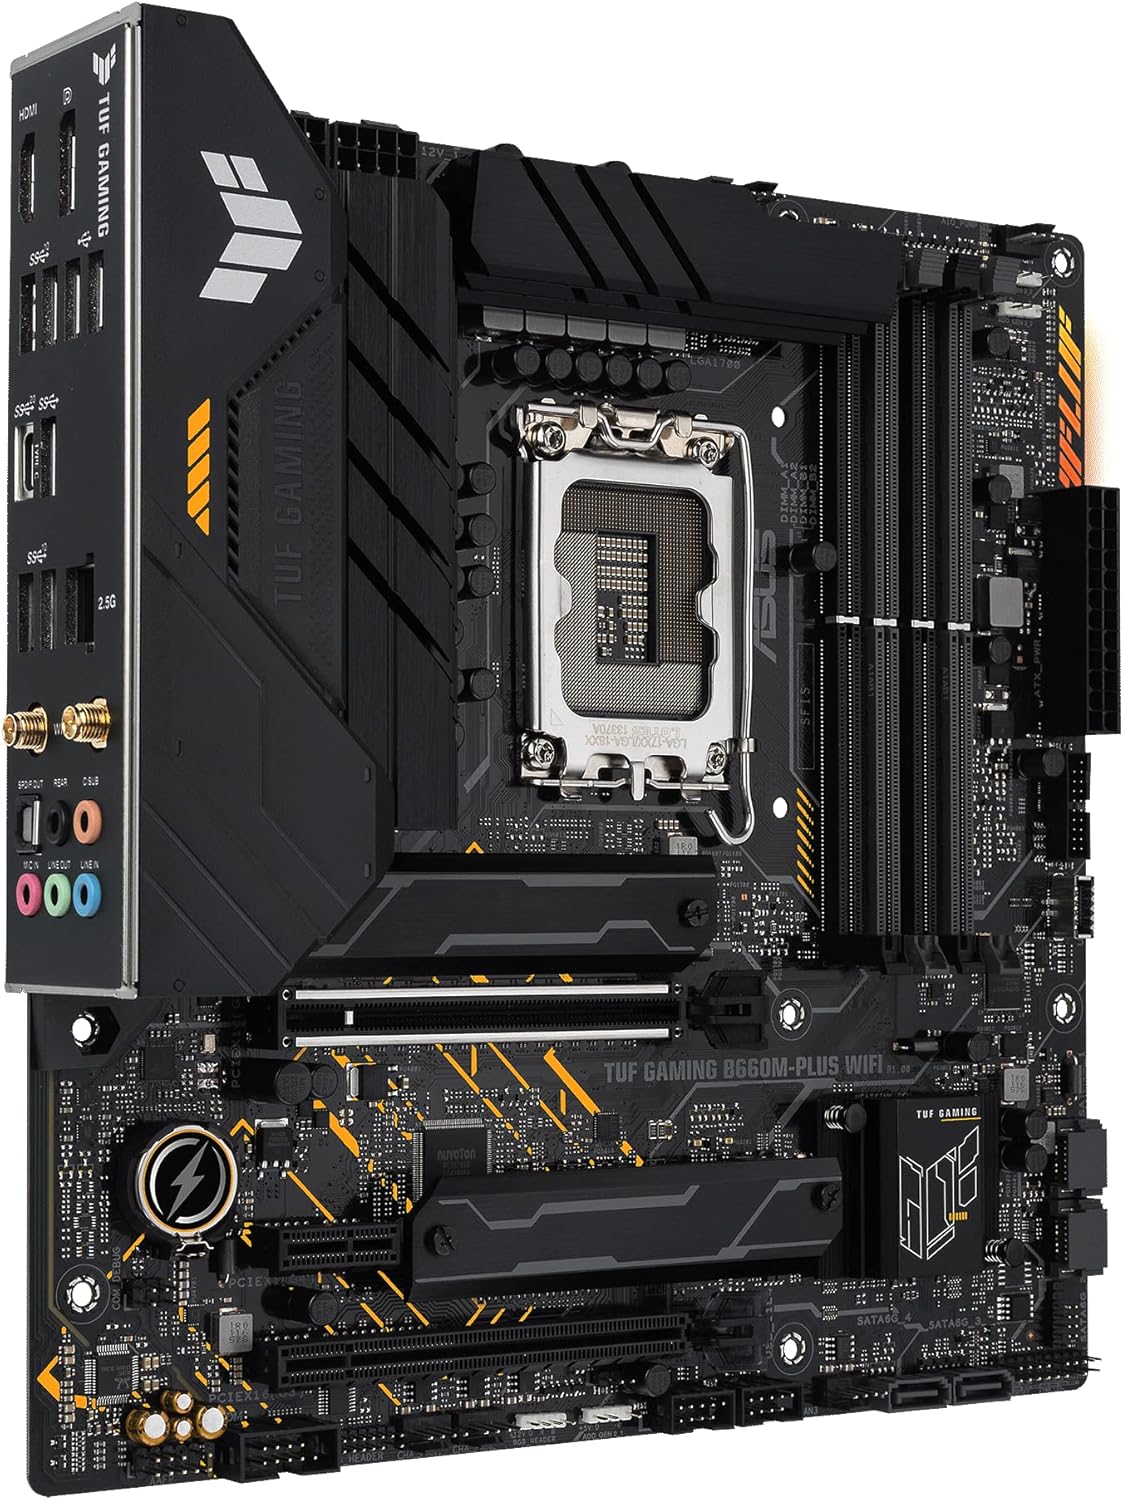
Figura 5.2: Angolat view of the motherboard, highlighting the rear I/O panel and various connectors.
6. Istruzzjonijiet Operattivi
6.1 L-Ewwel Boot
- After assembling all components, connect the power cord to the power supply and turn on the power switch.
- Agħfas il-buttuna tal-qawwa fuq il-kaxxa tal-kompjuter tiegħek.
- The system should power on and display the ASUS logo.
6.2 Konfigurazzjoni tal-BIOS/UEFI
Biex tidħol fl-utilità tas-setup tal-BIOS/UEFI, agħfas il-buttuna Ħassar ċavetta jew F2 key during the Power-On Self-Test (POST) process. Here you can configure system settings, boot order, and monitor hardware status.
6.3 Installazzjoni tas-sewwieq
After installing your operating system, install the necessary drivers for the motherboard components. These can be found on the included support DVD/USB drive or downloaded from the official ASUS support website. The ASUS Armory Crate software can assist with driver and utility installation.
6.4 Utilitajiet tas-Softwer
The ASUS Armory Crate software provides tools for system monitoring, fan control (Fan Xpert 4), two-way AI noise cancellation, RGB lighting customization, and peripheral management.
7. Manutenzjoni
- Tindif: Regularly clean dust from inside your computer case using compressed air. Ensure the system is powered off and unplugged before cleaning.
- Aġġornamenti tal-BIOS/UEFI: Iċċekkja l-appoġġ tal-ASUS perjodikament website for BIOS/UEFI updates. Updates can improve system stability, compatibility, and performance. Follow the instructions provided by ASUS carefully when updating the BIOS/UEFI.
- Aġġornamenti tas-sewwieq: Żomm is-sewwieqa tiegħek aġġornati biex tiżgura prestazzjoni ottimali u kompatibilità ma' softwer u ħardwer ġdid.
8 Issolvi l-problemi
Jekk tiltaqa' ma' problemi, ikkunsidra l-passi komuni li ġejjin għas-soluzzjoni tal-problemi:
- Ebda Qawwa: Ensure all power cables (24-pin, 8-pin/4-pin CPU, PCIe for GPU) are securely connected. Check the power supply switch and wall outlet.
- Ebda Display: Verify that the monitor is connected to the graphics card (or motherboard if using integrated graphics) and powered on. Reseat the graphics card and RAM modules.
- Instabbiltà/Ħsarat tas-Sistema: Check RAM installation and compatibility. Ensure CPU cooler is properly installed. Update drivers and BIOS/UEFI.
- Komponent Mhux Rilevat: Reseat the component (e.g., M.2 SSD, SATA drive, PCIe card). Check cable connections. Verify settings in BIOS/UEFI.
For more detailed troubleshooting or persistent issues, refer to the comprehensive manual on the ASUS support webis-sit jew ikkuntattja l-appoġġ tekniku tal-ASUS.
9. Speċifikazzjonijiet
| Karatteristika | Speċifikazzjoni |
|---|---|
| Brand | ASUS |
| Isem tal-Mudell | TUF GAMING B660M-PLUS WIFI |
| Socket tas-CPU | LGA 1700 |
| Proċessuri Kompatibbli | Intel LGA 1700 (12th Gen Intel Core) |
| Tip ta' Ċipset | Intel B660 |
| Teknoloġija tal-Memorja RAM | DDR5 |
| Veloċità tal-Arloġġ tal-Memorja | Sa 6000 MHz (OC) |
| Max RAM Memory Size | 128 GB |
| Slots tal-Memorja Disponibbli | 4 |
| Interface tal-Kard Grafika | PCI Express 5.0 |
| Total PCIe Ports | 3 (1x PCIe 5.0 x16, others for M.2/expansion) |
| Portijiet SATA Totali | 4 |
| Portijiet USB | Rear: USB 3.2 Gen 2x2 Type-C, USB 3.2 Gen 2, USB 3.2 Gen 1, USB 2.0. Front: USB 3.2 Gen 1 Type-C, USB 3.2 Gen 1, USB 2.0. |
| Ethernet | 2.5G Ethernet |
| Konnettività bla fili | Wi-Fi 6 |
| Outputs tal-Vidjo | HDMI, DisplayPort |
| Fattur tal-Formola | Mikro ATX |
| Numru tal-Mudell | 90MB1AZ0-M1EAY0 |
10. Garanzija u Appoġġ
ASUS products are designed with quality and reliability in mind. For information regarding your product's warranty, please refer to the warranty card included in your package or visit the official ASUS websit.
Għal appoġġ tekniku, downloads ta' sewwieqa, aġġornamenti tal-BIOS, u aktar dokumentazzjoni, jekk jogħġbok żur is-sit uffiċjali tal-appoġġ tal-ASUS websit:
When contacting support, please have your motherboard model name (TUF GAMING B660M-PLUS WIFI) and serial number ready.