1. Introduzzjoni
This manual provides detailed instructions for the safe and efficient operation of your InFocus P120 INL412 Multimedia Projector (Model INL4128). Please read this manual thoroughly before using the projector and keep it for future reference. This projector is designed for high-quality image projection, suitable for various applications including presentations, home entertainment, and gaming.
2. Informazzjoni dwar is-Sigurtà
Osserva l-prekawzjonijiet ta' sigurtà li ġejjin biex tevita ħsara lill-proġettur u tiżgura s-sigurtà tal-utent:
- Ventilazzjoni: Aċċerta ruħek li jkun hemm ventilazzjoni adegwata madwar il-proġettazzjoni. Timblokkax il-fetħiet tal-ventilazzjoni. Żomm distanza minima ta' 30 ċm (12 pulzieri) mill-ħitan jew oġġetti oħra.
- Sors tal-Enerġija: Uża biss il-provvista tal-enerġija u l-volum speċifikatitage. Connect the power cord securely.
- Sħana: The projector generates heat during operation. Do not touch the projector's vents or exhaust areas directly after use.
- Ħruġ tad-Dawl: Tħarisx direttament fil-lenti tal-proġettazzjoni meta tkun qed taħdem.amp ikun mixgħul, għax id-dawl intens jista’ jikkawża ħsara lill-għajnejn.
- Pjazzament: Place the projector on a stable, level surface. Avoid placing it in direct sunlight, near heat sources, or in areas with high humidity or dust.
- Tindif: Skonnettja l-korda tal-enerġija qabel it-tindif. Uża drapp artab u niexef. Tużax prodotti tat-tindif likwidi jew aerosol.
- Servizzi: Tippruvax tagħmel manutenzjoni tal-proġettazzjoni int stess. Irreferi għal kull manutenzjoni għand persunal tas-servizz kwalifikat.
3. Prodott Aktarview
3.1 Top Panel and Lens Area
The top panel features the control buttons for basic operation and the lens area with focus and zoom adjustments.

Figura 3.1: Fuq view of the InFocus P120 INL412 projector, highlighting the control panel on the right and the lens adjustment area on the left. The InFocus logo is visible on the top surface.
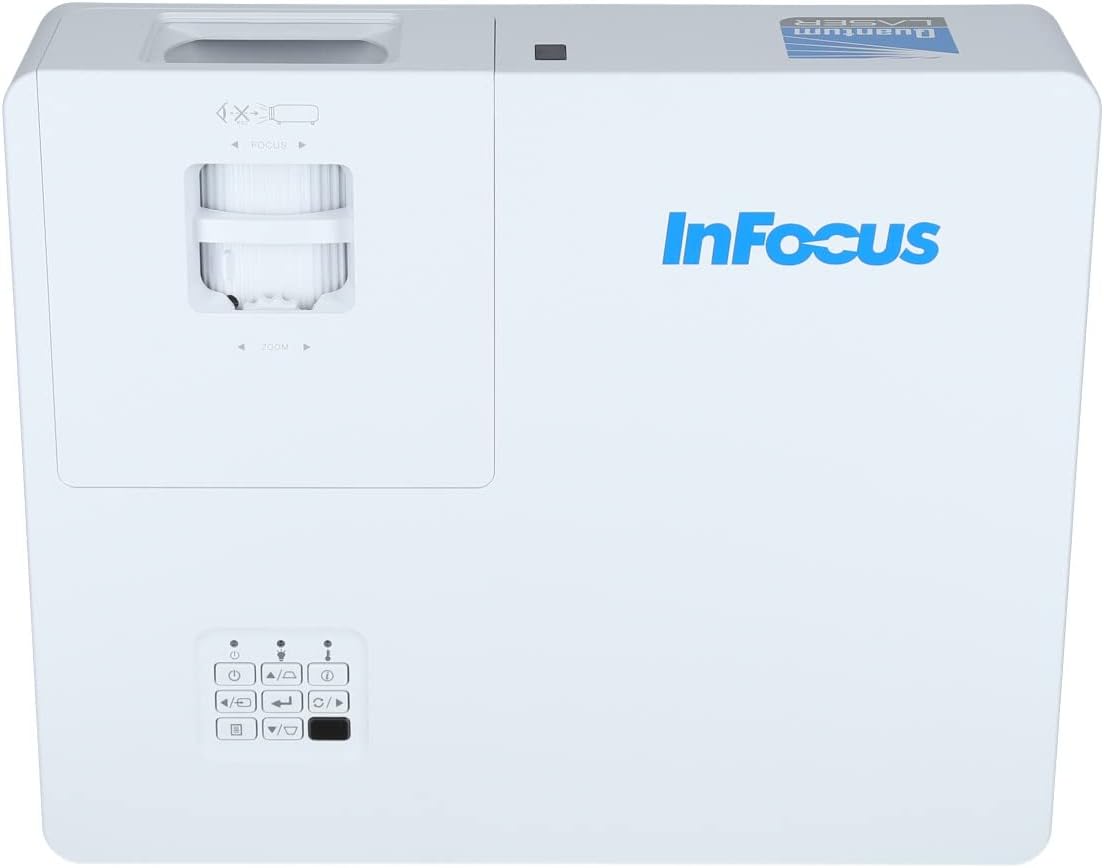
Figura 3.2: Egħluq view of the projector's top panel, showing the focus and zoom rings near the lens opening and the array of control buttons for power, menu, source selection, and navigation.
3.2 Konnessjonijiet tal-Panew ta' wara
The rear panel provides various input and output ports for connecting external devices.

Figure 3.3: Rear panel of the InFocus P120 INL412 projector, displaying a comprehensive array of connectivity options including HDMI (x2), USB, S-Video, Ethernet (LAN), VGA In (x2), VGA Out, RS232, and Audio In/Out ports. The power input is located on the bottom left.
Il-portijiet ewlenin jinkludu:
- HDMI 1 & 2: For connecting high-definition digital video and audio sources.
- USB: For connecting USB devices, potentially for media playback or firmware updates.
- Vidjo S: For connecting older video sources.
- VGA IN 1 & 2: For connecting computers or other devices with VGA output.
- ĦRUĠ VGA: For connecting to an external monitor.
- Ethernet (LAN): Għall-konnettività u l-kontroll tan-netwerk.
- Audio IN 1 & 2 / Audio OUT: Għal konnessjonijiet awdjo analogi.
- RS232: Għall-kontroll tas-serje.
- Input ta' Enerġija: Għall-konnessjoni tal-korda tal-enerġija AC.
3.3 Front and Side Panels
The front panel houses the projection lens and front ventilation, while the side panels feature additional ventilation grilles.

Figura 3.4: Quddiem view of the InFocus P120 INL412 projector, displaying the main projection lens on the right and the extensive front ventilation grille on the left, crucial for heat dissipation.

Figura 3.5: Ġenb view of the InFocus P120 INL412 projector, illustrating the side ventilation grilles that contribute to maintaining optimal operating temperature.
4. Setup
4.1 Pożizzjonament tal-Proġettur
Position the projector on a stable, flat surface or mount it securely. Ensure the projector is within the optimal projection distance for your screen size. Maintain clear space around the projector for proper ventilation.
4.2 Apparat li jgħaqqad
Before connecting any cables, ensure the projector and all source devices are powered off.
- Konnessjoni HDMI: Connect an HDMI cable from your source device (e.g., laptop, Blu-ray player, gaming console) to either the HDMI 1 or HDMI 2 port on the projector.
- Konnessjoni VGA: Connect a VGA cable from your computer to either VGA IN 1 or VGA IN 2. For audio, connect a separate audio cable from your computer's audio output to the corresponding Audio IN port on the projector.
- Konnessjoni USB: Insert a USB drive into the USB port for media playback (if supported by firmware) or service functions.
- Konnessjoni tal-Ethernet (LAN): Connect an Ethernet cable to the LAN port for network control or updates.
- Output Awdjo: If using external speakers, connect an audio cable from the Audio OUT port on the projector to your audio system.
4.3 Konnessjoni tal-Enerġija
Connect the power cord to the projector's power input and then plug the other end into a grounded electrical outlet.
5. Istruzzjonijiet Operattivi
5.1 Tixgħel/Jitfi
- Qawwa Mixgħul: Agħfas il- Qawwa button on the projector's control panel or the remote control. The power indicator light will change.
- Itfi: Agħfas il- Qawwa button again. A confirmation message may appear. Press the button a second time to confirm shutdown. Allow the projector to cool down before unplugging it.
5.2 Aġġustament tal-Fokus u ż-Zoom
Rotate the focus ring around the lens until the image appears sharp and clear. Use the zoom ring to adjust the image size to fit your screen.
5.3 L-Għażla tas-Sors tal-Input
Agħfas il- Sors button on the control panel or remote control to cycle through available input sources (HDMI 1, HDMI 2, VGA 1, VGA 2, S-Video, USB). Select the input corresponding to your connected device.
5.4 Navigazzjoni tal-Menu
Uża l- Menu button to access the on-screen display (OSD) menu. Use the arrow buttons to navigate through menu options and the Daħħal buttuna biex tagħżel. Agħfas Menu għal darb'oħra biex toħroġ.
6. Manutenzjoni
6.1 Tindif tal-Lenti
Gently wipe the lens with a soft, lint-free cloth specifically designed for optical surfaces. Do not use abrasive cleaners or excessive force, as this can scratch the lens.
6.2 Cleaning the Projector Exterior
Uża drapp artab u niexef biex tnaddaf il-parti tal-proġettazzjoni.asing. For stubborn dirt, dampen the cloth slightly with water, then wipe dry immediately. Avoid getting liquids into the projector's openings.
6.3 Ventilation Care
Regularly check the projector's ventilation grilles for dust accumulation. Use a soft brush or a vacuum cleaner with a brush attachment to gently remove dust from the vents to ensure proper airflow and prevent overheating.
7 Issolvi l-problemi
7.1 L-ebda Immaġni Ma Tidher
- Kun żgur li l-proġettazzjoni tkun mixgħula u li d-dawl indikatur tal-enerġija jkun mixgħul solidu.
- Verify that the video cable (HDMI, VGA, etc.) is securely connected to both the projector and the source device.
- Iċċekkja li s-sors tad-dħul korrett huwa magħżul fuq il-proġettazzjoni.
- Confirm that the source device (laptop, player) is powered on and outputting a signal.
7.2 L-Immaġni hija Ċajpra jew Mhux Fokusata
- Aġġusta ċ-ċirku tal-fokus fuq il-lenti tal-proġettazzjoni sakemm l-immaġni tkun ċara.
- Kun żgur li l-proġettazzjoni tinsab fid-distanza korretta mill-iskrin.
- Naddaf il-lenti tal-proġettazzjoni jekk tidher maħmuġa.
7.3 Ebda Ħoss
- If using HDMI, ensure the source device's audio output is set to HDMI.
- If using VGA, ensure a separate audio cable is connected from the source to the projector's Audio IN port.
- Iċċekkja s-settings tal-volum kemm fuq il-proġettazzjoni kif ukoll fuq l-apparat tas-sors.
- If using external speakers, ensure they are properly connected to the Audio OUT port and powered on.
8. Speċifikazzjonijiet
| Karatteristika | Dettall |
|---|---|
| Brand | InFocus |
| Manifattur | In Focus |
| Isem tal-Mudell | P120 INL412 |
| Numru tal-Mudell | INL4128 |
| Sena | 2023 |
| Interface tal-Ħardwer | Ethernet, HDMI, S-Video, USB |
| Numru ta' Oġġetti | 1 |
| Proporzjon ta' l-aspett | 16:9 |
| Wattage | 341 watt |
| Batteriji Inklużi | Nru |
| Batteriji Meħtieġa | Nru |
| Fattur tal-Formola | Desktop |
| Tip ta 'Immuntar | Immonta fuq il-mejda |
| Kontroll mill-bogħod Inkluż | Iva |
| Dimensjonijiet tal-Prodott | 56.13 x 46.48 x 25.15 ċm |
| Piż tal-oġġett | 5.5 kg |
| Daqs Massimu tal-Immaġni | 308.28 pulzieri |
| Daqs Minimu tal-Immaġni | 910.63 Millimetru |
| L-Ewwel Data Disponibbli | 5 ta’ Jannar, 2022 |
9. Garanzija u Appoġġ
For warranty information and technical support, please refer to the documentation included with your purchase or visit the official InFocus websit. Żomm il-prova tax-xiri tiegħek għal talbiet ta' garanzija.