
ASUS H610M-A D4-CSM
ASUS Prime H610M-A D4-CSM Motherboard User Manual
Model: H610M-A D4-CSM | Brand: ASUS
1. Introduzzjoni
This user manual provides comprehensive instructions for the installation, operation, and maintenance of your ASUS Prime H610M-A D4-CSM Micro-ATX Commercial Motherboard. Designed for 12th Generation Intel Core processors, this motherboard offers enhanced enterprise-level features, including robust system protection, 24/7 stability and reliability, and an improved management suite, ASUS Control Center Express, to streamline IT operations.
2. Informazzjoni dwar is-Sigurtà
Always handle the motherboard with care. Static electricity can damage components. Use an anti-static wrist strap or discharge static electricity by touching a grounded metal object before handling the motherboard. Ensure the power supply is disconnected from the wall outlet before installing or removing any components. Refer to the power supply unit's manual for specific safety guidelines.
3. Kontenut tal-Pakkett
Ivverifika li l-oġġetti kollha huma preżenti fil-pakkett:
- ASUS Prime H610M-A D4-CSM Motherboard
- Gwida għall-Utent
- Gwida Quick Start
- DVD ta' appoġġ (għad-drajvers u l-utilitajiet)
- Tarka I / O
- Kejbils SATA 6Gb/s (2x)
- M.2 SSD Screws and Stand-offs

Image 1: ASUS Prime H610M-A D4-CSM Motherboard and its retail packaging.
4. Setup
4.1. Installazzjoni tas-CPU (Sokit LGA 1700)
The motherboard supports 12th Gen Intel Core, Pentium Gold, and Celeron Processors. Carefully align the CPU with the LGA 1700 socket, ensuring the triangular markers on the CPU and socket match. Lower the load plate and secure the retention lever.
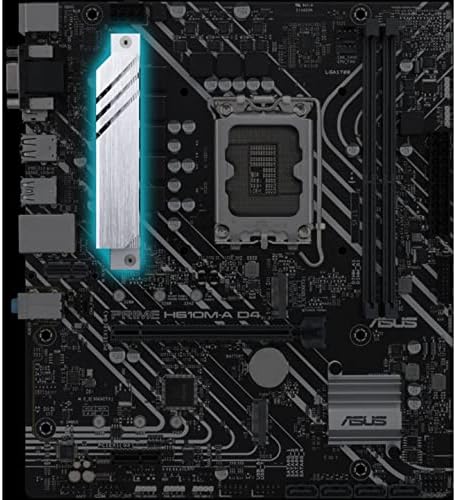
Immaġni 2: Mill-qrib view of the LGA 1700 CPU socket on the ASUS Prime H610M-A D4-CSM motherboard.
4.2. Installazzjoni tal-Memorja (DDR4)
This motherboard features two DIMM slots supporting up to 64GB of DDR4 memory. For optimal performance, install memory modules in a dual-channel configuration. Ensure the memory modules are correctly oriented and firmly seated in the DIMM slots until the clips snap into place.
4.3. Installazzjoni tal-Ħażna (M.2 u SATA)
The motherboard provides two M.2 slots for NVMe SSDs and four SATA 6Gb/s ports for traditional SATA drives. Install M.2 SSDs by aligning them with the slot and securing them with the provided screw and stand-off. Connect SATA drives using the SATA cables.
4.4. Slots ta 'Espansjoni
The motherboard includes one PCIe 4.0 x16 slot for graphics cards and one PCIe 3.0 x1 slot for other expansion cards. Insert expansion cards firmly into their respective slots and secure them with chassis screws.
4.5. Konnessjoni Periferali
Connect your display to the DisplayPort, HDMI, or D-Sub port on the rear I/O panel. Utilize the rear USB 3.2 Gen 2 Type-A ports and front USB 3.2 Gen 1 header for high-speed peripheral connectivity. The integrated Intel 1Gb Ethernet port provides reliable network access. Audio jacks are available for speaker and microphone connections.
5. Istruzzjonijiet Operattivi
After all components are installed and connected, ensure the power supply is properly connected to the motherboard (24-pin ATX power and 8-pin ATX 12V power). Power on your system. The motherboard will initiate the Power-On Self-Test (POST). If using a 13th Generation Intel processor, a BIOS update may be required for proper system operation. Refer to the ASUS support websit għall-aħħar verżjonijiet tal-BIOS u l-proċeduri tal-aġġornament.
6. Manutenzjoni
Regularly clean your computer case and motherboard to prevent dust buildup, which can lead to overheating. Ensure proper airflow within the chassis. Keep your BIOS updated to the latest version from the ASUS support website to benefit from performance improvements, bug fixes, and enhanced compatibility. This motherboard features ASUS-exclusive self-recovering BIOS technology for automatic system BIOS recovery from a verified backup, enhancing system stability.
7 Issolvi l-problemi
If you encounter issues, consult the following common troubleshooting steps:
- L-ebda Output tal-Wiri: Verify that the monitor is connected to the correct port (DisplayPort, HDMI, or D-Sub) and that the graphics card (if installed) is properly seated. Ensure the CPU and RAM are correctly installed.
- Is-Sistema Mhux Tibbutja: Check all power connections to the motherboard and components. Reseat RAM modules. If using a 13th Gen Intel CPU, ensure the BIOS has been updated to a compatible version.
- Kwistjonijiet ta' Rikonoxximent Periferali: Ensure USB devices are connected to the correct ports. Check device drivers in your operating system.
- BIOS Update for 13th Gen CPUs: Kif innutat fir-reazzjoni tal-utentviews, this motherboard may require a BIOS update to support 13th Generation Intel processors. If you experience boot issues with a 13th Gen CPU, you may need to temporarily install a 12th Gen CPU to perform the BIOS update.
For more detailed troubleshooting, refer to the comprehensive user guide or the ASUS support websit.
8. Speċifikazzjonijiet
| Karatteristika | Speċifikazzjoni |
|---|---|
| Brand | ASUS |
| Serje | PRIME H610M-A D4-CSM |
| Numru tal-Mudell | H610M-A D4-CSM |
| Socket tas-CPU | LGA 1700 (for 12th Gen Intel Core, Pentium Gold, Celeron Processors) |
| Chipset | Intel H610 |
| Memorja | 2 x DIMM, Max. 64GB, DDR4 3200/3000/2933/2800/2666/2400/2133 Non-ECC, Un-buffered Memory |
| Ħażna | 2 x M.2 slots (PCIe 3.0 x4/x2 mode), 4 x SATA 6Gb/s ports |
| Slots ta 'Espansjoni | 1 x PCIe 4.0 x16, 1 x PCIe 3.0 x1 |
| Portijiet USB (Wara) | 2 x USB 3.2 Gen 2 Type-A, 4 x USB 2.0 Type-A |
| Portijiet USB (ta' Quddiem) | 1 x USB 3.2 Gen 1 header (supports 2 additional USB 3.2 Gen 1 ports), 1 x USB 2.0 header (supports 3 additional USB 2.0 ports) |
| Ethernet | 1 x Intel 1Gb Ethernet (ASUS LANGuard) |
| Output tal-Grafika | 1 x DisplayPort, 1 x HDMI, 1 x D-Sub (VGA) |
| Awdjo | Realtek 7.1 Surround Sound Definizzjoni Għolja CODEC Awdjo |
| Dimensjonijiet | Micro-ATX Form Factor (9.6 inches x 8.3 inches) |
9. Garanzija u Appoġġ
ASUS Corporate Stable Model (CSM) motherboards offer up to 36-month supply availability, End-of-Life (EOL) notice, and Engineering Change Notice (ECN) control. For warranty information, technical support, and driver downloads, please visit the official ASUS support websit: www.asus.com/support.
You can also visit the ASUS Store on Amazon for product information: Ħanut tal-ASUS.
Dokumenti Relatati - H610M-A D4-CSM
 |
Manwal tal-Utent tal-Motherboard ASUS PRIME H610M-D D4 Dan il-manwal jipprovdi informazzjoni dettaljata dwar il-motherboard ASUS PRIME H610M-D D4, inklużi prekawzjonijiet ta' sigurtà, tqassim tal-komponenti, speċifikazzjonijiet, informazzjoni dwar il-BIOS, u gwidi tal-installazzjoni għas-CPU u l-memorja tas-sistema. |
 |
ASUS EX-H610M-V3 D4 Manwal għall-Utent tal-Motherboard Manwal komprensiv għall-utent għall-motherboard ASUS EX-H610M-V3 D4, li jkopri l-introduzzjoni tal-prodott, l-ispeċifikazzjonijiet, is-setup tal-BIOS, informazzjoni dwar is-sigurtà, u dettalji dwar il-konformità. |
 |
Manwal tal-Utent tal-Motherboard ASUS PRIME H610M-A D4 Manwal komprensiv għall-utent għall-motherboard ASUS PRIME H610M-A D4, li jkopri l-installazzjoni, informazzjoni dwar il-BIOS, speċifikazzjonijiet, u prekawzjonijiet ta' sigurtà. |
 |
ASUS PRIME B660M-A WIFI D4 Motherboard: Specifications and User Guide This document provides technical specifications, installation, operation, and disposal guidelines for the ASUS PRIME B660M-A WIFI D4 motherboard. Includes importer information. |
 |
Gwida għall-Bidu Mgħaġġel tal-Motherboard ASUS PRIME B660M-A D4 - Passi ta' Installazzjoni Gwida HTML konċiża u ottimizzata għas-SEO għall-installazzjoni tal-motherboard ASUS PRIME B660M-A D4. Tkopri s-CPU, ir-RAM, il-ħażna, il-kards tal-espansjoni, il-konnessjonijiet tal-enerġija, u s-setup inizjali b'deskrizzjonijiet testwali dettaljati tad-dijagrammi. |
 |
Manwal tal-Utent u Speċifikazzjonijiet tal-Motherboard ASUS ProArt B760-CREATOR D4 Manwal dettaljat għall-utent u speċifikazzjonijiet għall-motherboard ASUS ProArt B760-CREATOR D4, li jkopri l-kontenut tal-pakkett, l-ispeċifikazzjonijiet tas-sistema, it-tqassim, il-konnetturi, il-gwidi tal-installazzjoni għas-CPU, DIMM, u M.2, u l-I/O tal-pannell ta' wara. |
Ask a question about this manual
Ask about setup, troubleshooting, compatibility, parts, safety, or missing instructions. Manuals+ will review the question and use this page’s manual context to help answer it.