1. Introduzzjoni
Grazzi tax-xiriasing the Whadda Animated Ghost Kit (WSSA166). This kit provides an engaging electronic project that, once assembled, creates a sound-activated animated ghost. It is designed to respond to sudden noises, making it an ideal gadget for Halloween, parties, or as a fun educational project. Please note: This is a kit and requires basic soldering skills for assembly.
2. Informazzjoni dwar is-Sigurtà
- Always work in a well-ventilated area when soldering.
- Use appropriate safety gear, including safety glasses, to protect your eyes from solder splashes.
- Ensure your soldering iron is on a heat-resistant stand and unplugged when not in use.
- Evita li tmiss il-ponta sħuna tal-ħadid tal-issaldjar.
- Keep all components and tools out of reach of children.
- Armi l-iskart elettroniku b'mod responsabbli.
3. Kontenut tal-Pakkett
Before beginning assembly, please verify that all components listed below are present in your kit. Refer to the image for visual identification of the kit components.

Image: All components included in the Whadda Animated Ghost Kit, laid out for inspection. This includes the PCB, speaker, battery holder, LEDs, resistors, capacitors, transistors, and other small electronic parts.
Your kit should include:
- Bord taċ-ċirkwit stampat (PCB)
- Speaker
- Battery Holder (for 2xAAA batteries)
- Various Resistors
- Various Capacitors
- Transistors and Integrated Circuits
- LEDs (Dajowds li Jarmi d-Dawl)
- Microphone/Sound Sensor
- Aqleb
- Mounting Hardware (screws, nuts, standoffs)
- Fabric 'Ghost' Material
4. Setup u Assemblea
This section guides you through the assembly process. A basic understanding of electronics and proficiency in soldering are required. If you are new to soldering, it is recommended to practice on scrap components first.
4.1 Għodod Meħtieġa
- Soldering Iron (25-40W recommended)
- Solder (rosin core, electronic grade)
- Wire Cutters/Flush Cutters
- Tnalji tal-imnieħer tal-labra
- Multimeter (optional, for testing connections)
- Nuċċalijiet tas-Sigurtà
4.2 Passi tal-Assemblea
- Identifika Komponenti: Carefully identify each component using the provided circuit diagram (if included) and the markings on the PCB. Resistors have color codes, capacitors have values printed, and integrated circuits have model numbers.
- Salda l-Iżgħar Komponenti l-Ewwel: Begin by soldering the smallest components, such as resistors and diodes, to the PCB. This prevents larger components from obstructing access. Insert the component, bend the leads slightly to hold it in place, solder each lead, and then trim the excess leads with flush cutters.
- Ċirkwiti Integrati tal-Istann (ICs): If your kit includes ICs, ensure correct orientation (usually indicated by a notch or dot on the IC and a corresponding mark on the PCB). Solder each pin carefully, avoiding solder bridges.
- Solder Capacitors and Transistors: Pay attention to polarity for electrolytic capacitors and transistors. The longer lead of an electrolytic capacitor is usually positive (+). Transistors have specific pinouts (Emitter, Base, Collector) that must match the PCB.
- Solder Speaker and Microphone: Connect the speaker and microphone to their designated pads on the PCB. Ensure correct polarity if indicated.
- Solder Battery Holder Wires: Connect the red wire from the battery holder to the positive (+) terminal on the PCB and the black wire to the negative (-) terminal. Double-check polarity.
- Solder Switch: Solder the power switch to its designated location.
- Immuntar: Secure the assembled PCB and speaker within the ghost housing or frame using the provided mounting hardware.
- Waħħal id-Drapp: Drape and secure the fabric 'ghost' material over the assembled electronics and frame, ensuring the LEDs are visible as eyes.
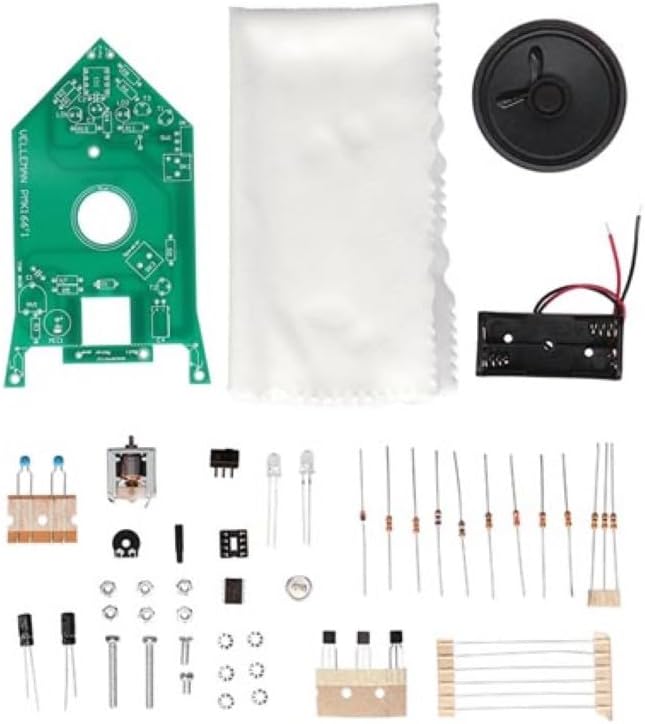
Image: The fully assembled circuit board of the Whadda Animated Ghost Kit, showing soldered components, speaker, and LEDs.
5. Istruzzjonijiet Operattivi
Once assembled, your Animated Ghost is ready for operation.
5.1 Installazzjoni tal-batterija
- Open the battery compartment on the battery holder.
- Insert 2x AAA batteries, ensuring correct polarity (+/-).
- Agħlaq il-kompartiment tal-batterija sew.
5.2 Tixgħel/Jitfi
Locate the power switch on the assembled circuit board. Flip the switch to the 'ON' position to power on the ghost. Flip it to 'OFF' to power down.
5.3 Sound Activation and Sensitivity
The Animated Ghost is designed to respond to sudden noises. When a sharp sound is detected, the ghost's eyes (LEDs) will light up, and it will emit a ghostly sound effect.
- Aġġustament tas-Sensittività: A potentiometer (small knob or screw on the PCB) allows you to adjust the sensitivity of the sound sensor. Turn it clockwise to increase sensitivity (responds to quieter sounds) or counter-clockwise to decrease sensitivity (requires louder sounds).
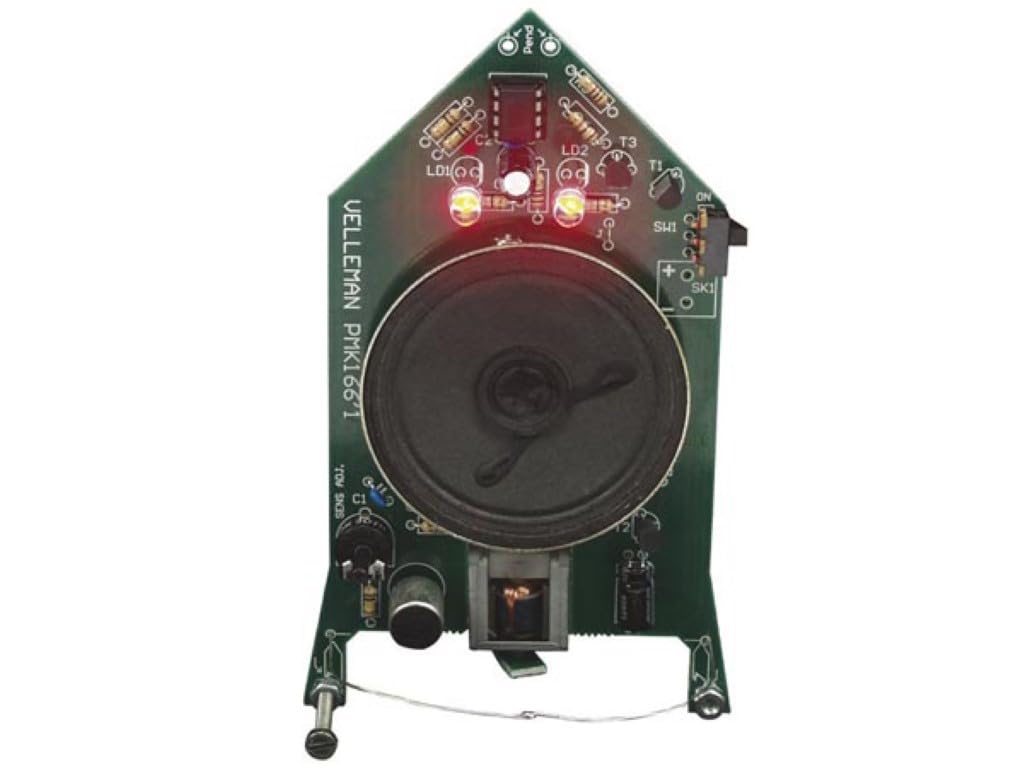
Image: The fully assembled Whadda Animated Ghost, showing its white fabric and glowing red LED eyes, indicating it is active or has been triggered by sound.
6. Manutenzjoni
- Tindif: Use a soft, dry cloth to gently clean the exterior of the ghost. Avoid using liquids or abrasive cleaners.
- Sostituzzjoni tal-batterija: If the ghost's response becomes weak or inconsistent, replace the AAA batteries. Always replace both batteries at the same time.
- Ħażna: When not in use for extended periods, remove the batteries to prevent leakage and store the ghost in a dry, cool place.
7 Issolvi l-problemi
| Problema | Kawża Possibbli | Soluzzjoni |
|---|---|---|
| Ghost does not power on (no lights, no sound). |
|
|
| Ghost does not respond to sound. |
|
|
| Il-ħoss huwa distort jew kwiet wisq. |
|
|
8. Speċifikazzjonijiet
- Mudell: WSSA166
- Funzjoni: Sound-activated animated ghost
- Provvista tal-Enerġija: 2x batteriji AAA
- Karatteristiċi: Responds to sudden noises, adjustable sensitivity
- Dimensjonijiet: 137 x 68 x 50 mm (5.39 x 2.68 x 1.97 pulzieri)
- Piż: Madwar 5 Uqija (142 grammi)
- Livell ta 'Ħiliet: Requires basic soldering skills
9. Garanzija u Appoġġ
For warranty information or technical support regarding your Whadda Animated Ghost Kit (WSSA166), please refer to the documentation provided with your purchase or contact the retailer/manufacturer directly. As this is a DIY kit, successful operation is dependent on correct assembly and soldering techniques.