1. Introduzzjoni
Grazzi tax-xiriasing the XTUGA ES602 Professional DJ Mixer. This manual provides essential information for the safe and efficient operation of your mixer. Please read it thoroughly before use and retain it for future reference.
The XTUGA ES602 is a versatile 7-channel mixing console designed for stage audio, DJ applications, and music production. It features XLR and LINE inputs, +48V phantom power, a built-in digital effect processor, USB/MP3 playback, and Bluetooth connectivity.
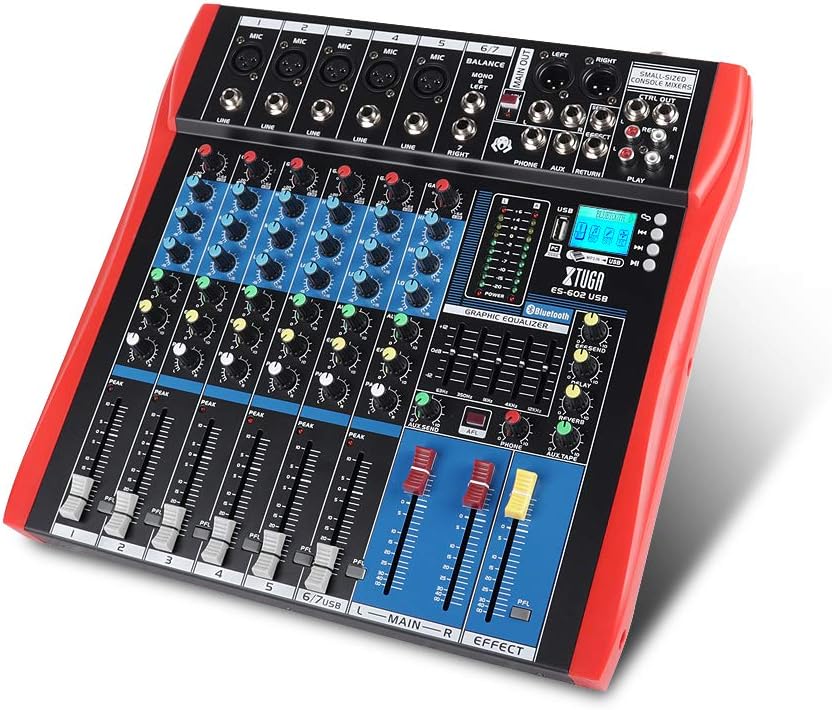
Figure 1: XTUGA ES602 Professional DJ Mixer overview. This image displays the top panel of the mixer, showing all input channels, control knobs, faders, and the master section with the USB/MP3/Bluetooth module.
2. Istruzzjonijiet tas-Sigurtà
- Provvista tal-Enerġija: Uża biss l-adapter tal-enerġija speċifikat. Kun żgur li l-volumtage taqbel mal-provvista tal-enerġija lokali tiegħek.
- Ilma u Umdità: Tesponix l-unità għax-xita jew għall-umdità. Tpoġġix oġġetti mimlija b'likwidi fuq l-unità.
- Ventilazzjoni: Aċċerta ruħek li jkun hemm ventilazzjoni adegwata. Timblokkax il-fetħiet tal-ventilazzjoni.
- Sorsi tas-Sħana: Żomm l-unità 'l bogħod minn sorsi tas-sħana bħal radjaturi, reġistri tas-sħana, stufi, jew apparati oħra li jipproduċu s-sħana.
- Tindif: Clean only with a dry cloth. Avoid liquid cleaners.
- Servizzi: Tippruvax tagħmel manutenzjoni fuq din l-unità int stess. Irreferi għal kull manutenzjoni għand persunal tas-servizz kwalifikat.
- Qawwa fantasma: When using condenser microphones, ensure +48V phantom power is activated only after connecting the microphone and before connecting to other devices to prevent damage.
3. Karatteristiċi
The XTUGA ES602 mixer offers a range of features for professional audio mixing:
- Konsola tat-Taħlit b'7 Kanal: Equipped with XLR and LINE inputs for versatile connectivity.
- +48V Enerġija Phantom: Available for condenser microphones.
- Kontrolli tal-Kanal Individwali: Each channel features GAIN, 3-band EQ (HIGH, MID, LOW), AUX, EFFECT, PAN control knobs, and a volume fader.
- PFL (Pre-Fader Listen) Switch: Allows monitoring of individual channels via headphones.
- Built-in Digital Effect Processor: Includes REPEAT, EFF SEND, DELAY, SEND, and RETURN controls for integrated effects.
- USB/MP3 Playback and Recording: Direct USB input for MP3 playback from U-disk and recording capabilities.
- Konnettività Bluetooth: Seamlessly connect mobile phones, tablets, and other Bluetooth-enabled devices for audio playback.
- Riżultati Prinċipali: XLR (L/R) and 1/4" (L/R) stereo output jacks.
- Output REC: Dedicated REC (L/R) output for external recording devices.
- Interface tal-headset: For monitoring audio.
- Indikaturi LED: Power and output level indicator lights for easy monitoring.
- Disinn Durabbli: Ultra-thin, all-metal chassis for high density dust resistance and durability.
4. Kontrolli u Funzjonijiet
This section details the various controls and connections on your XTUGA ES602 mixer.
4.1 Input Channels (Channels 1-7)
- Input tal-MIC (XLR): Connects balanced microphones.
- LINE Input (1/4" Jack): Connects line-level instruments or devices.
- +48V PHANTOM Power Switch: Activates phantom power for condenser microphones on XLR inputs.
- Pum GAIN: Jaġġusta s-sensittività tad-dħul għal kull kanal.
- HIGH, MID, LOW EQ Knobs: 3-band equalizer for adjusting the treble, midrange, and bass frequencies of each channel.
- Buttuna AUX: Controls the send level to the auxiliary output.
- Pum EFFETT: Controls the send level to the internal effect processor.
- Pum PAN: Adjusts the stereo position (left/right) of the channel.
- PFL Switch: Engages Pre-Fader Listen for monitoring the channel's signal before the fader.
- LED PEAK: Jixgħel meta s-sinjal tad-dħul ikun għoli wisq, u jindika potenzjal ta' qtugħ.
- Fader tal-Kanal: Adjusts the output volume of the individual channel.
4.2 Sezzjoni Prinċipali
- MAIN OUT (XLR & 1/4" Jacks): Balanced stereo main outputs for connecting to amplifiers jew kelliema li jaħdmu bil-mutur.
- REC OUT (RCA Jacks): Stereo output for connecting to recording devices.
- PHONES Jack (1/4"): Stereo headphone output for monitoring.
- AUX SEND/RETURN Jacks: For connecting external effects processors or monitoring systems.
- MAIN Faders (L/R): Controls the overall output volume of the mixer.
- EFFECT Level Knob: Adjusts the overall level of the internal effects.
- REPEAT, DELAY Knobs: Controls parameters of the digital effect processor.
- LEVEL Meter: LED display showing the main output level.

Figura 2: Dettaljat view of the XTUGA ES602 mixer's channel controls and LED level meters. This image highlights the individual channel knobs for GAIN, EQ, AUX, EFFECT, PAN, and the main output level indicators.
4.3 USB/MP3/Bluetooth Module
- Port USB: For connecting a USB flash drive for MP3 playback or connecting to a computer for recording/playback.
- Display LCD: Shows current mode, track information, and Bluetooth status.
- Buttuni tal-Kontroll: Play/Pause, Stop, Previous/Next Track, Mode selection (USB/Bluetooth/PC).
- Indikatur Bluetooth: Juri l-istatus tal-konnessjoni Bluetooth.

Figure 3: Close-up of the Bluetooth and MP3 connection section on the XTUGA ES602 mixer. This image shows the USB port, LCD display, and control buttons for media playback and Bluetooth pairing.
5. Setup
Follow these steps to set up your XTUGA ES602 mixer.
5.1 Konnessjoni tal-Enerġija
- Kun żgur li s-swiċċ tal-enerġija tal-mixer ikun fil-pożizzjoni OFF.
- Connect the provided power adapter to the mixer's power input.
- Ipplaggja l-adapter tal-enerġija f'bokk tal-enerġija AC adattat.
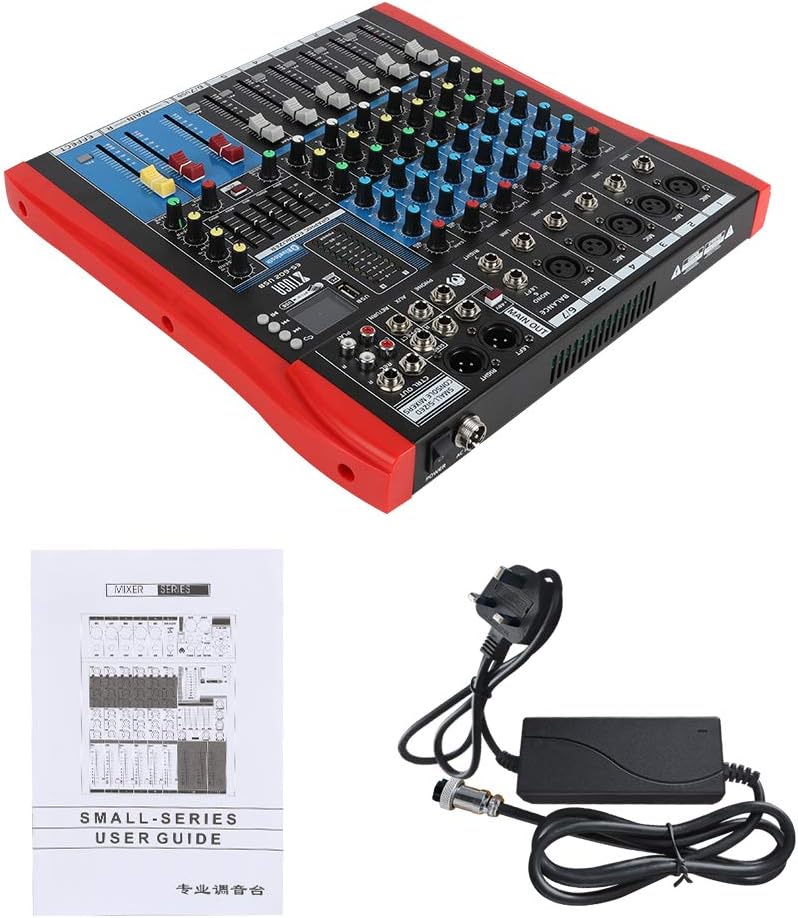
Figure 4: XTUGA ES602 mixer shown with its power adapter and user guide. This illustrates the components included for initial setup.
5.2 Konnessjoni ta' Mikrofoni u Strumenti
- For microphones, connect XLR cables to the Input MIC jacks. If using condenser microphones, activate the +48V PHANTOM Power Switch for the respective channel.
- For line-level instruments (keyboards, guitars with preamps, etc.), connect 1/4" TS/TRS cables to the Input tal-LINJA ġakkijiet.
- Ensure all channel GAIN knobs are set to their minimum position before connecting.
5.3 Konnessjoni ta' Apparati tal-Ħruġ
- Qabbad l-ispikers ewlenin tiegħek jew ampaktar ħajja għall - MAIN OUT (XLR or 1/4") ġakkijiet.
- For recording, connect an external recording device to the REC OUT (RCA) ġakkijiet.
- Ipplaggja l - headphones fil - TELEFONiċi jack for monitoring.
5.4 Connecting to a Computer for Recording
- Connect a USB cable from the mixer's Port USB lill-kompjuter tiegħek.
- The mixer should be recognized as an audio device by your operating system.
- Select the mixer as the input device in your digital audio workstation (DAW) or recording software.
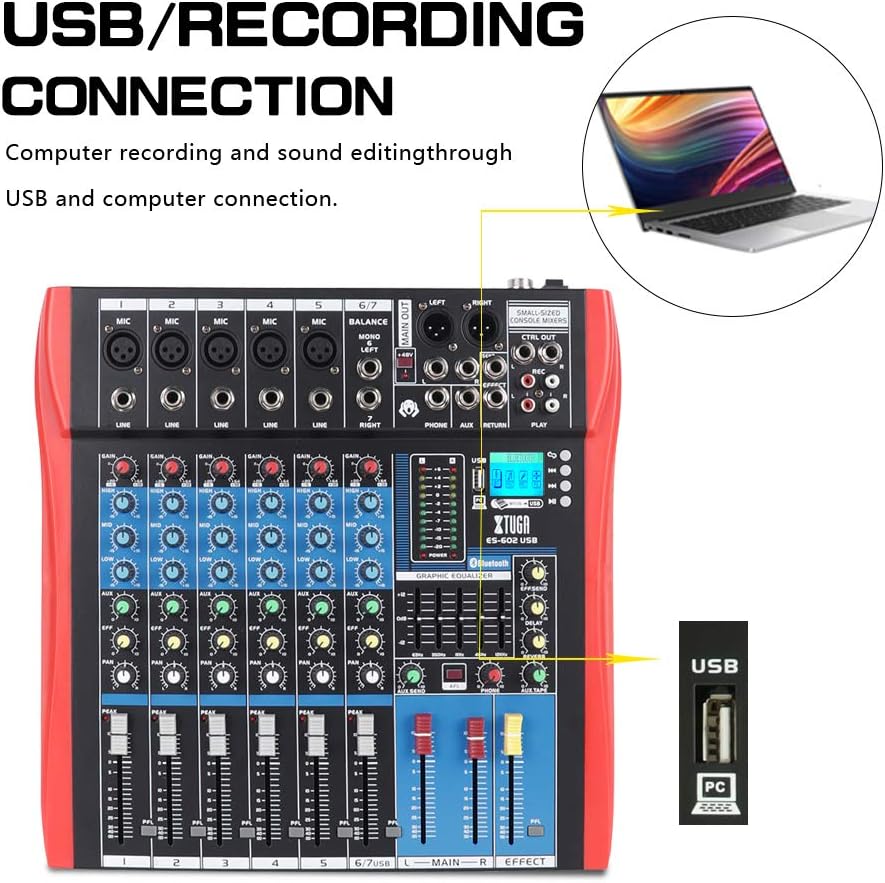
Figure 5: Illustration of the XTUGA ES602 mixer connected to a laptop via USB for recording and sound editing. This highlights the USB input port and its function.
6. Joperaw
This section covers the basic operation of your XTUGA ES602 mixer.
6.1 Powering On and Initial Level Setting
- After all connections are made, turn on your mixer's power switch.
- Bil-mod għolli l- MAIN Faders għal livell ta’ smigħ komdu.
- For each active input channel, gradually increase the pum GAIN sal- PEAK LED flashes only occasionally during the loudest parts of the signal.
- Adjust individual Faders tal-Kanal to balance the mix.
6.2 L-użu tal-Bluetooth
- Agħfas il- buttuna MODE on the USB/MP3/Bluetooth module until "Bluetooth" appears on the LCD display. The Bluetooth indicator will flash.
- On your mobile device, search for Bluetooth devices and select "XTUGA MIXER" (or similar).
- Once paired, the Bluetooth indicator will become solid. You can now play audio from your device through the mixer.
- Use the module's control buttons for Play/Pause, Next/Previous track.
6.3 USB/MP3 Playback
- Daħħal flash drive USB li fih awdjo MP3 files fil- Port USB.
- The mixer should automatically switch to USB mode and begin playback. If not, press the buttuna MODE biex tagħżel USB.
- Use the control buttons to navigate tracks and control playback.
6.4 Ir-reġistrazzjoni
- To USB Drive: In USB/MP3 mode, press the buttuna REC on the module to start recording the main mix to the connected USB drive. Press again to stop.
- Għall-Kompjuter: Ensure the mixer is connected to your computer via USB. Open your recording software and select the mixer as the input device. Start recording within your software.
6.5 L-Użu tal-Effetti
- Aġġusta l- EFFECT knob on individual channels to send a portion of that channel's signal to the internal effect processor.
- Uża l- EFFECT Level knob in the master section to control the overall volume of the applied effect.
- Aġġusta l- IRREpeti u DEWMIEN knobs to fine-tune the characteristics of the digital effect.
7. Manutenzjoni
Manutenzjoni xierqa tiżgura l-lonġevità u l-prestazzjoni ottimali tal-mixer tiegħek.
- Tindif: Use a soft, dry cloth to clean the exterior of the mixer. Do not use abrasive cleaners, solvents, or waxes.
- Protezzjoni mit-Trab: Meta ma tkunx qed tużah, għatti l-mixer biex tipproteġih mit-trab u l-fdalijiet.
- Ħażna: Aħżen il-mixer f'post frisk u niexef 'il bogħod mix-xemx diretta u minn temperaturi estremi.
- Ġestjoni tal-Kejbil: Evita li tgħawweġ jew tgħaqqad il-kejbils b'mod eċċessiv. Skonnettja l-kejbils billi tiġbed il-plagg, mhux il-kejbil innifsu.
8 Issolvi l-problemi
Jekk tiltaqa' ma' problemi bil-mixer tiegħek, irreferi għall-problemi u s-soluzzjonijiet komuni li ġejjin.
- Ebda Ħsejjes tal-Ħsejjes:
- Iċċekkja jekk il-mixer hu mixgħul.
- Tiżgura kollox MAIN Faders and individual Faders tal-Kanal are raised.
- Verify that output cables are securely connected to your amplifier/kelliema.
- Iċċekkja l-volum fuq tiegħek amplifier/kelliema.
- Ebda Sinjal tad-Dħul:
- Ensure microphones/instruments are properly connected to the correct input jacks.
- Iċċekkja jekk il- pum GAIN for the respective channel is sufficiently turned up.
- If using a condenser microphone, ensure +48V Enerġija FANTASMA hija attivata.
- Test input sources (microphones, instruments) with another device to confirm they are working.
- Ħoss Mgħawġ:
- Naqqas il- pum GAIN for the offending channel if the PEAK LED huwa kontinwament mixgħul.
- Baxxi l- MAIN Faders if the output level meter is consistently in the red.
- Iċċekkja għal kejbils bil-ħsara.
- Kwistjonijiet ta' Konnessjoni Bluetooth:
- Ensure the mixer is in Bluetooth mode (LCD shows "Bluetooth").
- Kun żgur li l-Bluetooth tat-tagħmir mobbli tiegħek huwa attivat u fil-firxa tiegħu.
- Ipprova neħħi l-akkoppjar u erġa' qabbad l-apparat.
- Il-Plekkjar tal-USB Mhux Jaħdem:
- Ensure the USB drive is properly inserted and contains compatible MP3 files.
- Agħfas il- buttuna MODE to ensure the mixer is in USB mode.
- Ipprova USB drive differenti.
9. Speċifikazzjonijiet
| Karatteristika | Speċifikazzjoni |
|---|---|
| Numru tal-Mudell | ES602 (also ES802/1202 series) |
| Numru ta 'Kanali | 7 |
| Teknoloġija tal-Konnettività | Awżiljarju, Bluetooth, USB |
| Input Awdjo | Auxiliary, USB, XLR |
| Tip ta' Konnettur tal-Output | Awżiljarju, XLR |
| Sors tal-Enerġija | Corded Elettriku |
| Piż tal-oġġett | 3.59 kg |
| Dimensjonijiet tal-Prodott | 46 x 46 x 14 ċm |
| Manifattur | XTUGA |
| UPC | 784124158754 |
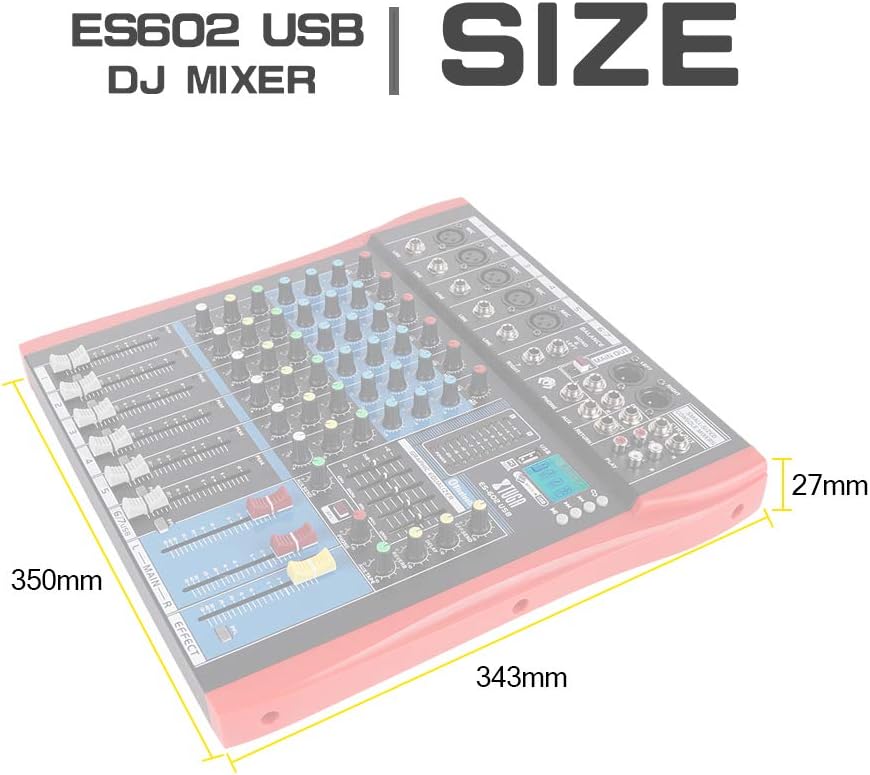
Figure 6: Dimensions of the XTUGA ES602 USB DJ Mixer, showing measurements of 350mm length, 343mm width, and 27mm height.
10. Garanzija u Appoġġ
XTUGA products are designed for reliability and performance. For warranty information and technical support, please refer to the warranty card included with your product or visit the official XTUGA websit. Żomm l-irċevuta tax-xiri tiegħek bħala prova tax-xiri għal kwalunkwe talba ta' garanzija.