
ASUS Prime B450M-K II (90MB1600-M0EAY0)
Manwal tal-Utent tal-Motherboard tal-ASUS Prime B450M-K II
Model: 90MB1600-M0EAY0
1. Introduzzjoni
The ASUS Prime B450 Series motherboards provide the solid foundation needed for your first build, plus flexibility to grow with your ambitions. We've melded all the good stuff that's packed into AMD Ryzen™ processors with essential ASUS design and engineering, so you benefit from industry-leading technologies — including automated system tuning, comprehensive cooling controls, and immersive onboard audio. When you build with an ASUS Prime B450 Series motherboard, you build smart, easy and affordably.
Karatteristiċi Ewlenin
- Tkessiħ komprensiv: PCH heat sink and Xpert fan
- Konnettività ultra-veloċi: M.2 support, 1GB Ethernet and USB 3.2 Gen 1 Type-A
- Protezzjoni 5X III: Multiple hardware protection devices for all-round system protection
- Dawl LED: lighting control for PCIe slots and audio trace paths
2. Kontenut tal-Pakkett
Iċċekkja li l-oġġetti kollha huma preżenti u f'kundizzjoni tajba malli tiftaħ il-pakkett.

Image: ASUS Prime B450M-K II Motherboard and included accessories.
- ASUS Prime B450M-K II Motherboard
- Gwida għall-Utent / Manwal
- Tarka I / O
- Kejbils SATA 6Gb/s (2x)
- M.2 Anchor Screw Package
- DVD ta 'Appoġġ
3. Prodott Aktarview
Familiarize yourself with the layout and components of your motherboard.

Immaġni: Minn fuq għal isfel view of the ASUS Prime B450M-K II motherboard.
The image above displays the main components including the AMD AM4 CPU socket, DDR4 DIMM slots, PCIe slots, M.2 slot, SATA ports, and various headers for front panel connections.
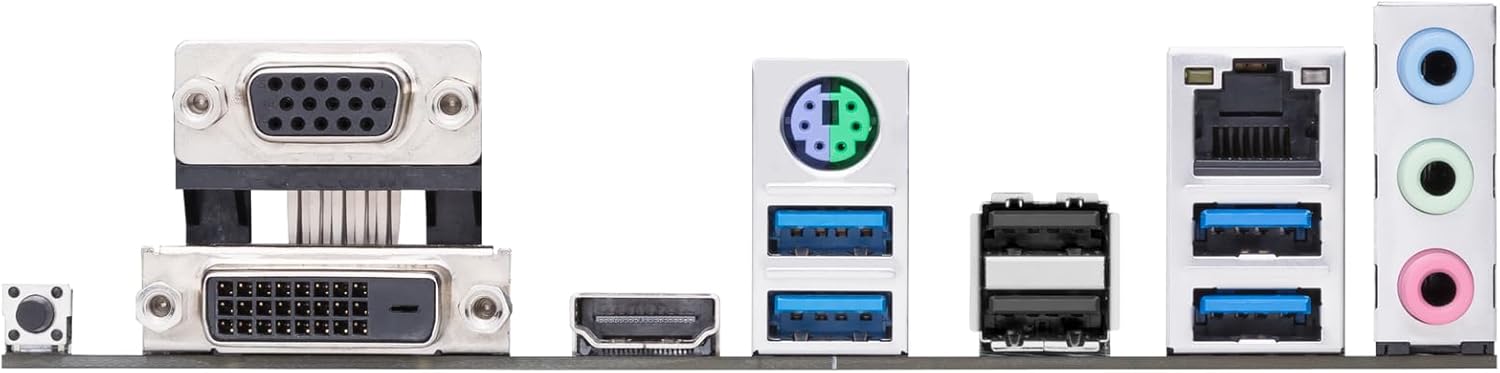
Image: Rear I/O Panel of the ASUS Prime B450M-K II motherboard.
The rear I/O panel provides connectivity for external devices, including USB ports, Ethernet, audio jacks, and video outputs (DVI-D, D-Sub/VGA, HDMI).
4. Setup u Installazzjoni
4.1. Qabel ma Tibda
- Ensure you have a static-free environment. Use an anti-static wrist strap or frequently touch a grounded metal object.
- Verify compatibility of all components (CPU, RAM, GPU, PSU) with your motherboard.
- For AMD Ryzen™ 3000 Series desktop processors used with 400 Series motherboards, a compatible BIOS update may be required. Visit the manufacturer's website for guidance on BIOS update procedures.
4.2. Installazzjoni tas-CPU
The motherboard supports AMD AM4 socket CPUs. Handle the CPU by its edges to avoid touching the pins or contacts.

Image: Close-up of the CPU socket area on the motherboard.
- Sib is-sokit tas-CPU fuq il-motherboard.
- Erfa' l-lieva tat-tagħbija fuq il-ġenb tas-sokit.
- Carefully align the triangular marker on the CPU with the corresponding marker on the socket.
- Niżżel is-CPU bil-mod fis-sokit. Tisforzahx.
- Lower the load lever back into place to secure the CPU.
4.3. Installazzjoni tas-CPU Cooler
After installing the CPU, install the CPU cooler. If using the stock AMD cooler, ensure thermal paste is pre-applied or apply a thin, even layer of thermal paste to the CPU's integrated heat spreader (IHS).
- Position the cooler over the CPU, aligning the mounting holes with the motherboard's backplate.
- Secure the cooler by tightening the screws in a diagonal pattern until snug.
- Qabbad il-kejbil tal-fann tas-CPU mal-header CPU_FAN fuq il-motherboard.
4.4. Installazzjoni tal-Memorja (RAM)
The motherboard features two DDR4 DIMM slots. For optimal performance, refer to the motherboard manual for recommended slot population for dual-channel configuration.
- Iftaħ il-klipps fiż-żewġt itruf tas-slott tad-DIMM.
- Allinja l-islott fuq il-modulu tal-memorja maċ-ċavetta fl-islott tad-DIMM.
- Agħfas sew 'l isfel fuq iż-żewġt itruf tal-modulu tal-memorja sakemm il-klipps jidħlu f'posthom.
4.5. Storage Device Installation (M.2, SATA)
Install your M.2 SSD and/or SATA drives.
- M.2 SSD: Insert the M.2 SSD into the M.2 slot at an angle, then push it down and secure it with the provided M.2 anchor screw.
- Drajvs SATA: Connect SATA data cables from your drives to the SATA 6Gb/s ports on the motherboard. Connect power cables from your PSU to the drives.
4.6. Graphics Card (PCIe) Installation
Installa l-karta grafika tiegħek fl-islott primarju tal-PCIe x16.
- Open the retention clip on the PCIe x16 slot.
- Align the graphics card with the slot and press down firmly until it clicks into place.
- Secure the card to your PC case with screws.
- Qabbad kwalunkwe kejbil tal-enerġija PCIe meħtieġ mill-PSU tiegħek mal-karta grafika.
4.7. Konnessjoni tal-Periferali u l-Enerġija
Connect the main power supply unit (PSU) cables, front panel connectors, and external peripherals.
- Connect the 24-pin ATX power connector and the 8-pin ATX 12V power connector from your PSU to the motherboard.
- Connect front panel headers (power button, reset button, HDD LED, power LED) to the F_PANEL header.
- Connect USB 2.0 and USB 3.2 Gen 1 front panel headers.
- Connect front panel audio header.
- Connect external peripherals (monitor, keyboard, mouse) to the rear I/O panel.
5. It-Tħaddim tal-Motherboard Tiegħek
5.1. Konfigurazzjoni tal-BIOS/UEFI
The BIOS (Basic Input/Output System) or UEFI (Unified Extensible Firmware Interface) is the first software that runs when you power on your computer. It initializes hardware components and loads the operating system.
- Biex tidħol fis-Setup tal-BIOS/UEFI, agħfas il-buttuna DEL ċavetta matul it-Test Awtomatiku tal-Power-On (POST).
- Navigate through the menus using your keyboard or mouse to configure system settings, boot order, and overclocking options.
5.2. Installazzjoni tas-sewwieq
After installing your operating system, install the necessary drivers for your motherboard components to ensure optimal performance and stability. Drivers can be found on the included Support DVD or downloaded from the ASUS official websit.
- Install chipset drivers first.
- Install LAN, audio, and other peripheral drivers.
- Install graphics card drivers from the GPU manufacturer's websit.
5.3. Utilitajiet tas-Softwer
ASUS provides various software utilities to enhance your user experience, such as AI Suite 3 for system tuning and Fan Xpert for comprehensive cooling control.
6. Manutenzjoni
6.1. Tindif
Tindif regolari jgħin biex iżomm prestazzjoni ottimali u jestendi l-ħajja tal-motherboard tiegħek.
- Always power off and unplug your PC before cleaning.
- Uża arja kkompressata biex tneħħi t-trab mill-fannijiet, is-sinkijiet tas-sħana, u komponenti oħra.
- Use a soft, lint-free cloth to wipe surfaces. Avoid using liquid cleaners directly on components.
6.2. BIOS/Driver Updates
Iċċekkja l-appoġġ tal-ASUS perjodikament website for updated BIOS versions and drivers. Updates can improve system stability, performance, and add support for new hardware.
- Follow the instructions provided by ASUS for BIOS updates carefully to avoid system damage.
- Always back up important data before performing major updates.
7 Issolvi l-problemi
Din it-taqsima tipprovdi soluzzjonijiet għal kwistjonijiet komuni li tista’ tiltaqa’ magħhom.
- Ebda Qawwa: Ensure all power cables (24-pin ATX, 8-pin ATX 12V) are securely connected to the motherboard and PSU. Check PSU functionality.
- Ebda Display: Verify that the monitor is connected to the graphics card (or motherboard if using integrated graphics) and powered on. Reseat the graphics card and RAM modules.
- Instabbiltà/Ħsarat tas-Sistema: Check RAM compatibility and seating. Ensure CPU cooler is properly installed and thermal paste is applied. Update drivers and BIOS.
- Periferali Mhux Rilevat: Check cable connections. Try a different port. Install relevant drivers.
- Kwistjonijiet tal-BIOS: If you encounter issues after a BIOS update, try clearing the CMOS (Complementary Metal-Oxide-Semiconductor) by removing the CMOS battery for a few minutes or using the CLRTC jumper (refer to the detailed manual for location).
8. Speċifikazzjonijiet Tekniċi
| Karatteristika | Speċifikazzjoni |
|---|---|
| Brand | ASUS |
| Serje | Prim B450M-K II |
| Numru tal-Mudell tal-Oġġett | 90MB1600-M0EAY0 |
| Socket tas-CPU | Sokit AM4 |
| Proċessuri Kompatibbli | AMD Ryzen 1000, 2000, 3000, 4000, 5000 series |
| Tip ta' Ċipset | AMD B450 |
| Teknoloġija tal-Memorja RAM | DDR4 |
| Veloċità tal-Memorja | 4400 MHz |
| Numru ta 'USB 2.0 Ports | 2 |
| Sistema Operattiva | Windows |
| Piż tal-oġġett | 1.1 liri |
| Dimensjonijiet tal-Prodott | 8.7 x 1.77 x 8.9 pulzieri |
| Voltage | 12 Volts |
| Data L-Ewwel Disponibbli | 28 ta’ Settembru, 2020 |
9. Garanzija u Appoġġ
For detailed warranty information and technical support, please refer to the warranty card included in your product package or visit the official ASUS support websit. Il website provides drivers, FAQs, and contact information for customer service.
Appoġġ onlajn: www.asus.com/support/
Ask a question about this manual
Ask about setup, troubleshooting, compatibility, parts, safety, or missing instructions. Manuals+ will review the question and use this page’s manual context to help answer it.