
1. Introduzzjoni
This manual provides essential information for the installation, operation, and maintenance of your ASUS Prime A520M-K motherboard. The ASUS Prime A520M-K is a Micro-ATX motherboard designed for AMD AM4 socket processors, supporting 3rd Gen AMD Ryzen processors. It features DDR4 memory support, PCIe expansion, and multiple display outputs for a reliable computing experience.
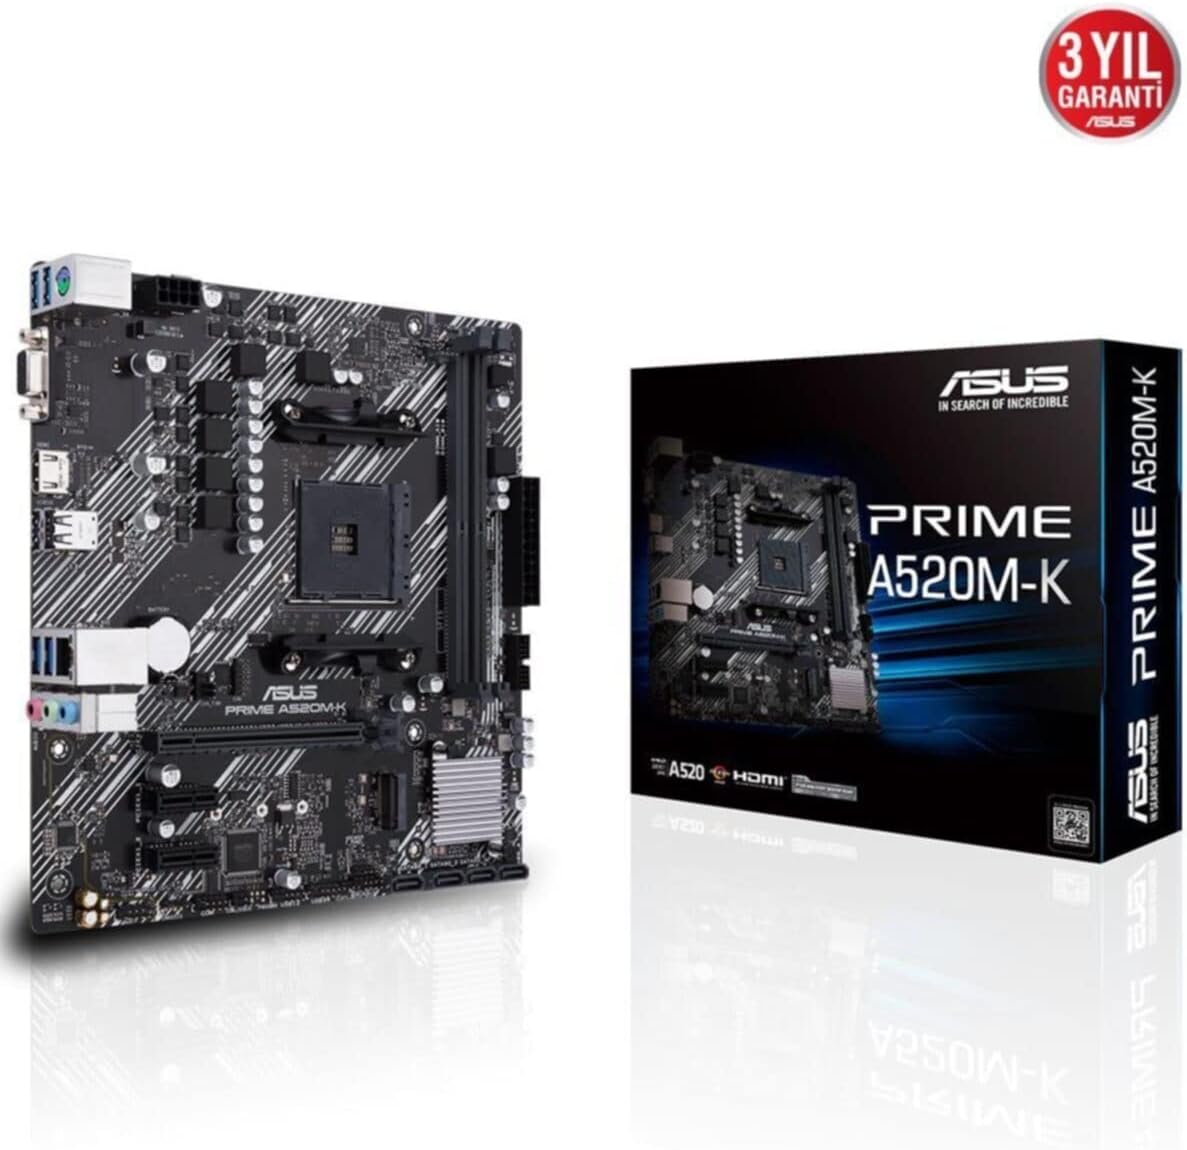
Figure 1: ASUS Prime A520M-K Motherboard and Retail Box.
2. Setup u Installazzjoni
Careful installation is crucial for optimal performance. Ensure your system components are compatible with the ASUS Prime A520M-K motherboard.
2.1. Installazzjoni tal-Proċessur
The motherboard features an AMD AM4 socket. Align your AMD AM4 processor with the socket, ensuring the triangular markers on the CPU and socket match. Gently place the CPU into the socket without applying force, then secure it with the retention lever.
2.2. Installazzjoni tal-Memorja
The ASUS Prime A520M-K supports up to 64GB of DDR4 RAM across two DIMM slots. Insert DDR4 memory modules into the slots, ensuring they are properly seated until the clips on both ends lock into place.
2.3. Karti ta' Espansjoni
Utilize the PCIe expansion slots for graphics cards or other expansion cards. Align the card with the slot and press firmly until it is fully seated. Secure the card with a screw to the chassis.
2.4. Apparati tal-Ħażna
Connect SATA storage devices (HDDs/SSDs) to the available SATA 6Gb/s ports using SATA data cables. Ensure power cables from your power supply are also connected to these devices.
2.5. Konnessjonijiet tal-Enerġija
Qabbad il-konnettur ewlieni tal-enerġija ATX ta' 24 pin u l-konnettur tal-enerġija ATX ta' 8 pin 12V mill-provvista tal-enerġija tiegħek mal-portijiet korrispondenti fuq il-motherboard.
2.6. Konnetturi tal-Panew ta 'quddiem
Connect your chassis's front panel cables (power button, reset button, USB ports, audio jacks, LED indicators) to the designated headers on the motherboard. Refer to the motherboard diagram for precise locations.
2.7. Il-Panel tal-I/O ta' wara
The rear I/O panel includes various ports for peripherals:
- D-SUB (VGA) Port: For connecting to older monitors.
- Port HDMI: For connecting to modern displays.
- Portijiet USB 2.0: For connecting peripherals like keyboards and mice.
- Port tal-LAN: Għall-konnettività tan-netwerk.
- Ġakki tal-Awdjo: For speakers, headphones, and microphones.

Figure 2: Rear I/O panel with D-SUB, HDMI, USB, LAN, and audio ports.
Vidjo 1: Prodott Fuqview of the ASUS Prime A520M-K Motherboard, demonstrating key features and connectivity options for easy installation.
3. Istruzzjonijiet Operattivi
Ladarba l-komponenti kollha jkunu installati u konnessi, tista' tixgħel is-sistema tiegħek.
3.1. L-Ewwel Boot
Upon the first boot, the system may enter the BIOS/UEFI setup utility. This allows you to configure system settings, boot order, and monitor hardware status. Press the designated key (usually Del or F2) during startup to access the BIOS.
3.2. Installazzjoni tas-Sistema Operattiva
Install your preferred operating system (e.g., Windows) from a bootable USB drive or DVD. Follow the on-screen instructions provided by the operating system installer.
3.3. Installazzjoni tas-sewwieq
After installing the operating system, install the necessary drivers for the motherboard's chipset, audio, LAN, and any other integrated components. These drivers are typically provided on a support DVD or can be downloaded from the ASUS official websit.
4. Manutenzjoni
Manutenzjoni regolari tgħin biex tiżgura l-lonġevità u t-tħaddim stabbli tal-motherboard tiegħek.
- Tneħħija tat-Trab: Naddaf it-trab mill-motherboard u l-komponenti perjodikament bl-użu ta' arja kkompressata. Kun żgur li s-sistema tkun mitfija u skonnettjata qabel ma tnaddafha.
- Aġġornamenti tal-BIOS/UEFI: Keep your BIOS/UEFI firmware updated to benefit from performance improvements, bug fixes, and support for new hardware. Download updates only from the official ASUS websit.
- Ġestjoni tal-Kejbil: Kun żgur li l-kejbils kollha huma mgħoddija sew u mwaħħlin sew biex tevita li l-fluss tal-arja jiġi mblukkat u li jkun hemm skonnessjonijiet aċċidentali.
- Batterija CMOS: The motherboard uses a small lithium-ion battery (CR2032) to retain BIOS settings and system time. If your system consistently loses time or BIOS settings, this battery may need replacement.
5 Issolvi l-problemi
Jekk tiltaqa' ma' problemi, irreferi għall-passi komuni li ġejjin għas-soluzzjoni tal-problemi:
- Ebda Qawwa: Check all power connections, including the 24-pin and 8-pin connectors to the motherboard, and ensure the power supply is switched on.
- Ebda Display: Verify that your monitor is connected to the correct display output (D-SUB or HDMI) on the motherboard or dedicated graphics card. Reseat the graphics card and RAM modules.
- Instabbiltà/Ħsarat tas-Sistema: This can be caused by incompatible RAM, overheating, or outdated drivers. Check RAM compatibility, ensure proper cooling, and update all drivers.
- Żbalji fil-Kodiċi POST: If your motherboard has diagnostic LEDs or a POST code display, consult the ASUS website or full manual for the meaning of specific codes.
- Irrisettjar tal-BIOS: To reset BIOS settings to default, locate the CLRTC (Clear CMOS) jumper on the motherboard and follow the instructions in the full manual, or remove the CMOS battery for a few minutes.
6. Speċifikazzjonijiet
Detailed technical specifications for the ASUS Prime A520M-K motherboard:
| Karatteristika | Speċifikazzjoni |
|---|---|
| Brand | ASUS |
| Serje | PRIME A520M-K |
| Numru tal-Mudell | 90MB1500-M0EAY0 |
| Socket tas-CPU | Sokit AM4 |
| Proċessuri Kompatibbli | AMD AM4 Socket 3rd Gen AMD Ryzen |
| Tip ta' Ċipset | AMD A520 |
| Teknoloġija tal-Memorja RAM | DDR4 SDRAM |
| Slots tal-Memorja | 2 x DIMM |
| Memorja Massima Appoġġjata | 64GB |
| Veloċità tal-Arloġġ tal-Memorja | 2133 MHz (Bażi) |
| Numru ta 'USB 2.0 Ports | 2 (I/O ta' wara) |
| Output tal-vidjo | D-SUB, HDMI |
| Fattur tal-Formola | Mikro ATX |
| Dimensjonijiet tal-Prodott (LxWxH) | 8.9 x 8.7 x 0.79 pulzieri |
| Piż tal-oġġett | 1.19 liri |
| Kulur | Iswed |
| Pjattaforma | Windows |
| Data L-Ewwel Disponibbli | 18 ta’ Awwissu, 2020 |
7. Garanzija u Appoġġ
The ASUS Prime A520M-K motherboard typically comes with a manufacturer's warranty. Please refer to the warranty card included with your product or visit the official ASUS support website for detailed warranty terms and conditions. For technical assistance, driver downloads, and further support, please visit the Appoġġ ASUS websit.

Figure 3: ASUS Prime A520M-K Motherboard, indicating a 3-year warranty.