
1. Introduzzjoni
This manual provides detailed instructions for the installation, operation, and maintenance of your ASUS TUF Gaming B550-PLUS ATX Gaming Motherboard. Designed for AMD 3rd Gen Ryzen CPUs, this motherboard offers robust performance and stability with features like PCIe 4.0, 2.5Gb LAN, and comprehensive cooling solutions.
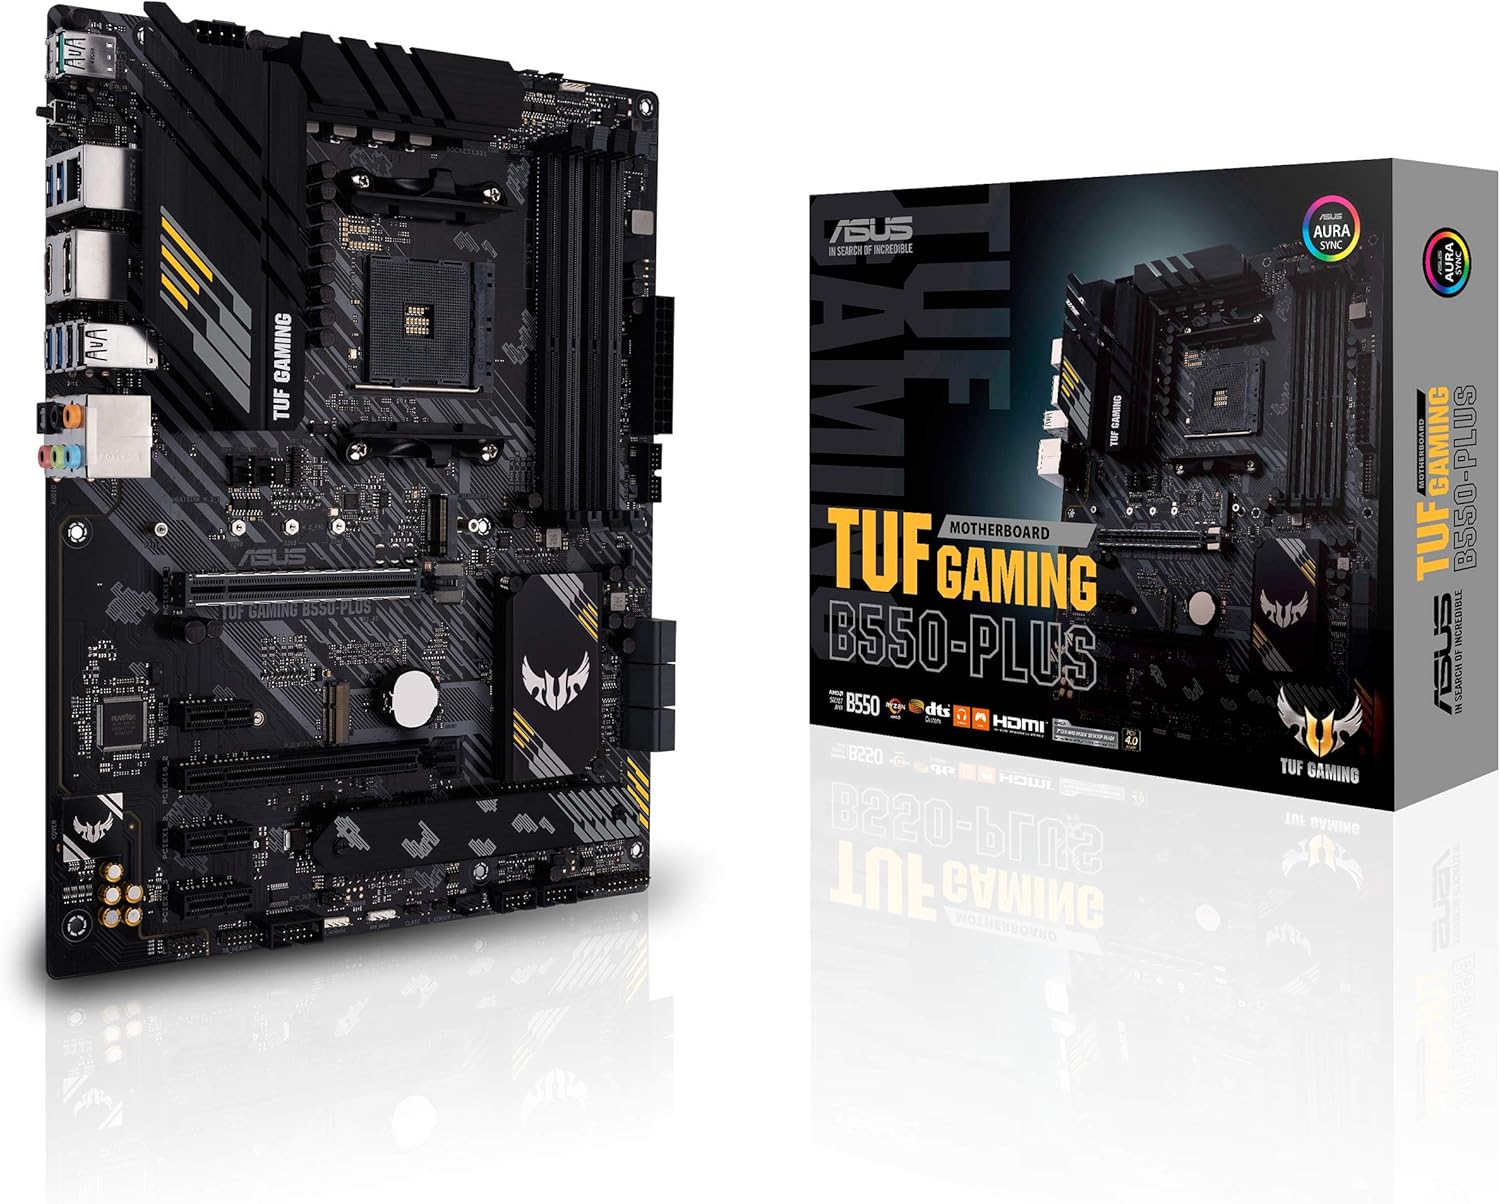
Figure 1.1: The ASUS TUF Gaming B550-PLUS Motherboard and its retail packaging.
2. Setup u Installazzjoni
Follow these steps to properly install your motherboard and its components.
2.1 Spakkjar u Spezzjoni
Carefully remove all components from the box. Verify that all items listed in the "What's in the Box" section are present and undamaged.

Figure 2.1: Contents typically found in the ASUS TUF Gaming B550-PLUS retail box, including the motherboard, I/O shield, user guide, support DVD, SATA cables, M.2 screws, and M.2 rubber.
2.2 Komponent Aktarview
Familiarize yourself with the key areas of the motherboard before installation.

Figure 2.2: Key features for gaming immersion, including 4-pin RGB headers, Realtek 2.5 Gb LAN, Realtek S1200A 7.1-channel HD audio codec, 3-pin addressable Gen 2 RGB header, and Aura Sync RGB lighting.

Figure 2.3: Features related to power and performance, such as ProCool Socket with solid pins, military-grade TUF chokes & caps, 64Gb/s M.2 support (PCIe 4.0 x4 & SATA mode), and 32Gb/s M.2 support (PCIe 3.0 x4 & SATA mode).

Figure 2.4: Comprehensive cooling and protection features, including TUF LANGuard & ESD Guards, VRM heatsinks & thermal pads, ASUS SafeSlot, M.2 heatsink, 4-pin PWM/DC fan headers, multi-temperature sources, and AIO water-cooling set support.

Figure 2.5: The rear I/O panel, featuring USB 3.2 Gen 2 (Type-A & Type-C), BIOS Flashback button, HDMI 2.1, DisplayPort 1.2, Realtek 2.5 Gb LAN, 2x USB 3.2 Gen 1, 2x USB 2.0, 1x Optical S/PDIF Out, and audio jacks.
2.3 Processor Installation
- Kun żgur li l-lieva tas-sokit tas-CPU tkun fil-pożizzjoni miftuħa.
- Allinja l-marka trijangulari fuq is-CPU mal-marka fuq is-sokit.
- Poġġi s-CPU bil-mod fis-sokit. Tisforzahx.
- Agħlaq il-lieva tas-sokit biex twaħħal is-CPU.
2.4 Installazzjoni tal-Memorja (RAM)
- Iftaħ il-klipps fiż-żewġt itruf tas-slott tad-DIMM.
- Allinja l-islott fuq il-modulu tal-memorja maċ-ċavetta fl-islott tad-DIMM.
- Daħħal il-modulu tal-memorja sew fl-islott sakemm il-klipps jidħlu f'posthom.
2.5 Installazzjoni ta' Apparat tal-Ħażna (M.2 SSDs)
- Locate the M.2 slots on the motherboard. One slot supports PCIe 4.0 x4, and the other supports PCIe 3.0 x4.
- Remove the M.2 heatsink if present (for the primary M.2 slot).
- Daħħal l-M.2 SSD fl-islott f'angolu ta' 30 grad.
- Push down the SSD and secure it with the provided M.2 screw.
- Erġa' installa l-heatsink tal-M.2 jekk applikabbli.
2.6 Installazzjoni tal-Karta tal-Grafika (PCIe)
- Open the retention clip on the PCIe x16 slot.
- Align the graphics card with the slot and press firmly until it clicks into place.
- Waħħal il-kard max-chassis b'kamin.
2.7 Konnessjonijiet tal-Provvista tal-Enerġija
- Connect the 24-pin ATX power connector.
- Connect the 8-pin (or 4+4 pin) CPU power connector.
- Connect SATA power cables to storage drives as needed.
2.8 Konnessjonijiet ta' Front Panel
Connect the power button, reset button, HDD LED, power LED, and USB/audio headers from your chassis to the corresponding pins on the motherboard. Refer to the motherboard's user guide for exact pin layouts.
2.9 BIOS Update (for Ryzen 5000 series CPUs)
If installing a Ryzen 5000 series CPU, ensure your BIOS is up to date. This motherboard supports BIOS Flashback, allowing you to update the BIOS without a CPU installed.
- Niżżel l-aħħar BIOS file mill-appoġġ tal-ASUS websit għall-mudell speċifiku tal-motherboard tiegħek.
- Semmi mill-ġdid il-BIOS imniżżel file according to ASUS instructions (usually to "TUF GAMING B550-PLUS.CAP").
- Ikkopja l-isem ġdid file to the root directory of a FAT16/FAT32 formatted USB flash drive.
- With the system powered off but connected to power, insert the USB drive into the designated BIOS Flashback USB port on the rear I/O panel (refer to Figure 2.5).
- Press and hold the BIOS Flashback button for approximately three seconds until the LED starts flashing.
- Wait for the LED to stop flashing, indicating the update is complete. This may take several minutes.
- Remove the USB drive and power on the system.
3. It-Tħaddim tal-Motherboard
Once assembled, you can configure your system through the UEFI BIOS and install the operating system.
3.1 UEFI BIOS Overview
The UEFI BIOS (Unified Extensible Firmware Interface Basic Input/Output System) allows you to configure hardware settings, boot order, and system performance. To enter BIOS setup, press the DEL ċavetta jew F2 ċavetta waqt l-istartjar tas-sistema.
- Modalità EZ: Jipprovdi malajr fuqview of system information, fan profiles, and boot priority.
- Modalità Avvanzata: Offers detailed configuration options for CPU, memory, storage, and peripherals.
3.2 Fan Xpert 4 and Q-Fan Control
The motherboard features comprehensive fan control through Fan Xpert 4 software or the UEFI Q-Fan Control utility. This allows for precise tuning of fan speeds based on temperature sensors, ensuring optimal cooling and noise levels.
3.3 Dawl RGB Aura Sync
Customize the RGB lighting effects on your motherboard and connected Aura Sync compatible devices using the ASUS Aura Sync software. The motherboard includes both 4-pin RGB headers and a 3-pin addressable Gen 2 RGB header for extensive customization.
3.4 Konfigurazzjoni Awdjo
The integrated Realtek S1200A 7.1-channel HD audio codec, combined with DTS Sound Unbound and Sonic Studio III, provides high-fidelity audio. Ensure proper driver installation for optimal sound performance.
4. Manutenzjoni
Manutenzjoni xierqa tiżgura l-lonġevità u t-tħaddim stabbli tal-motherboard tiegħek.
- Tneħħija tat-Trab: Naddaf it-trab mill-motherboard u l-komponenti regolarment bl-użu ta' arja kkompressata. Kun żgur li s-sistema tkun mitfija u skonnettjata qabel ma tnaddafha.
- Aġġornamenti tal-BIOS: Iċċekkja l-appoġġ tal-ASUS perjodikament websit għal verżjonijiet ġodda tal-BIOS. L-aġġornamenti jistgħu jtejbu l-istabbiltà, il-kompatibbiltà, u l-prestazzjoni.
- Aġġornamenti tas-sewwieq: Keep all device drivers (chipset, LAN, audio, etc.) updated to ensure optimal performance and compatibility with your operating system.
- Ġestjoni tal-Kejbil: Kun żgur li l-kejbils interni huma mqiegħda pulit biex itejbu l-fluss tal-arja u jipprevjenu l-interferenza.
5 Issolvi l-problemi
Din it-taqsima tindirizza kwistjonijiet komuni li tista’ tiltaqa’ magħhom.
5.1 Ebda Qawwa / Ebda POST (Test Awtomatiku tal-Power-On)
- Iċċekkja l-Konnessjonijiet tal-Enerġija: Ensure the 24-pin ATX and 8-pin CPU power connectors are securely seated.
- Ivverifika l-Komponenti: Reseat the CPU, RAM modules, and graphics card. Try booting with only essential components (CPU, one RAM stick, graphics card if no integrated graphics).
- CMOS ċar: Power off the system, unplug the power cord, and remove the CMOS battery for 5-10 minutes, or use the Clear CMOS jumper if available.
- Flashback tal-BIOS: If using a new CPU generation (e.g., Ryzen 5000 series), ensure the BIOS is updated using the BIOS Flashback feature as described in Section 2.9.
5.2 Instabbiltà tas-Sistema / Ħabtiet
- Kwistjonijiet ta' Memorja: Run a memory diagnostic tool (e.g., Windows Memory Diagnostic, MemTest86). Try different RAM slots or modules.
- Is-sħana żejda: Monitor CPU and GPU temperatures. Ensure all fans are functioning correctly and heatsinks are properly seated.
- Kunflitti tas-Sewwieqa: Update all drivers to their latest versions. Perform a clean installation of graphics drivers.
- Provvista tal-Enerġija: Kun żgur li l-unità tal-provvista tal-enerġija (PSU) tiegħek għandha biżżejjed ilmatage għall-komponenti kollha.
5.3 Network Connectivity Issues (2.5Gb LAN)
- Installazzjoni tas-sewwieq: Ensure the Realtek 2.5Gb LAN driver is correctly installed.
- Iċċekkja tal-Cable: Verify the Ethernet cable is securely connected to both the motherboard and the router/modem.
- Router/Modem: Erġa' ibda t-tagħmir tan-netwerk tiegħek.
6. Speċifikazzjonijiet Tekniċi
| Karatteristika | Speċifikazzjoni |
|---|---|
| Brand | ASUS |
| Isem tal-Mudell | TUF GAMING B550-PLUS |
| Socket tas-CPU | Sokit AM4 |
| Proċessuri Kompatibbli | AMD 3rd Generation Ryzen, Ryzen 5000 Series (with BIOS update) |
| Tip ta' Ċipset | AMD B550 |
| Teknoloġija tal-Memorja RAM | DDR4 |
| Veloċità tal-Arloġġ tal-Memorja | 4400 MHz (OC) |
| Kapaċità Massima tal-Ħażna tal-Memorja | 128 GB |
| Appoġġ PCIe | PCIe 4.0 |
| LAN | 2.5Gb Ethernet (Realtek) |
| Output tal-vidjo | HDMI 2.1 (4K@60Hz), DisplayPort 1.2 |
| Portijiet USB | USB 3.2 Gen 2 Type-C & Type-A, USB 3.2 Gen 1, USB 2.0 |
| M.2 Slots | 2 (one PCIe 4.0 x4, one PCIe 3.0 x4) |
| Fattur tal-Formola | ATX |
| Piż tal-oġġett | 2 liri |
| Dimensjonijiet tal-Prodott | 13.3 x 10.7 x 2.7 pulzieri |
7. Garanzija u Appoġġ
7.1 Informazzjoni dwar Garanzija
ASUS products come with a limited warranty. Please refer to the warranty card included in your product packaging or visit the official ASUS websit għal termini u kundizzjonijiet dettaljati tal-garanzija speċifiċi għar-reġjun tiegħek.
7.2 Appoġġ Tekniku
For technical assistance, driver downloads, BIOS updates, or further inquiries, please visit the official ASUS support websit:
Appoġġ Uffiċjali tal-ASUS Websit
You can also find helpful resources, FAQs, and community forums on the ASUS websit.