
1. Introduzzjoni
This manual provides detailed instructions for the safe and effective use of the DYDZYJ CFsunbird Automatic Step-up/Step-down Voltage Regulator Module, Model XY-SJV-4. This module is designed to automatically adjust its output voltage to a set value, regardless of whether the input voltage is higher or lower than the desired output. It is suitable for various electronic projects requiring a stable and adjustable power supply.
2. Karatteristiċi tal-prodott
- Automatic Step-up and Step-down (Buck-Boost) functionality.
- Vol ta 'input wiesa'tagFirxa e: 5.5V sa 30V.
- Vol ta' output aġġustabblitagFirxa e: 0.5V sa 30V.
- High efficiency magnetic ring for stable operation.
- Compact design for easy integration into projects.
- Capable of natural heat dissipation up to 3A/30W, with auxiliary heat dissipation supporting up to 4A/50W.
3. Speċifikazzjonijiet
| Parametru | Valur |
|---|---|
| Numru tal-Mudell | XY-SJV-4 |
| Input Voltage | DC 5.5V - 30V |
| Ħruġ Voltage | DC 0.5V - 30V (Adjustable) |
| Output Current (Natural Dissipation) | 3A (Mass) |
| Output Power (Natural Dissipation) | 30W (Mass) |
| Output Current (Auxiliary Dissipation) | 4A (Mass) |
| Output Power (Auxiliary Dissipation) | 50W (Mass) |
| Temperatura operattiva | -40°C sa +85°C |
| Dimensjonijiet | 56mm x 20mm (madwar) |
4. Prekawzjonijiet tas-Sigurtà
- Always ensure correct polarity when connecting input and output. Incorrect connections can damage the module and connected devices.
- Taqbiżx il-volum massimu tad-dħultage (30V) or output current/power ratings.
- Ensure adequate ventilation, especially when operating at higher currents or power levels, to prevent overheating. Consider auxiliary cooling for loads above 3A/30W.
- Avoid touching the module components during operation, as some parts may become hot.
- Keep the module away from moisture, dust, and static electricity.
- This module is intended for use by individuals familiar with basic electronics and electrical safety.
5. Setup
The module features clearly labeled input and output terminals for straightforward connection.

Figura 1: Fuq view tal-voltage regulator module, showing input and output terminals.

Figura 2: Qiegħ view of the module, displaying the model number XY-SJV-4 and input/output voltage firxiet.
5.1. Konnessjonijiet
- Konnessjoni tal-Input: Connect your DC power source to the 'IN+' (positive) and 'IN-' (negative) terminals. Ensure the input voltage is within the 5.5V to 30V range.
- Konnessjoni tal-Output: Connect your load or device to the 'OUT+' (positive) and 'OUT-' (negative) terminals.
5.2. Initial Voltage Aġġustament
Before connecting a sensitive load, it is recommended to adjust the output voltage sal-livell mixtieq.
- Connect the input power source.
- Uża multimeter biex tkejjel il-volumtage across the 'OUT+' and 'OUT-' terminals.
- Locate the small potentiometer (trimmer) on the module.
- Using a small screwdriver, gently turn the potentiometer clockwise to increase the output voltage or counter-clockwise to decrease it, until the desired voltage jintlaħaq.
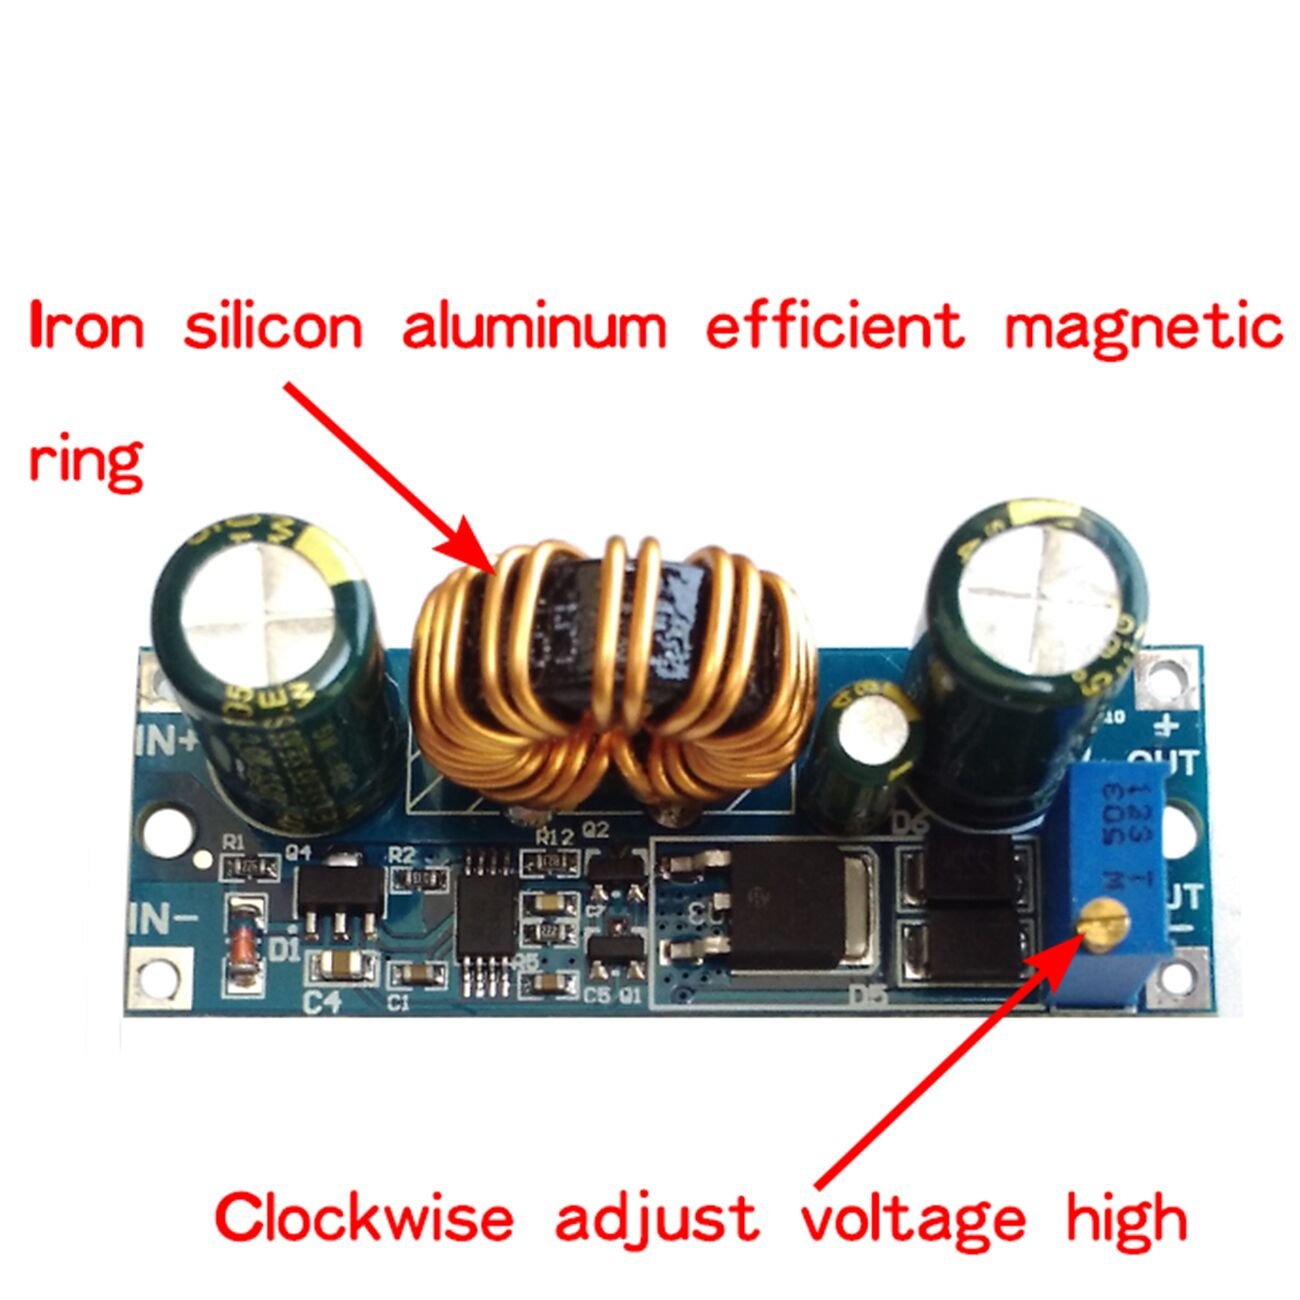
Figura 3: Il-volumtage adjustment potentiometer is located near the output terminals. Turning it clockwise increases the output voltage.
6. Istruzzjonijiet Operattivi
Once the module is set up and the output voltage is adjusted, it will maintain the set output voltage even if the input voltage fluctuates within its specified range (5.5V to 30V).
6.1. Load Considerations
The module can handle up to 3A/30W with natural heat dissipation. For applications requiring higher current or power (up to 4A/50W), auxiliary cooling such as a heatsink or fan is necessary to prevent overheating and ensure stable operation.

Figure 4: Heat dissipation ratings for the module, indicating the need for auxiliary cooling at higher loads.
7. Manutenzjoni
- Żomm il-modulu nadif u ħieles mit-trab u l-fdalijiet.
- Regularly check connections to ensure they are secure.
- Monitor the module's temperature during operation, especially under heavy loads. If it becomes excessively hot, reduce the load or improve cooling.
- Avoid physical shock or excessive vibration to the module.
8 Issolvi l-problemi
8.1. No Output Voltage
- Check input power supply: Ensure the input voltage is within the 5.5V-30V range and the power source is functioning correctly.
- Verify connections: Confirm that 'IN+' and 'IN-' are correctly connected to the power source and 'OUT+' and 'OUT-' to the load.
- Check for short circuits: Disconnect the load and measure the output voltage. Jekk voltage appears, there might be a short circuit in your load.
8.2. Output Voltage is Unstable or Incorrect
- Adjust potentiometer: Re-adjust the output voltage using the onboard potentiometer.
- Check load: Ensure the load current/power does not exceed the module's maximum ratings. Overloading can cause voltage drop or instability.
- Input voltage fluctuations: Verify the input voltage is stable. Significant fluctuations in input can affect output stability if the module is operating at its limits.
- Overheating: If the module is hot, it may be throttling output. Improve cooling.
8.3. Module Overheats
- Reduce load: Decrease the current drawn from the module.
- Improve ventilation: Ensure the module is in an open area with good airflow.
- Add auxiliary cooling: For loads exceeding 3A/30W, attach a heatsink to the main power components or use a cooling fan.
9. Dimensjonijiet

Figure 5: Approximate dimensions of the module: 56mm length by 20mm width.
10. Garanzija u Appoġġ
For warranty information or technical support, please refer to the seller or manufacturer's official channels. Keep your purchase receipt for any warranty claims.