
LECTRUS LECT-TAB1011
LECTRUS 10.1-inch Android Tablet User Manual
Model: LECT-TAB1011
1. Introduzzjoni
Thank you for choosing the LECTRUS 10.1-inch Android Tablet. This device is designed to provide a versatile and portable computing experience, featuring Android 9.0 Pie, GMS certification, and robust connectivity options including Wi-Fi and 3G cellular capabilities. This manual will guide you through the setup, operation, and maintenance of your new tablet.
2. Prodott Aktarview
The LECTRUS tablet combines a vibrant 10.1-inch IPS display with powerful performance for everyday tasks, entertainment, and communication. It features a quad-core processor, 2GB RAM, and 32GB internal storage, expandable via microSD. Dual cameras allow for capturing photos and video calls, while dual SIM card slots provide flexible connectivity.

Figura 2.1: Quddiem view of the LECTRUS 10.1-inch Android Tablet, displaying its home screen with weather and music widgets.
3. Komponenti u Kontrolli
Iffamiljarizza ruħek mad-disinn fiżiku tat-tablet tiegħek:
- Buttuna tal-Qawwa: Press and hold to power on/off or restart. Press briefly to sleep/wake the screen.
- Volume Buttons (V+, V-): Aġġusta l-volum tal-awdjo.
- USB (OTG) Port: For charging, data transfer, and connecting USB devices (e.g., flash drives, keyboards).
- Jack tal-headphone: Connect 3.5mm headphones or external speakers.
- SIM Card Slots (SIM 1, SIM 2): Insert Nano-SIM cards for cellular data and calls.
- Slott tal-Karta MicroSD: Insert a microSD card for expandable storage (up to 128GB).
- Front Camera (2 MP): Għal sejħiet bil-vidjo u selfies.
- Rear Camera (5 MP): Għat-teħid ta' ritratti u vidjows.
- Flash Lamp: Provides illumination for the rear camera.
- Kelliema: Ħruġ awdjo integrat.
- Irrisettja Pinhole: A small hole for a hard reset in case of system unresponsiveness.
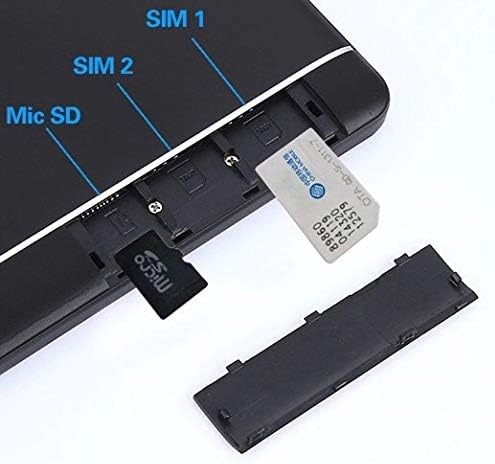
Figure 3.1: Detailed diagram of the LECTRUS tablet's ports, buttons, and camera locations.
4. Setup
4.1 Iċċarġjar inizjali
Before first use, fully charge your tablet. Connect the included USB cable to the tablet's USB (OTG) port and the other end to a power adapter. The battery indicator on the screen will show charging progress.
4.2 Tixgħel/Jitfi
- Biex Tixgħel: Press and hold the Power button until the LECTRUS logo appears.
- Biex Tifi: Agħfas u żomm il-buttuna tal-Power sakemm jidher menu. Agħżel "Power off" u kkonferma.
- Biex terġa' tibda: Agħfas u żomm il-buttuna tal-Power sakemm jidher menu. Agħżel "Restart" u kkonferma.
- Sleep/Qawmien: Briefly press the Power button to turn the screen off or on without powering down the device.
4.3 Installazzjoni tal-Karta SIM u l-Karta MicroSD
Your tablet supports dual SIM cards for cellular connectivity and a microSD card for expanded storage.
- Locate the removable plastic cover on the side of the tablet.
- Gently pry open the cover to reveal the SIM card slots (SIM 1, SIM 2) and the MicroSD card slot.
- Insert your Nano-SIM cards into the designated SIM slots with the gold contacts facing down, ensuring they click into place.
- Insert your microSD card into its slot until it clicks.
- Erġa' poġġi l-għatu tal-plastik sew.

Figura 4.3: Close-up view of the SIM card and MicroSD card slots, showing proper insertion.
4.4 Wizard tas-Setup Inizjali
Malli tixgħelha għall-ewwel darba, it-tablet jiggwidak permezz ta' proċess inizjali ta' setup. Segwi l-istruzzjonijiet fuq l-iskrin biex:
- Agħżel il-lingwa tiegħek.
- Qabbad ma 'netwerk Wi-Fi.
- Idħol bil-kont Google tiegħek jew oħloq wieħed ġdid.
- Issettja l-illokkjar tal-iskrin (PIN, mudell, password).
- Review and accept Google services and privacy settings.
5. Istruzzjonijiet Operattivi
5.1 Navigazzjoni Bażika
The LECTRUS tablet uses a capacitive touchscreen for interaction:
- Tektek: Agħżel oġġett jew iftaħ applikazzjoni.
- Mess u Żomm: Aċċessa l-menus kuntestwali jew iddreggja l-oġġetti.
- Swipe: Scroll through pages, lists, or switch between home screens.
- Agħfas biex Tiżżumja: Use two fingers to zoom in or out on images, maps, or web paġni.

Figure 5.1: User interacting with the tablet's 10-point capacitive touchscreen for web browsing.
5.2 Konnettività tan-Netwerk
- Wi-Fi: Go to Settings > Network & Internet > Wi-Fi. Turn Wi-Fi on, select your network, and enter the password.
- Dejta Mobbli (3G): Ensure a valid SIM card is inserted. Go to Settings > Network & Internet > Mobile network. Enable Mobile data. You may need to configure APN settings if your carrier requires it.

Figure 5.2: Tablet screen showing wireless and network settings, including Wi-Fi and Bluetooth options.
5.3 Tqabbil tal-Bluetooth
To connect Bluetooth devices like headphones or speakers:
- Mur fuq Settings > Apparati konnessi > Bluetooth.
- Ixgħel il-Bluetooth.
- Kun żgur li l-apparat Bluetooth tiegħek jinsab fil-modalità ta' tqabbil.
- Select your device from the list of available devices and follow any on-screen prompts to complete pairing.

Figure 5.3: User enjoying audio content on the tablet with wired headphones, demonstrating media playback capabilities.
5.4 Użu tal-Kamera
The tablet features a 5 MP rear camera and a 2 MP front camera.
- Iftaħ l-applikazzjoni "Kamera" mill-iskrin tad-dar jew mill-kexxun tal-app.
- Tektek il-buttuna tax-shutter biex tieħu ritratt.
- Tektek l-ikona tas-swiċċ tal-kamera biex taqleb bejn il-kameras ta' quddiem u ta' wara.
- Agħżel il-modalità tal-vidjow biex tirrekordja vidjows.
Figure 5.4: Tablet being used for a video call or to take a selfie, highlighting the front camera functionality.
5.5 Funzjonalità tal-GPS
The built-in GPS allows for navigation and location-based services.
- Ensure Location services are enabled in Settings > Location.
- Uża applikazzjonijiet tal-mapep installati minn qabel jew niżżel l-app tan-navigazzjoni preferuta tiegħek mill-Google Play Store.

Figure 5.5: Tablet mounted in a car, displaying a map application for GPS navigation.
5.6 Ġestjoni tal-App
Niżżel u immaniġġja l-applikazzjonijiet mill-Google Play Store.
- Installa Apps: Open the "Play Store" app, search for your desired app, and tap "Install".
- Iddiżinstalla l-Apps: Go to Settings > Apps & notifications > See all apps. Select the app you wish to uninstall and tap "Uninstall".

Figure 5.6: Tablet home screen displaying a grid of various application icons, including browser, calculator, camera, and email.
6. Manutenzjoni
6.1 Tindif tat-Tablet Tiegħek
Uża drapp artab u mingħajr suf biex tnaddaf l-iskrin u l-qafas tat-tablet. Għal tbajja' persistenti, neħħi ftit.ampNaddaf id-drapp bl-ilma jew b'prodott tat-tindif tal-iskrin. Evita kimiċi ħarxa jew materjali li joborxu.
6.2 Kura tal-Batterija
- Evita temperaturi estremi, għax jistgħu jnaqqsu l-ħajja tal-batterija.
- Tħallix il-batterija tixxotta kompletament ta' spiss.
- Uża l-ċarġer oriġinali jew ċarġer kompatibbli ċċertifikat.
6.3 Aġġornamenti tas-Software
Periodically check for system updates to ensure optimal performance and security. Go to Settings > System > Advanced > System update.
6.4 Ġestjoni tal-Ħażna
Biex tillibera spazju għall-ħażna:
- Iddiżinstalla l-applikazzjonijiet mhux użati.
- Ħassar ritratti, vidjows, u affarijiet mhux meħtieġa files.
- Mexxi bil-kbir files to an inserted microSD card.
- Clear cache data for apps in Settings > Apps & notifications.
7 Issolvi l-problemi
| Problema | Soluzzjoni Possibbli |
|---|---|
| It-tablet ma jixgħelx. | Ensure the battery is charged. Connect the charger and wait a few minutes before attempting to power on. If unresponsive, press and hold the power button for 10-15 seconds. |
| Problemi bil-konnessjoni tal-Wi-Fi. | Erġa' ibda t-tablet u r-router Wi-Fi tiegħek. Insieh in-netwerk fis-settings tal-Wi-Fi u erġa' qabbad. Kun żgur li tinsab fil-firxa tas-sinjal Wi-Fi. |
| L-apps huma bil-mod jew qed jiġġarraf. | Close background applications. Clear the app's cache (Settings > Apps & notifications > [App Name] > Storage & cache > Clear cache). Restart the tablet. Ensure sufficient free storage space. |
| Il-batterija tiskula malajr. | Reduce screen brightness. Disable Wi-Fi, Bluetooth, and GPS when not in use. Close unused apps running in the background. Check battery usage in Settings > Battery to identify power-hungry apps. |
| Cannot detect SIM card. | Ensure the SIM card is correctly inserted. Restart the tablet. Try the SIM card in another device to confirm it is functional. |
8. Speċifikazzjonijiet
| Karatteristika | Dettall |
|---|---|
| Isem tal-Mudell | Lectrus |
| Numru tal-Mudell tal-Oġġett | LECT-TAB1011 |
| Sistema Operattiva | Android 9 Pie |
| Daqs tal-Iskrin | 10.1 Pulzier |
| Riżoluzzjoni tal-Iskrin | 1280x800 |
| Proċessur | 1.3 GHz Quad-core (MediaTek) |
| RAM | 2 GB SDRAM DDR3 |
| Ħażna Interna | 32 GB |
| Ħażna espansibbli | Up to 128GB via MicroSD (Not Included) |
| Wara WebCam Riżoluzzjoni | 5 MP |
| Quddiem WebCam Riżoluzzjoni | 2 MP |
| Tip bla fili | Bluetooth, 802.11bgn (Wi-Fi), Radio Frequency (3G) |
| Konnettività | Dual SIM Card Slots (3G: WCDMA 850/1900/2100 MHz, 2G: GSM 850/900/1800/1900MHz), GPS, FM |
| Ħajja tal-Batterija (Medja) | 5 Sigħat |
| Piż tal-oġġett | 1.5 liri |
| Dimensjonijiet tal-Prodott | 9.45 x 6.6 x 0.3 pulzieri |
| Kulur | Iswed |
9. Garanzija u Appoġġ
LECTRUS products are designed for reliability and performance. For warranty information, please refer to the warranty card included with your product or visit the official LECTRUS website. If you encounter any issues not covered in this manual or require further assistance, please contact LECTRUS customer support through the contact information provided on the product packaging or the official brand websit.
For online support and frequently asked questions, you may also visit the LECTRUS store page on Amazon: LECTRUS Store.
Ask a question about this manual
Ask about setup, troubleshooting, compatibility, parts, safety, or missing instructions. Manuals+ will review the question and use this page’s manual context to help answer it.