1. Prodott Aktarview
The ASAKUKI 300ml Essential Oil Diffuser is a versatile 5-in-1 ultrasonic device designed to enhance your environment. It functions as an aromatherapy diffuser, humidifier, and air purifier, featuring LED lighting and an automatic shut-off for safety. This manual provides instructions for safe and effective use of your diffuser.

Image 1.1: ASAKUKI 300ml Essential Oil Diffuser in operation, showing mist output.
2. Linji Gwida dwar is-Sigurtà
- Always use purified water in the diffuser.
- Evita kuntatt dirett mal-ġilda maż-żjut essenzjali mhux dilwiti.
- Żomm l-apparat fejn ma jintlaħaqx mit-tfal u l-annimali domestiċi.
- Be aware that certain essential oils (e.g., Eucalyptus, Jasmine, Chamomile, Lavender, Lemongrass) may cause skin irritation or allergic reactions if not used properly.
- Żgura ventilazzjoni xierqa waqt l-użu.
- Do not exceed the maximum water fill line (300ml).
- Skonnettja l-apparat qabel ma tnaddaf jew timlieh mill-ġdid.
3. Istruzzjonijiet ta' Setup
Follow these steps to set up your ASAKUKI Essential Oil Diffuser:
- Ipplaggja l-Adapter tal-Enerġija: Connect the power adapter to the diffuser's power input port.
- Żid l-Ilma: Lift the aroma diffuser lid and fill the water tank with purified water. Do not exceed the 300ml maximum fill line.
- Żid Żejt Essenzjali: Add 2-3 drops of your preferred essential oil directly into the water tank.
- Ibdel il-Qoxra: Carefully place the lid back onto the diffuser, ensuring it is securely seated.
- Qabbad mal-Enerġija: Ipplaggja l-adapter tal-enerġija f'iżbokk tal-ħajt.

Image 3.1: Visual guide for setting up the diffuser, including connecting power, adding water, replacing the lid, and starting operation.
4. Istruzzjonijiet Operattivi
Your diffuser features two control buttons: 'LIGHT' and 'MIST'.
4.1. Mist Control
- Short Press 'MIST' Button: Press briefly to turn on the mist and cycle through timer settings: ON (continuous), 1 hour, 3 hours, 6 hours. The diffuser will automatically shut off when the timer expires or water runs out.
- Long Press 'MIST' Button (2 seconds): Press and hold for 2 seconds to adjust mist intensity. One beep indicates weak mist mode (up to 10 hours runtime), and two beeps indicate strong mist mode (up to 6 hours runtime).

Image 4.1: Illustration of the two available mist modes and their approximate runtimes.
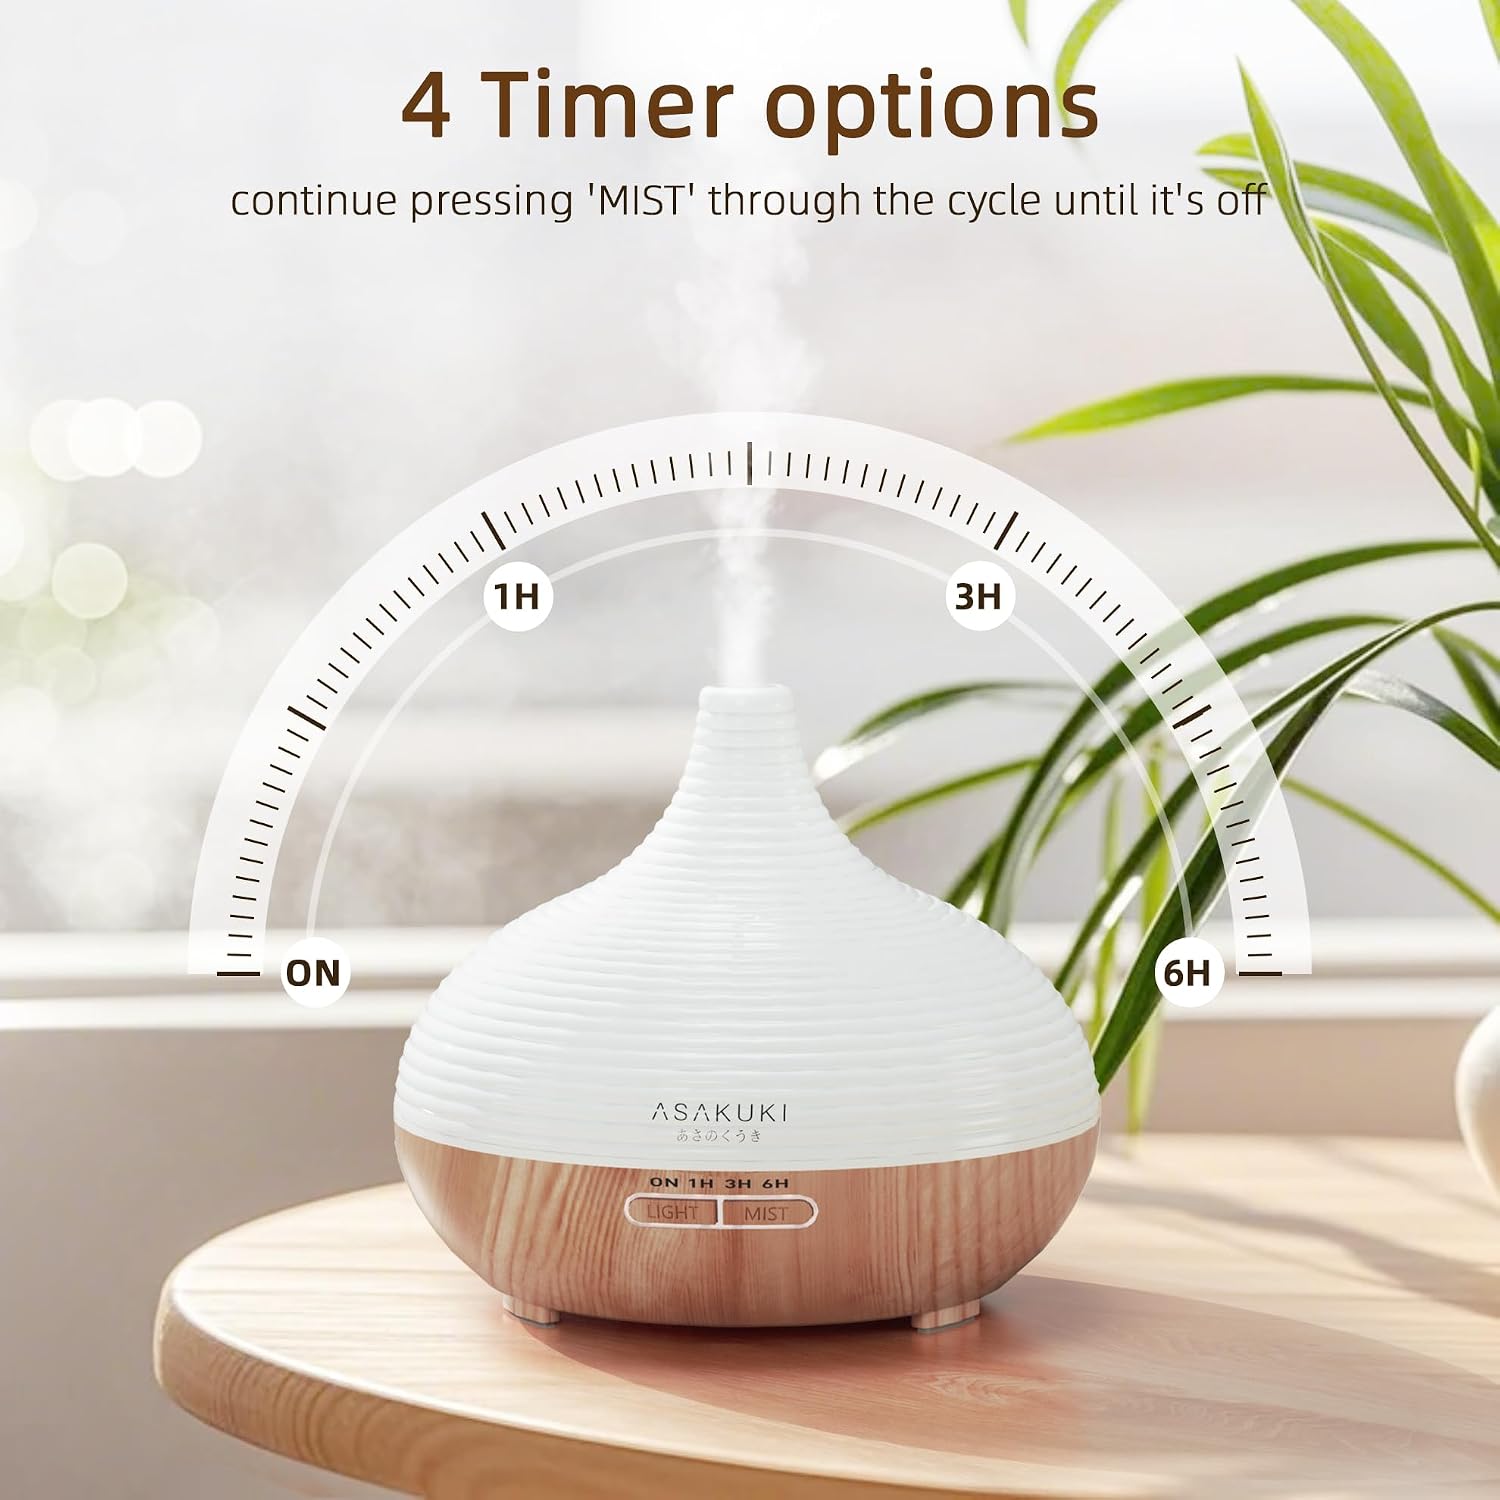
Image 4.2: Visual representation of the diffuser's timer settings.
4.2. Kontroll tad-Dawl
- 1st Short Press 'LIGHT' Button: Cycles through 14 LED color options.
- 2nd Short Press 'LIGHT' Button: Fixes the light at the current color.
- 3rd Short Press 'LIGHT' Button: Fixes the light at another color.
- Long Press 'LIGHT' Button: Press and hold to turn off the light function.

Immaġni 4.3: Eż.amples of the 14 LED color options available on the diffuser.

Immaġni 4.4: Dettaljata view of the 'LIGHT' and 'MIST' button operations.
5. Manutenzjoni
Regular cleaning ensures optimal performance and extends the lifespan of your diffuser.
5.1. Manutenzjoni ta 'Kuljum
- After each use, unplug the diffuser and empty any remaining water from the tank.
- Wipe the inside of the water tank with a clean, soft cloth.
5.2. Tindif ta' kull Ġimgħa
- Unplug the diffuser and remove the lid.
- Pour 1 cup of distilled white vinegar into the water tank.
- Let it sit for 30-60 minutes to dissolve any mineral buildup or essential oil residue.
- Carefully drain the vinegar from the tank, avoiding the air outlet.
- Wipe the tank and ultrasonic plate with a soft cloth or cotton swab.
- Rinse the tank with clean water and wipe dry.
- Do not immerse the base of the diffuser in water.
6 Issolvi l-problemi
If you encounter issues with your diffuser, please refer to the following common solutions:
| Problema | Kawża Possibbli | Soluzzjoni |
|---|---|---|
| L-ebda ċpar jew ċpar dgħajfa | Insufficient water; water level too high; mineral buildup on ultrasonic plate; diffuser not plugged in. | Ensure water is between min and max lines (preferably slightly below max). Clean the ultrasonic plate. Check power connection. |
| Id-diffużur ma jixgħelx | No power; water tank empty (automatic shut-off activated). | Check power adapter connection and wall outlet. Refill water tank. |
| Id-dawl ma jaħdimx | Light function turned off; electrical issue. | Press the 'LIGHT' button to activate. If problem persists, contact customer support. |
| Ħoss mhux tas-soltu | Livell tal-ilma baxx wisq; id-diffużur mhux fuq wiċċ ċatt. | Add water. Place diffuser on a stable, flat surface. |
7. Speċifikazzjonijiet
- Numru tal-Mudell: 100-DF003
- Kapaċità tat-Tank tal-Ilma: 300 Millilitru
- Materjal: BPA-free PP plastic (main body), Wood-grain finish (base)
- Sors tal-Enerġija: Corded Elettriku
- Wattage: 220 watt
- Runtime: Up to 6 hours (strong mist), Up to 10 hours (weak mist)
- Tifi awtomatiku: Yes (waterless auto shut-off)
- Sors tad-Dawl: 14-Kulur LED
- Żona ta' Kopertura: Approximately 55.74 square meters (600 sq ft)
- Dimensjonijiet (L x W x H): 6.61" x 5.91" x 6.61"

Image 7.1: Summary of key diffuser specifications.
8. Garanzija u Appoġġ
ASAKUKI is committed to customer satisfaction. While specific warranty details are not provided in this manual, if you encounter any issues with your diffuser or require assistance, please contact ASAKUKI customer support. Your satisfaction is our priority.
For support, please refer to the contact information provided with your purchase or visit the official ASAKUKI websit.