Introduzzjoni
This user manual provides comprehensive instructions for the Andoer HDV-201LM 1080P FHD Digital Video Camera. It covers setup, operation, maintenance, and troubleshooting to help you get the most out of your device. The Andoer HDV-201LM is a portable digital video camera designed for capturing high-quality photos and videos, making it ideal for preserving memories.
Kontenut tal-Pakkett
Malli tiftaħ il-pakkett, jekk jogħġbok ivverifika li l-oġġetti kollha li ġejjin huma inklużi:
- 1 x Digital Video Camera
- 1 x Camera Bag
- 2 x Rechargeable Batteries (one already in camera)
- 1 x USB Cable
- Kejbil 1 x AV
- 1 x Kontroll mill-bogħod
- 1 x Manwal tal-Utent (bl-Ingliż)

Image: All items included in the Andoer HDV-201LM package, including the camera, batteries, cables, remote, and bag.
Setup
1. Installazzjoni tal-batterija
The camera comes with two 3.7V 1500mAh rechargeable batteries. One battery is typically pre-installed. Before first use, ensure you remove any insulating film from the battery terminals.
- Open the battery compartment cover, usually located at the bottom or side of the camera.
- Insert the battery, ensuring the correct polarity as indicated inside the compartment.
- Agħlaq l-għatu tal-kompartiment tal-batterija sew.
- Charge the battery fully before initial use using the provided USB cable.

Image: The Andoer HDV-201LM camera, two rechargeable batteries, and the remote control, illustrating the main components.
2. Installazzjoni tal-Kard tal-Memorja
The camera requires an SD card (not included) for storing photos and videos. A Class 10 or higher SD card is highly recommended for optimal performance and smooth recording.
- Locate the SD card slot, typically near the battery compartment.
- Daħħal il-kard SD bil-kuntatti tal-metall iħarsu fid-direzzjoni t-tajba sakemm tikklikkja f'postha.
- Biex tneħħiha, imbotta l-karta bil-mod 'il ġewwa sakemm toħroġ 'il barra.
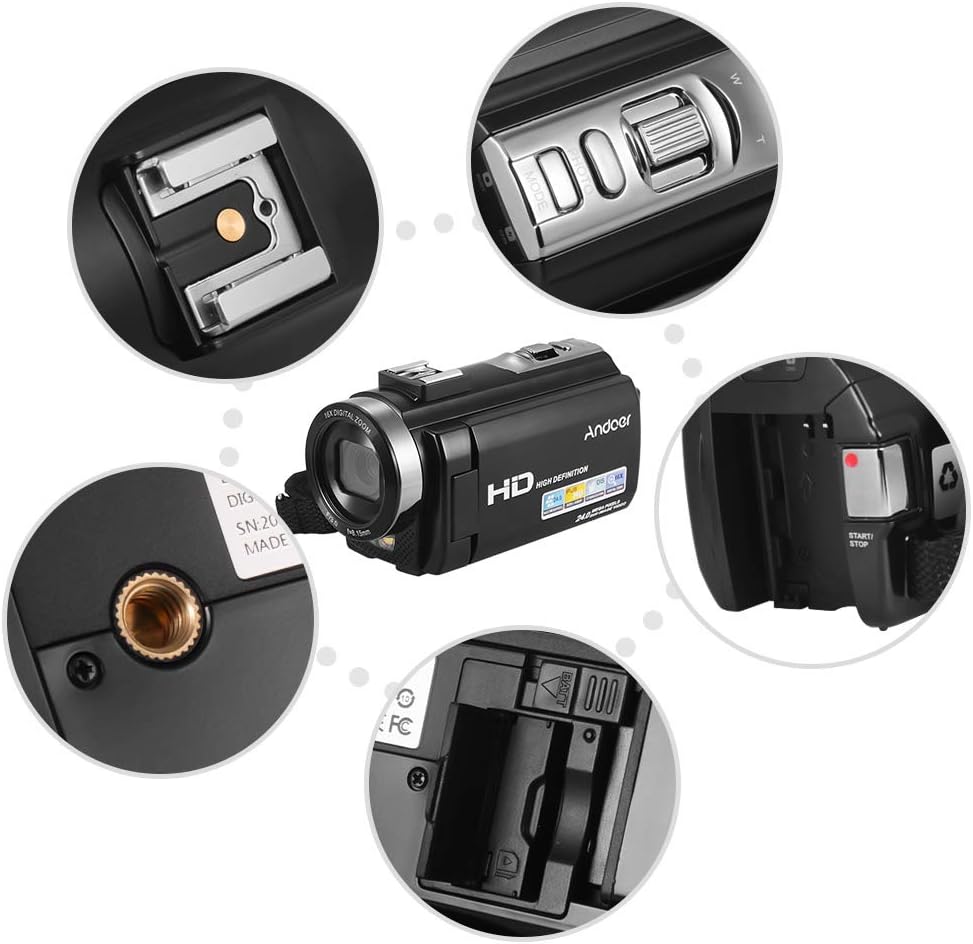
Immaġni: Close-up views of various camera components, including the SD card slot, hot shoe mount, and control buttons.
3. Attaching External Accessories
The camera features a hot shoe mount for connecting external accessories such as microphones or LED video lights (sold separately).
- Slide the accessory onto the hot shoe mount located on top of the camera.
- Secure the accessory if it has a locking mechanism.
- For external microphones, connect the audio cable to the camera's microphone input port.

Image: Illustration of the hot shoe mount on the Andoer HDV-201LM camera, showing how external microphones and LED lights can be attached.
Istruzzjonijiet Operattivi
1. Power On/Off
- To power on, open the LCD screen or press the QAWWA buttuna.
- To power off, close the LCD screen or press and hold the QAWWA buttuna.
2. Reġistrar Vidjows
The camera supports 1080P FULL HD video recording.
- Ixgħel il-kamera.
- Ensure the camera is in video recording mode (usually indicated by a video camera icon on the screen). If not, press the MODALITÀ buttuna biex taqleb.
- Agħfas il- BIDU/WAQQF button to begin recording. The recording indicator will light up.
- Agħfas il- BIDU/WAQQF buttuna għal darb'oħra biex tieqaf tirrekordja.
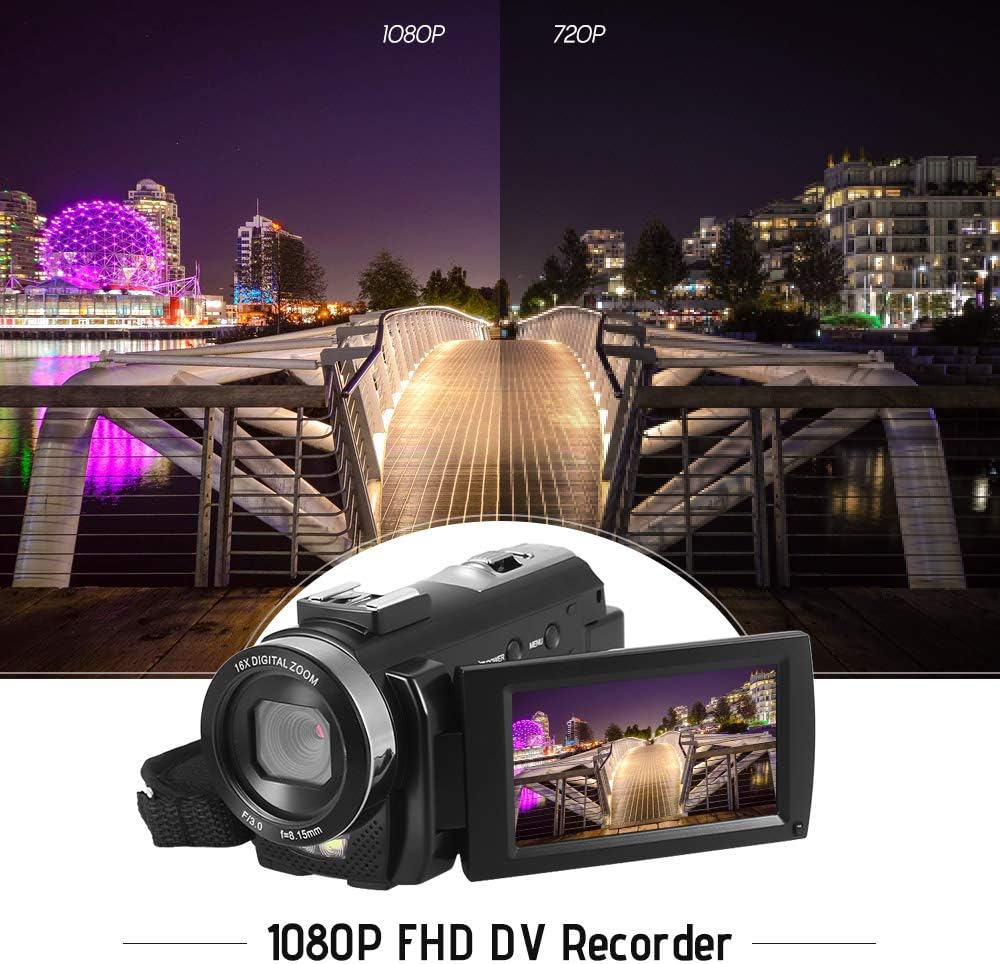
Image: Comparison of 1080P and 720P video quality, highlighting the 1080P FHD capability of the Andoer HDV-201LM camcorder.
3. Teħid tar-Ritratti
The camera can capture still images up to 24MP (interpolation).
- Ixgħel il-kamera.
- Agħfas il- MODALITÀ button to switch to photo mode (indicated by a camera icon).
- Ikkwadra r-ritratt tiegħek billi tuża l-iskrin LCD.
- Agħfas il- RITRAT button (shutter button) to take a picture.
4. Using the LCD Screen
The 3.0-inch TFT-LCD screen offers 270° rotation for flexible viewangoli.
- Rotate the screen to face forward for self-recording or to various angles for comfortable viewing.
- The screen displays recording status, battery level, mode, and other settings.

Image: The Andoer HDV-201LM camera with its rotatable LCD screen open, showing the camera's compact design.
5. Zoom Diġitali
The camera features 16X digital zoom.
- Uża l- W (Wisa') u T (Telephoto) buttons, typically located near the top of the camera, to zoom in or out.
- Note: Digital zoom may reduce image quality compared to optical zoom.

Image: Demonstrates the 16X digital zoom capability of the Andoer HDV-201LM, showing a zoomed-in view of a subject.
6. Settings tal-Menu
Access the menu to adjust various camera settings:
- Agħfas il- MENU buttuna biex tidħol fil-menu tas-settings.
- Uża l-buttuni tan-navigazzjoni ('il fuq/'l isfel/xellug/lemin) biex tagħżel l-għażliet.
- Agħfas il- OK buttuna biex tikkonferma għażla.
- Agħfas MENU għal darb'oħra biex toħroġ.
Is-settings ewlenin jinkludu:
- Bilanċ abjad: Auto, Daylight, Cloudy, Fluorescent, Tungsten.
- Modalità: Auto, Night, Portrait, Landscape, Backlight, Sport, Party, Beach, High Sensitivity.
- Espożizzjoni: Adjust brightness from ±3.0EV.
- Self-timer: Off, 2s, 5s, 10s.
- Power Power OFF: OFF, 1min, 3min, 5min.
- Funzjonijiet oħra: Face detection, smile capture, beauty face, anti-shake.

Image: A user holding and operating the Andoer HDV-201LM camera, demonstrating its portability and ease of use.
7. Konnessjoni ma' Kompjuter (USB)
You can connect the camera to a computer to transfer files.
- Kun żgur li l-kamera tkun mixgħula.
- Qabbad il-kamera mal-kompjuter tiegħek billi tuża l-kejbil USB ipprovdut.
- Il-kamera se tidher bħala disk drive li jista' jitneħħa fuq il-kompjuter tiegħek.
- You can now access and transfer your photos and videos.
Supported Operating Systems: Windows XP/Vista/7/8/10.

Immaġni: Close-up view of the USB and TV output ports on the Andoer HDV-201LM camera, indicating connectivity options.
8. Connecting to a TV (AV Output)
View your recordings directly on a television using the AV cable.
- Connect one end of the AV cable to the camera's AV output port.
- Connect the other end to the AV input ports on your television (yellow for video, white/red for audio).
- Agħżel is-sors tad-dħul AV korrett fuq it-TV tiegħek.
TV Output Standards: NTSC/PAL.
9. Bl-użu tal-Kontroll mill-bogħod
Il-kontroll mill-bogħod inkluż jippermetti tħaddim konvenjenti mill-bogħod.
- Ensure the remote control battery (1 x 3V CR2025) is installed correctly.
- Point the remote control towards the camera's IR receiver.
- Use the buttons on the remote to control recording, playback, zoom, and menu navigation.
Manutenzjoni
1. Tindif tal-Kamera
- Uża drapp artab u niexef biex tnaddaf il-korp tal-kamera.
- For the lens and LCD screen, use a specialized lens cleaning cloth and solution. Avoid abrasive materials.
- Tużax deterġenti jew solventi qawwija.
2. Kura tal-batterija
- Aħżen il-batteriji f'post frisk u niexef meta ma tkunx qed tuża.
- Evita li tiċċarġja l-batteriji kompletament ta' spiss biex ittawwal il-ħajja tagħhom.
- Jekk il-kamera ma tkunx se tintuża għal perjodu twil ta' żmien, neħħi l-batterija.
3. Ħażna
- Store the camera in its camera bag to protect it from dust and scratches.
- Keep the camera away from extreme temperatures, humidity, and direct sunlight.
Issolvi l-problemi
| Problema | Kawża Possibbli | Soluzzjoni |
|---|---|---|
| Il-kamera ma tixgħelx. | Battery is dead or not inserted correctly. Insulating film on battery. | Charge the battery. Reinsert the battery correctly. Remove insulating film. |
| Ma nistax nirrekordja vidjow/nieħu ritratti. | No SD card or SD card full/corrupted. Incorrect mode. | Insert a valid SD card. Delete files or format SD card. Switch to correct mode. |
| Kwalità fqira tal-immaġni/vidjow. | Lens is dirty. Low light conditions. Digital zoom used excessively. | Clean the lens. Use LED fill light. Avoid excessive digital zoom. |
| Il-kontroll mill-bogħod ma jaħdimx. | Battery dead or incorrectly inserted. Obstruction between remote and camera. | Replace/reinsert remote battery. Ensure clear line of sight to IR receiver. |
| Il-kamera tiffriża jew ma tibqax tirrispondi. | Żball fis-softwer. | Neħħi u erġa' daħħal il-batterija biex tirrisettja l-kamera. |
Speċifikazzjonijiet
| Karatteristika | Dettall |
|---|---|
| Brand | Andoer |
| Numru tal-Mudell | HDV-201LM |
| Sensor | 8MP CMOS Sensor, max. 24MP (interpolation) |
| Memorja Esterna | SD Card, max. 32G (Not included, Class 10+ recommended) |
| Lenti tal-Kamera | Ff (F/3.0 f=8.15mm) |
| Skrin | 3.0 Inch TFT-LCD (16:9), 270° rotation |
| Video Format & Resolution | AVI, 1920*1080P FULL HD/30fps, 1280*720 HD/30fps, VGA 640*480/30fps, QVGA 320*240/30fps |
| Image Format & Resolution | JPG, 5600*4200 (24MP Interpolation) / 5200*3900 (20MP Interpolation) / 4608*3456 (16MP Interpolation) / 4000*3000 (12MP Interpolation) / 3648*2736 (10MP Interpolation) / 3648*2048 HD (7M-Wide Interpolation) / 2592*1944 (5MP) / 2048*1536 (3MP) / 1920*1080 HD (2M-Wide) / 640*480 VGA |
| Bilanċ abjad | Auto/ Daylight/ Cloudy/ Fluorescent/ Tungsten |
| Modalità | Auto/Night/Portrait/Landscape/Backlight/Sport/Party/Beach/High Sensitivity |
| Espożizzjoni | ± 3.0EV |
| Self-timer | Mitfi, 2s, 5s, 10s |
| Qawwa Awtomatika OFF | OFF/1min/ 3min/ 5min |
| Port USB | USB2.0 |
| Output tat-TV | NTSC/ PAL |
| Appoġġ tas-Sistema Operattiva | Windows XP/Vista/7/8/10 |
| Provvista tal-Enerġija tal-Kamera | 1 * Battery 3.7V 1500mAh (included) |
| Batterija tal-Kontroll mill-bogħod | 1 * 3V CR2025 Battery |
| Daqs tal-Kamera | 13.5 * 5.5 * 6.5cm / 5.3 * 2.2 * 2.6in |
| Piż tal-Kamera | 273g / 9.6oz (With battery) |
Garanzija u Appoġġ
This product comes with standard manufacturer support. For extended coverage, consider the following options:
- 1 Year Extended Warranty Plan
- 2 Years Extended Warranty Plan
For technical support or warranty claims, please refer to the contact information provided with your purchase documentation or visit the official Andoer websit.