1. Introduzzjoni
This manual provides detailed instructions for the installation, operation, and maintenance of your ASRock B365 PRO4 ATX Motherboard. Please read this manual thoroughly before proceeding with installation to ensure correct setup and to prevent damage to the components.
The ASRock B365 PRO4 motherboard supports 9th and 8th Generation Intel Core Processors, offering a robust platform for personal computing. It features a Digi Power Design with an 8 Power Phase Design, ensuring stable power delivery to the CPU.
2. Informazzjoni dwar is-Sigurtà
- Always disconnect the power supply before installing or removing any components.
- Ilbes ċinga tal-polz anti-statika biex tevita ħsara minn skarika elettrostatika (ESD) lil komponenti sensittivi.
- Immaniġġja l-motherboard mit-truf tagħha biex tevita li tmiss komponenti sensittivi.
- Żgura ventilazzjoni xierqa fil-kaxxa tal-PC tiegħek biex tevita li tissaħħan iżżejjed.
- Żomm il-motherboard 'il bogħod mill-umdità u minn temperaturi estremi.
3. Setup u Installazzjoni
3.1 Kontenut tal-Pakkett
Ivverifika li l-oġġetti kollha huma preżenti fil-pakkett:
- ASRock B365 PRO4 Motherboard
- Gwida ta 'Installazzjoni Mgħaġġla
- Appoġġ CD
- Tarka I / O
- 2 x Kejbils tad-Data SATA
- 3 x Viti għal Sokits M.2
- 1 x Standoff għal Sokit M.2

Image: ASRock B365 PRO4 Motherboard and its included accessories, including the quick installation guide, support CD, I/O shield, SATA cables, and M.2 screws/standoff.
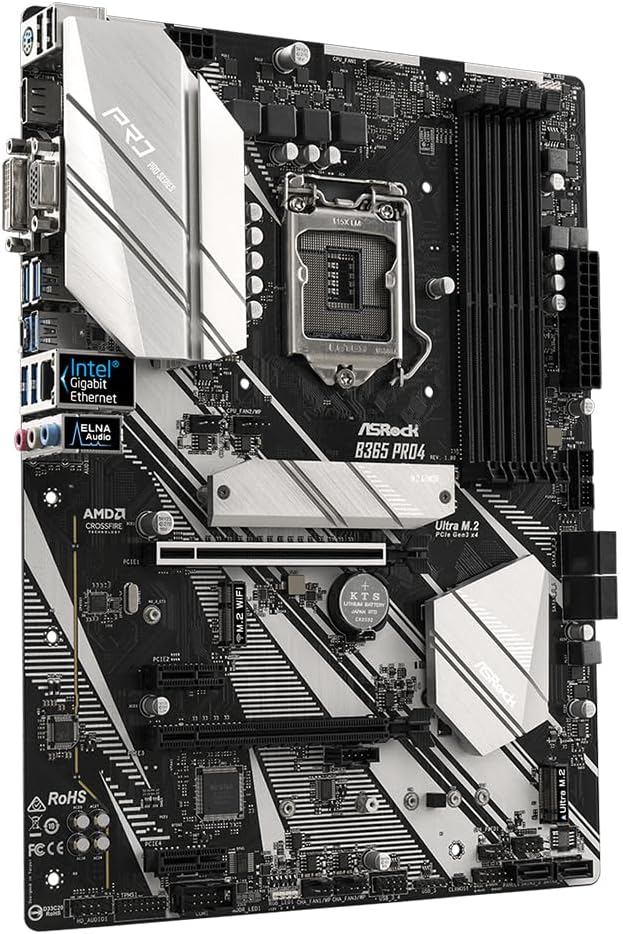
3.2 Layout tal-Motherboard
Iffamiljarizza ruħek mal-komponenti u l-konnetturi ewlenin fuq il-motherboard.

Immaġni: Minn fuq għal isfel view of the ASRock B365 PRO4 Motherboard, highlighting the CPU socket, RAM slots, PCIe slots, and M.2 slots.

Immaġni: Angolata view of the ASRock B365 PRO4 Motherboard, showing the heatsinks and various connectors.
3.3 Installazzjoni tas-CPU (LGA1151)
- Iftaħ il-lieva tas-sokit tas-CPU u erfa' l-pjanċa tat-tagħbija.
- Allinja s-CPU bir-reqqa mas-sokit, filwaqt li tiżgura li t-trijangolu tad-deheb fuq is-CPU jaqbel mat-trijangolu fuq is-sokit.
- Poġġi s-CPU bil-mod fis-sokit mingħajr ma tisforzah.
- Agħlaq il-pjanċa tat-tagħbija u waħħalha bil-lieva.
3.4 Installazzjoni tal-Memorja (RAM)
The motherboard features 4 DDR4 DIMM slots, supporting dual-channel memory up to 64GB.
- Iftaħ il-klipps fiż-żewġt itruf tas-slott tad-DIMM.
- Allinja l-islott fuq il-modulu tar-RAM maċ-ċavetta fl-islott tad-DIMM.
- Insert the RAM module firmly until the clips snap into place.
3.5 Installazzjoni ta' Apparat ta' Ħażna
The motherboard supports 6 SATA3 ports and 2 Ultra M.2 ports.
- Drajvs SATA: Connect SATA data cables to the SATA ports on the motherboard and to your storage devices (HDDs/SSDs). Connect power cables from your power supply to the devices.
- SSDs M.2: Locate the M.2 slots. Insert the M.2 SSD into the slot at an angle, then gently push it down and secure it with the provided screw and standoff.
3.6 Installazzjoni ta' Karta ta' Espansjoni (PCIe)
The motherboard has 2 PCI-Express 3.0 x16 slots and 2 PCI-Express 3.0 x1 slots.
- Select an appropriate PCIe slot for your expansion card (e.g., graphics card).
- Neħħi l-bracket tal-metall korrispondenti mill-kaxxa tal-PC tiegħek.
- Align the card with the slot and press firmly until it is seated correctly.
- Waħħal il-kard mal-kaxxa tal-PC b'kamin.
3.7 Connecting Peripherals to the I/O Panel
The rear I/O panel provides various ports for connecting external devices.
Immaġni: Close-up view of the ASRock B365 PRO4 Motherboard's rear I/O panel, showing ports for PS/2, USB 2.0, USB 3.1 Gen 1, VGA, DVI-D, HDMI, LAN, and audio jacks.
- Portijiet USB: Connect USB devices (keyboard, mouse, external drives) to the available USB 2.0 (5 ports) and USB 3.1 Gen 1 (8 ports, including 1 Type-C rear) ports.
- Outputs tal-Vidjo: Connect your monitor to the VGA, DVI-D, or HDMI port.
- Port tal-LAN: Qabbad kejbil Ethernet għal aċċess għan-netwerk.
- Ġakki tal-Awdjo: Connect speakers, headphones, or microphones to the audio jacks.
- Port PS/2: Connect a PS/2 keyboard or mouse.
4. Istruzzjonijiet Operattivi
4.1 L-Ewwel Boot u s-Setup tal-BIOS
- After assembling all components, connect the power supply and monitor.
- Power on your system. Press Del or F2 waqt l-istartjar biex tidħol fl-utilità tas-setup tal-BIOS/UEFI.
- Configure boot order, system time, and other necessary settings. Save changes and exit.
- Install your operating system from a bootable USB drive or optical media.
4.2 Installazzjoni tas-sewwieq
After installing the operating system, install the necessary drivers from the provided Support CD or download the latest versions from the ASRock websit. Is-sewwieqa ewlenin jinkludu:
- Sewwieqa taċ-Ċipset
- Sewwieqa tal-Awdjo (Realtek ALC892)
- LAN Drivers (Intel I219V Gigabit Ethernet)
- Sewwieqa tal-Grafika (għal grafika integrata jew GPU diskreta)
5. Manutenzjoni
- Tneħħija tat-Trab: Regularly clean dust from the motherboard and case fans using compressed air. Ensure the system is powered off and unplugged before cleaning.
- Aġġornamenti tal-BIOS: Iċċekkja l-ASRock website periodically for BIOS updates. Updates can improve system stability and compatibility. Follow the instructions carefully when updating the BIOS.
- Ġestjoni tal-Kejbil: Kun żgur li l-kejbils huma mqiegħda pulit biex itejbu l-fluss tal-arja u jipprevjenu l-interferenza.
6 Issolvi l-problemi
- Ebda Qawwa:
- Check all power connections, including the 24-pin ATX and 8-pin 12V CPU power connectors.
- Kun żgur li s-swiċċ tal-provvista tal-enerġija jkun fil-pożizzjoni ON.
- Ebda Display:
- Verify that the monitor is connected to the correct video output (either integrated graphics or discrete GPU).
- Erġa' poġġi l-karta grafika u l-moduli tar-RAM.
- Instabbiltà/Ħsarat tas-Sistema:
- Iċċekkja l-moduli tar-RAM għal qagħda tajba.
- Kun żgur li l-cooler tas-CPU huwa installat sew u jagħmel kuntatt tajjeb.
- Aġġorna s-sewwieqa u l-BIOS għall-aħħar verżjonijiet.
- SSD M.2 Mhux Rilevat:
- Kun żgur li l-M.2 SSD huwa mwaħħal u mwaħħal sew.
- Check BIOS settings to ensure M.2 slots are enabled and configured correctly (SATA vs. PCIe mode).
7. Speċifikazzjonijiet
| Karatteristika | Dettall |
|---|---|
| Socket tas-CPU | LGA 1151 |
| Proċessuri Kompatibbli | Proċessuri Intel Core tat-9/8 Ġenerazzjoni (sa 95W) |
| Chipset | Intel B365 |
| Memorja | 4 x DDR4 DIMM slots, Dual Channel, Non-ECC, Buffered, Max 64GB (2666/2400/2133 MHz) |
| Slots ta 'Espansjoni | 2 x PCIe 3.0 x16, 2 x PCIe 3.0 x1 |
| Appoġġ Multi-Grafika | AMD Quad CrossFireX and CrossFire Technology |
| Ħażna | 6 x SATA3 ports (RAID 0, 1, 5, 10), 2 x Ultra M.2 ports (PCIe Gen3 x4 & SATA3) |
| Awdjo | Realtek ALC892 7.1-Kanali HD Awdjo |
| LAN | Intel I219V Gigabit Ethernet |
| Portijiet USB | 8 x USB 3.1 Gen1 (1 Type-C rear, 5 rear, 2 via header), 5 x USB 2.0 (2 rear, 3 via header) |
| Outputs tal-Vidjo | 1 x VGA, 1 x DVI-D, 1 x HDMI |
| Fattur tal-Formola | ATX (12.0 x 9.0 inch / 30.5 x 22.9 cm) |
8. Garanzija u Appoġġ
8.1 Informazzjoni dwar Garanzija
The ASRock B365 PRO4 Motherboard comes with a Garanzija limitata ta 'sena. This warranty covers defects in materials and workmanship under normal use. For specific terms and conditions, please refer to the warranty card included with your product or visit the official ASRock websit.
Note: Damage caused by improper installation, misuse, unauthorized modifications, or natural disasters is not covered under warranty.
8.2 Appoġġ Tekniku
For technical assistance, driver downloads, BIOS updates, or further troubleshooting, please visit the official ASRock support websit:
Tista' wkoll tikkuntattja lis-servizz tal-klijenti ta' ASRock direttament permezz tagħhom websit għal appoġġ personalizzat.