1. Introduzzjoni
This manual provides detailed instructions for the installation, operation, maintenance, and troubleshooting of your ASUS ROG STRIX GeForce RTX 2070 Overclocked 8G GDDR6 graphics card. The ASUS ROG STRIX RTX 2070 O8G is engineered for high-performance gaming, featuring NVIDIA's Turing Architecture, support for multiple monitors, VR-Ready capabilities, a reinforced frame, triple Axial-Tech fans with Max Contact technology for superior cooling, and customizable Aura Sync RGB lighting.
Please read this manual thoroughly before installing and using your graphics card to ensure optimal performance and longevity.
2. Kontenut tal-Pakkett
Iċċekkja li l-oġġetti kollha elenkati hawn taħt huma preżenti fil-pakkett tal-prodott tiegħek:
- Karta Grafika ROG-STRIX-RTX2070-O8G-GAMING
- DVD ta' appoġġ (għad-drajvers u l-utilitajiet)
- Manwal għall-Utent (dan id-dokument)
3. Prodott Aktarview
The ASUS ROG STRIX GeForce RTX 2070 is designed for exceptional gaming performance and reliability. Key features include:
- NVIDIA Turing Architecture: Powered by NVIDIA Turing with a 1845 MHz Boost Clock (OC Mode) and 2304 CUDA cores.
- Memorja b'Veloċità Għolja: Equipped with 8GB GDDR6 memory for fast texture loading and smooth gameplay.
- Multi-Monitor & VR Support: Supports up to 4 monitors with DisplayPort 1.4, HDMI 2.0, and a VR headset via USB Type-C ports.
- Tkessiħ Avvanzat: Features triple Axial-Tech 0db Fans and Max Contact technology for increased cooling efficiency and IP5X dust-resistance.
- Bini Premium: Auto Extreme Technology and Super Alloy Power II components ensure premium quality and reliability.
- Dawl personalizzabbli: ASUS Aura Sync RGB lighting offers a wide spectrum of colors and synchronization with other Aura Sync enabled products.
- Software Utility: GPU Tweak II provides real-time performance monitoring, streaming capabilities, and includes Game Booster, XSplit Gamecaster, WTFast, and Quantum Cloud.
Referenza Viżwali

Figura 3.1: Quddiem view of the ASUS ROG STRIX RTX 2070 graphics card, showcasing its triple Axial-Tech fans.
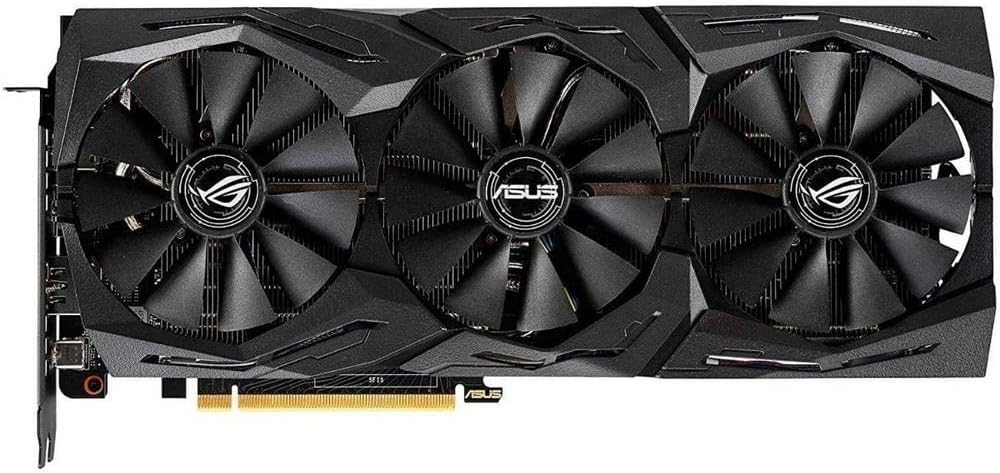
Figura 3.2: Quddiem angolat view of the graphics card, highlighting the fan design and shroud aesthetics.

Figure 3.3: A different angled front view, providing another perspective of the cooling solution.

Figura 3.4: Wara view of the graphics card, showing the protective backplate with ROG branding.

Figure 3.5: Input/Output (I/O) panel of the graphics card, detailing the DisplayPort 1.4, HDMI 2.0, and USB Type-C ports.

Figura 3.6: Ġenb view of the graphics card, showing the two 8-pin power connectors required for operation.
4. Setup u Installazzjoni
Follow these steps to properly install your ASUS ROG STRIX GeForce RTX 2070 graphics card:
- Ipprepara s-Sistema Tiegħek: Itfi l-kompjuter tiegħek u aqla’ l-kejbils kollha. Iftaħ il-kaxxa tal-kompjuter tiegħek.
- Sib is-Slott tal-PCIe: Identifika slott PCI Express x16 disponibbli fuq il-motherboard tiegħek.
- Neħħi l-Għotjien tas-Slott: Remove the necessary slot covers from your computer case to accommodate the graphics card.
- Installa Karta Grafika: Carefully align the graphics card with the PCIe slot and press it firmly until it is securely seated. Secure the card to the case with screws.
- Qabbad l-Enerġija: Connect two 8-pin PCIe power cables from your power supply unit (PSU) to the corresponding power connectors on the graphics card. Ensure a minimum 550W PSU is used for stable operation.
- Close Case & Connect Display: Close your computer case and reconnect all cables. Connect your display monitor(s) to the graphics card's DisplayPort, HDMI, or USB Type-C outputs.
- Installa Sewwieqa: Power on your computer. Once the operating system loads, install the latest graphics drivers from the ASUS support websit (www.asus.com/support/) or use the provided Support DVD.
5. Istruzzjonijiet Operattivi
After successful installation and driver setup, your graphics card is ready for use. Here are some operational guidelines:
- Setup ta' Multi-Monitor: Connect up to four displays to the available DisplayPort, HDMI, and USB Type-C ports. Configure display settings through your operating system or NVIDIA Control Panel.
- VR Headset Connectivity: Utilize the USB Type-C port for compatible VR headsets to enjoy immersive virtual reality experiences.
- ASUS GPU Tweak II: Install and use the ASUS GPU Tweak II software for advanced control over your graphics card. This utility allows you to:
- Monitor GPU clock speed, memory clock, voltage, and fan speed in real-time.
- Adjust performance settings for overclocking or power efficiency.
- Access Game Booster for optimizing system performance during gaming.
- Utilize XSplit Gamecaster for streaming and recording gameplay.
- ASUS Aura Sync: Customize the RGB lighting effects on your graphics card using the ASUS Aura Sync software. Synchronize lighting with other compatible ASUS components for a unified aesthetic.
6. Manutenzjoni
Manutenzjoni xierqa tiżgura l-lonġevità u l-prestazzjoni ottimali tal-karta grafika tiegħek:
- Tneħħija tat-Trab: Naddaf it-trab mill-fannijiet u s-sink tas-sħana regolarment bl-użu ta' arja kkompressata. Kun żgur li s-sistema tkun mitfija u skonnettjata qabel ma tnaddafha.
- Fan Care: The Axial-Tech fans are designed for durability and IP5X dust-resistance, reducing the need for frequent deep cleaning. However, ensure no obstructions impede fan rotation.
- Aġġornamenti tas-sewwieq: Keep your graphics drivers updated to the latest version available from the ASUS support websit. L-aġġornamenti tas-sewwieqa spiss jinkludu titjib fil-prestazzjoni u tiswija ta' żbalji.
- Fluss tal-Arja tas-Sistema: Ensure your computer case has adequate airflow to prevent heat buildup, which can affect graphics card performance and lifespan.
7 Issolvi l-problemi
Jekk tiltaqa' ma' problemi bil-karta grafika tiegħek, ikkunsidra l-passi li ġejjin għas-soluzzjoni tal-problemi:
- L-ebda Output tal-Wiri:
- Kun żgur li l-kejbil tad-displej huwa konness sew kemm mal-karta grafika kif ukoll mal-monitor.
- Verify that the monitor is powered on and set to the correct input source.
- Iċċekkja jekk il-karta grafika hijiex imdaħħla sew fl-islott tal-PCIe.
- Confirm that all required power connectors (two 8-pin) are securely attached to the graphics card.
- Instabbiltà/Ħsarat tas-Sistema:
- Kun żgur li l-unità tal-provvista tal-enerġija (PSU) tiegħek tissodisfa l-minimu ta' wattstage requirement (recommended 550W).
- Aġġorna s-sewwieqa tal-grafika tiegħek għall-aħħar verżjoni.
- Check GPU temperatures using monitoring software (e.g., GPU Tweak II) to ensure it's not overheating.
- If overclocked, revert to default settings to check for stability.
- Prestazzjoni Fqira fil-Logħob:
- Kun żgur li s-sewwieqa tal-grafika tiegħek huma aġġornati.
- Check in-game graphics settings; try reducing settings if performance is consistently low.
- Monitor GPU and CPU utilization to identify potential bottlenecks.
- Ensure background applications are not consuming excessive system resources.
8. Speċifikazzjonijiet
| Karatteristika | Speċifikazzjoni |
|---|---|
| Proċessur tal-Grafika | NVIDIA GeForce RTX 2070 (Turing Architecture) |
| CUDA Cores | 2304 |
| Boost Clock (OC Mode) | 1845 MHz |
| Memorja | 8GB GDDR6 |
| Veloċità tal-Arloġġ tal-Memorja | 14000 MHz |
| Interface tal-Output tal-Vidjo | 3 x DisplayPort 1.4, 1 x HDMI 2.0, 1 x USB Type-C |
| Maximum Digital Resolution | 7680x4320 |
| Bus Standard | PCI Express |
| Konnetturi tal-Enerġija | 2 x 8-pin (recommended 550W PSU) |
| Tkessiħ | Triple Axial-Tech Fans with Max Contact Technology |
| Dimensjonijiet (Approx.) | 11.8 x 5.2 x 2.1 pulzieri (300 x 132 x 53 mm) |
| Piż | 4 Lira (1.81 kg) |
| Isem tal-Mudell | ROG STRIX |
| Numru tal-Parti | ROG-STRIX-RTX-2070-O8G |
9. Garanzija u Appoġġ
Your ASUS ROG STRIX GeForce RTX 2070 graphics card comes with a 3-Sena Garanzija. For detailed warranty terms and conditions, please refer to the warranty card included in your package or visit the official ASUS websit.
For technical support, driver downloads, FAQs, and further assistance, please visit the ASUS Support Center:
No official seller videos are available for this product in the provided data. For product demonstrations or additional visual guides, please refer to the ASUS support website or authorized ASUS channels.