Introduzzjoni
The MakerHawk Electronic Load Tester is a versatile device designed for testing battery capacity, power supplies, and various charging devices. It features adjustable constant current discharge, voltage and current measurement, and multiple protection settings. This manual provides essential information for safe and effective operation of your device.

Image: The MakerHawk Electronic Load Tester, showcasing its main components including the circuit board with a large red fan, an LCD display, control knobs, and various connection ports. Accessories like a power adapter, alligator clips, and USB cables are also visible.
Prekawzjonijiet tas-Sigurtà
Always observe the following safety guidelines to prevent damage to the device or injury:
- Prevent Burning Warning: When testing high-voltage batteries or large power sources, ensure both current adjustment knobs are turned fully counter-clockwise to their minimum (zero) position before connecting the power source. After connection, slowly adjust the current knob according to the desired power. Do not instantly transfer to full power, as this can cause excessive instantaneous power load, risking damage to the discharge tube.
- The body discharge power must not exceed 150W to prevent burnout.
- Ensure proper polarity when connecting batteries or power supplies to avoid damage. The battery terminal polarity is indicated on the device.
- Use appropriate gauge wires for higher amperage tests to prevent overheating of cables.
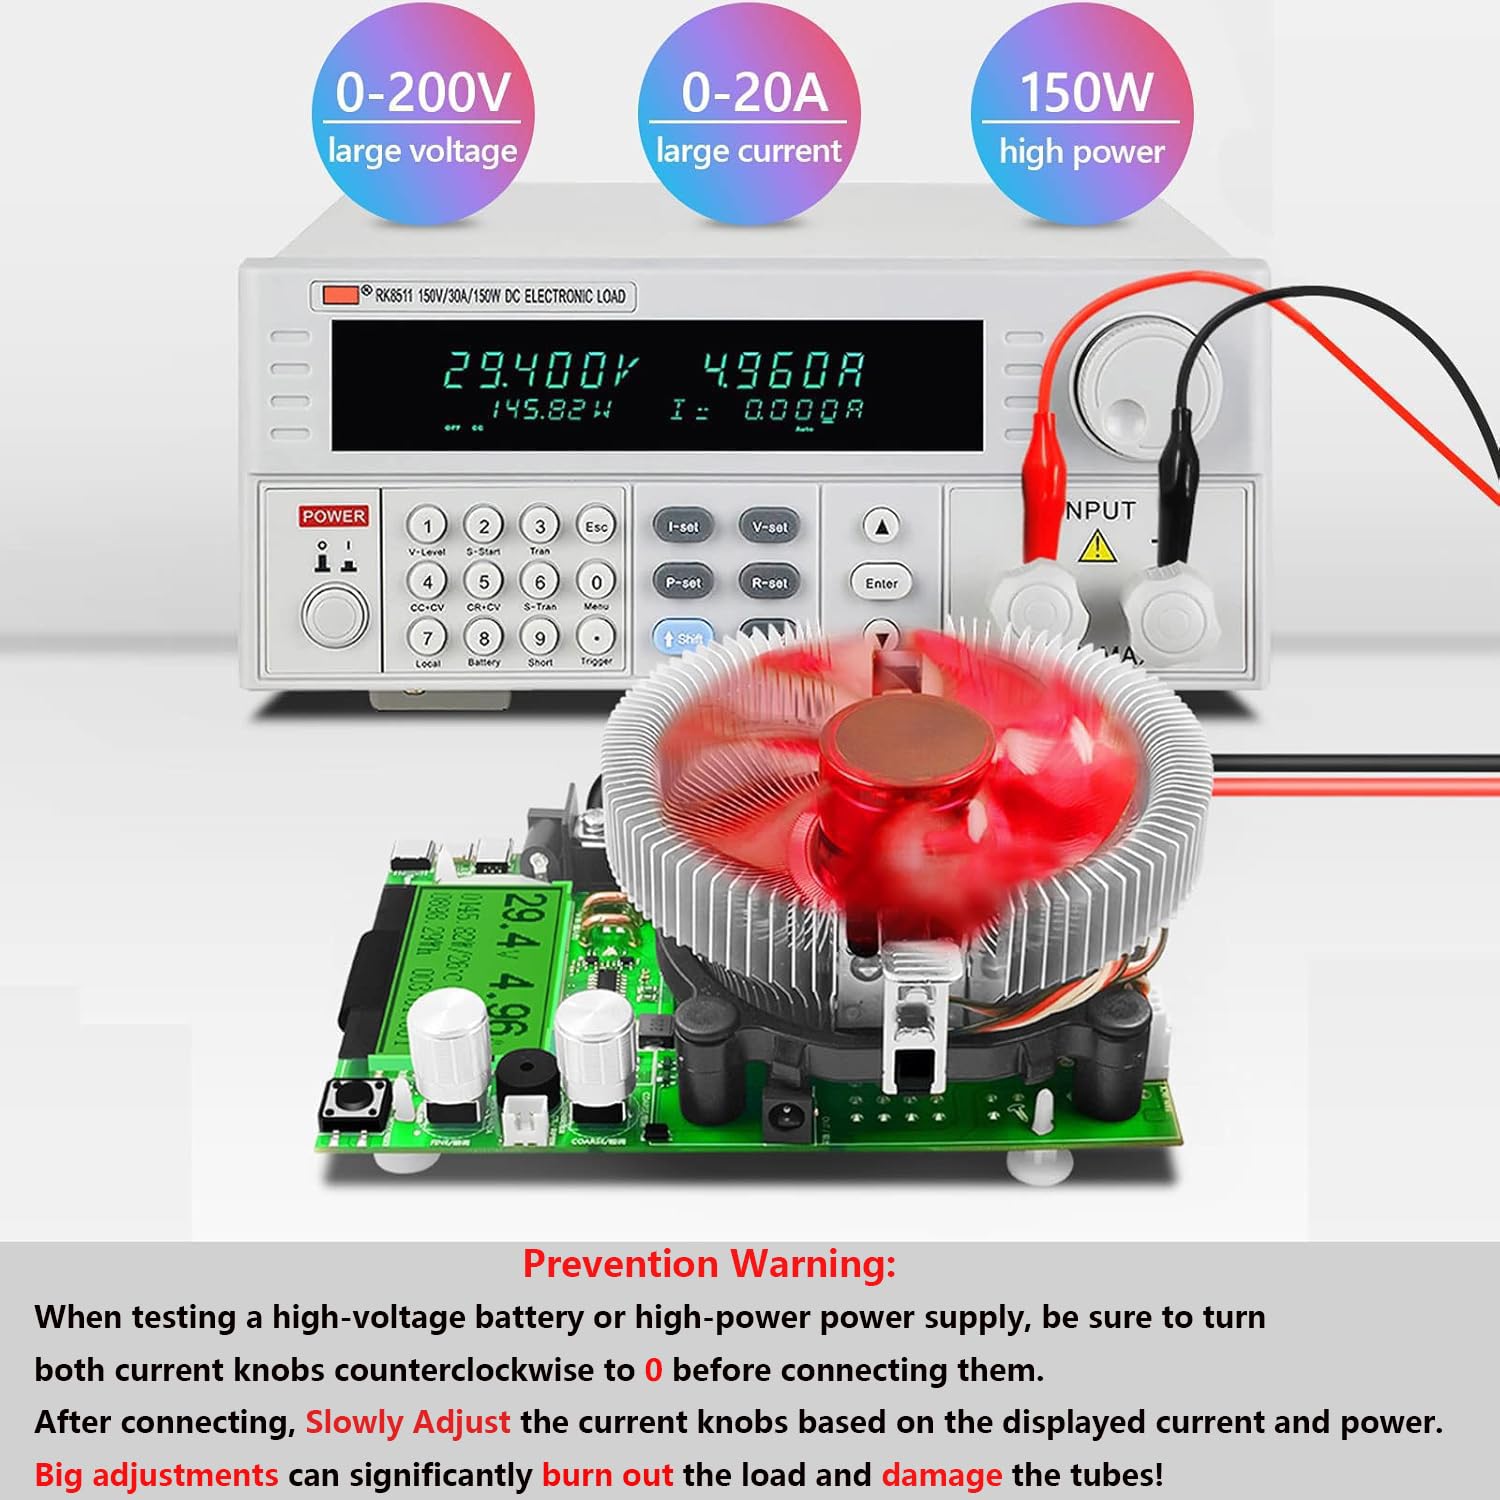
Image: A visual representation of the prevention warning, emphasizing the importance of turning current knobs to zero before connecting high-voltage or high-power sources. It shows the device connected to an external power supply and a larger electronic load.
Prodott Overview
Familiarize yourself with the components of your Electronic Load Tester:

Image: A detailed diagram of the MakerHawk Electronic Load Tester circuit board, labeling key components such as power supply interfaces (DC5.0, Micro USB), Schottky diodes, huge discharge tube, fan interfaces, current adjustment knobs (coarse and fine), multi-function buttons, and various input ports (Mini USB, Micro USB, Type-C USB).
Komponenti Ewlenin:
- Power Supply Interfaces: DC6-12V DC5.0 and DC6-12V Micro USB.
- Current Adjustment Knobs: Two knobs for precise current control (coarse and fine).
- Skrin tad-displej: Juri voltage, current, capacity, power, temperature, and time.
- Buttuni b'ħafna funzjonijiet: Used for setting parameters and resetting data.
- Portijiet tal-Input: USB, Mini USB, Micro USB, Type-C USB for various testing scenarios.
Setup u Konnessjoni
Follow these steps to set up your Electronic Load Tester:
- It-Tħaddim tal-Apparat: Connect the tester to a DC6-12V power source using either the DC5.0 power supply port or the Micro USB power supply port.
- Initial Current Adjustment: Before connecting any battery or power supply for testing, ensure both the coarse and fine current adjustment knobs are turned fully counter-clockwise to their minimum (zero) position. This is crucial to prevent sudden high current draw.
- Konnessjoni tat-Tagħbija:
- For batteries or DC power supplies, use the provided alligator clips. Connect the positive (+) terminal of the battery/supply to the positive input of the tester and the negative (-) terminal to the negative input.
- For USB devices (e.g., power banks, chargers), use the appropriate USB input port (USB, Mini USB, Micro USB, Type-C USB).
- Slowly Adjust Current: Once the load is connected, slowly turn the current adjustment knobs clockwise to increase the discharge current to your desired level. Observe the display for real-time current and power readings.
Operazzjoni
The Electronic Load Tester offers various measurement and testing capabilities:
Meded tal-Kejl:
- Voltage Kejl: 0.00V ~ 200V
- Kejl kurrenti: 0.00A ~ 20A
- Kejl tal-Enerġija: 0000.00W ~ 150W (P = U x I)
Per example, at 10V input, approximately 18A discharge current is possible. At 20V input, approximately 9A; at 30V input, approximately 6A.
Keystroke Operations:
The multi-function button allows for various settings and data resets:
- Stampa Twila: Resets all data (mAh, Wh, time).
- Press doppju: Resets capacity data (mAh).
- Istampa Tripla: Resets power data (Wh).
- Four Presses: Resets time data (00:00:00).
- Five Presses: Toggles auto standby and discharge countdown.
- Seven Presses (No Load): With no load connected, performs current zero calibration and environmental temperature accurate calibration.
Setting Alarm Thresholds:
The device can be configured with various alarm settings to protect the connected device and the tester itself. These settings are typically adjusted using the multi-function button with specific click patterns (e.g., three-click for decrement, double-click for increment) to navigate and set values.
- Overvoltage Twissija: Default 300V. Adjustable range 1-300V. If input voltage exceeds this, an alarm sounds.
- Vol baxxtage Twissija: Default 0.00V. Adjustable range 0.00-290V. If input voltage drops below this, an alarm sounds.
- Overcurrent Warning: Default 100A. Adjustable range 0.2-150A. If input current exceeds this, an alarm sounds.
- Power Overload Warning: Default 185W. Adjustable range 1.00W-150A. If input power exceeds this, an alarm sounds.

Image: A visual guide to setting alarm thresholds for the Electronic Load Tester, including Overvoltage, Lowvoltage, Overcurrent, and Power overload warnings, showing how the display changes to indicate an alarm.
Testing Fast Charge Protocols:
The tester supports testing Qualcomm QC2.0/3.0 and PD fast charge voltages. To trigger these, you must use a compatible QC/PD charger and a voltage trigger inducer to output the desired voltages (5V/9V/12V/15V/20V) for aging tests.

Image: The Electronic Load Tester connected to a power strip, demonstrating its ability to test Qualcomm QC2.0/3.0 and PD fast charge protocols. It shows the device connected to a USB charger and a fast charge trigger module.
Applikazzjonijiet:
The device can be used to test a variety of electronic components and power sources:
- Various types of batteries (e.g., Li-ion, NiMH, Lead-acid)
- Data cables for voltage drop and current capacity
- Provvisti ta 'enerġija DC
- Charging treasures (power banks)
- Ċarġers tal-USB
- AC/DC power adapters

Image: A collage of images illustrating various applications of the Electronic Load Tester, including testing different types of batteries, data cables, DC power supplies, power banks, USB chargers, and AC/DC adapters.
Manutenzjoni
The MakerHawk Electronic Load Tester is designed for durability and requires minimal maintenance. Adhering to the following guidelines will help ensure its longevity:
- Tindif: Use a soft, dry cloth to clean the device. Do not use abrasive cleaners or solvents. Ensure no liquids enter the device.
- Ħażna: Aħżen l-apparat f'post frisk u niexef 'il bogħod mix-xemx diretta u minn temperaturi estremi.
- Verifika tal-Fann: Periodically inspect the cooling fan for any obstructions or debris. Ensure the fan blades can spin freely to maintain optimal cooling during operation.
- Spezzjoni tal-Cable: Regularly check all connecting cables and alligator clips for signs of wear, damage, or loose connections. Replace any damaged cables immediately.
- Immaniġġjar kif suppost: Evita li twaqqa' l-apparat jew li tissottomettih għal impatti qawwija, li jistgħu jagħmlu ħsara lill-komponenti interni.
Issolvi l-problemi
If you encounter issues with your Electronic Load Tester, refer to the following common troubleshooting steps:
| Problema | Kawża Possibbli | Soluzzjoni |
|---|---|---|
| L-apparat ma jixgħelx. |
|
|
| No current discharge or incorrect readings. |
|
|
| Device alarms frequently. |
|
|
| Cooling fan not spinning. |
|
|
Speċifikazzjonijiet
Detailed technical specifications for the MakerHawk Electronic Load Tester:
| Karatteristika | Speċifikazzjoni |
|---|---|
| Voltage Medda ta' Kejl | 0.00V ~ 200V |
| Firxa tal-Kejl kurrenti | 0.00A ~ 20A |
| Firxa tal-Kejl tal-Enerġija | 0000.00W ~ 150W |
| Capacity Cumulative Range | 0 ~ 999.999AH |
| Power Accumulative Range | 0 ~ 9999.9WH |
| Impedance Measurement Range | 1 ~ 999.9 ohms |
| Firxa tal-Kejl tat-Temperatura | 0 ~ 99 grad Celsius |
| Timing Maximum Time | 999 siegħa 59 minuta 59 sekonda |
| Ħin Aġġorna | >500MS/time >500MS/TIMES |
| Rata ta' Kejl | Madwar 0.5 darbiet/sekonda |
| Overvoltage Reminder Setting Range | 1 ~ 200V |
| Vol baxxtage Reminder Setting Range | 0 ~ 190V |
| Overcurrent Reminder Setting Range | 0.2 ~ 100A |
| Tip ta 'Wiri | Micro-power liquid crystal module LCM black font green backlight Chinese and English display |
| Dimensjonijiet tal-Prodott | 156mm * 96mm * 58mm (6.14 x 3.78 x 2.28 inches) |
| Temperatura tax-Xogħol | -10 ~ +60 grad Celsius |
| Umdità tax-Xogħol | 10 ~ 80 (NO DOUBT) |
| Pressjoni tal-Arja tax-Xogħol | 80 ~ 106KPA |
| Piż tal-oġġett | 83 Gram (2.93 uqija) |
| Numru tal-Mudell | H1168EJBUK89PN55OQTRXCJK |

Image: The packing list and physical dimensions of the Electronic Load Tester, showing the device, alligator clips, USB alligator cable, power adapter, and US plug adapter.
Garanzija u Appoġġ
For warranty information and technical support, please refer to the official MakerHawk channels.
- Gwida Uffiċjali għall-Utent (PDF): For detailed instructions and additional information, you can download the official user guide hawn.
- MakerHawk Store: Visit the official MakerHawk store on Amazon for product information and customer service: MakerHawk Store.
- Servizz tal-Klijent: For specific inquiries or technical assistance, please contact MakerHawk customer support through their official webis-sit jew il-pjattaforma minn fejn inxtara l-prodott.
Note: No specific warranty period is provided in the product data. Please refer to the manufacturer's official documentation or contact customer support for warranty details.