
ASUS STRIX B360-H GAMING
Manwal tal-Utent tal-Motherboard tal-Logħob ASUS ROG Strix B360-H
Model: STRIX B360-H GAMING
1. Prodott Aktarview
The ASUS ROG Strix B360-H Gaming motherboard is engineered for optimal gaming performance, featuring robust hardware safeguards and advanced cooling solutions. It supports Intel 8th Gen processors and offers high-speed data transfer capabilities.

Image 1.1: The ASUS ROG Strix B360-H Gaming motherboard alongside its retail packaging, showcasinid-disinn u l-branding tal-prodott.
Karatteristiċi ewlenin:
- Designed exclusively for 8th generation Intel Core processors to maximize connectivity and speed with Dual NVMe M.2, USB 3.1 Gen2 and Intel Optane Memory compatibility.
- ASUS Optic-MEM improves memory stability and performance by improving trace isolation between PCB layers to maintain signal integrity even at higher frequencies.
- Gamer's Guardian Hardware-level safeguards provide component longevity and reliability.
- FanXpert 4 allows for dynamic fan calibration and optimized system cooling while gaming.
- Pre-mounted I/O shield ensures streamlined installation and represents ROG's attention to detail and quality.
2. X'hemm fil-Kaxxa
Verify that all components listed below are included in your product package:

Image 2.1: A visual representation of all items included in the ASUS ROG Strix B360-H Gaming motherboard package.
- Motherboard
- Karta ta' Garanzija
- Manwal għall-Utent
- Software Drivers DVD
- Irbit tal-kejbil
- Stikers tar-ROG Strix
- Viti
- Hanger tal-Bieb
- 4x Kejbils SATA
- RGB Extension Cable
3. Setup u Installazzjoni
Follow these steps for proper installation of your motherboard into a compatible PC case.
3.1 Motherboard Layout and Connectors

Immaġni 3.1: Dettaljata view of the motherboard highlighting key areas such as DIMM slots, SafeSlot PCIe, and Dual M.2 sockets.
Familiarize yourself with the motherboard's layout, including the CPU socket (LGA1151), 4x DIMM slots for DDR4 memory (up to 64GB), SafeSlot PCIe 3.0 x16 slots, and Dual M.2 sockets for high-speed storage.
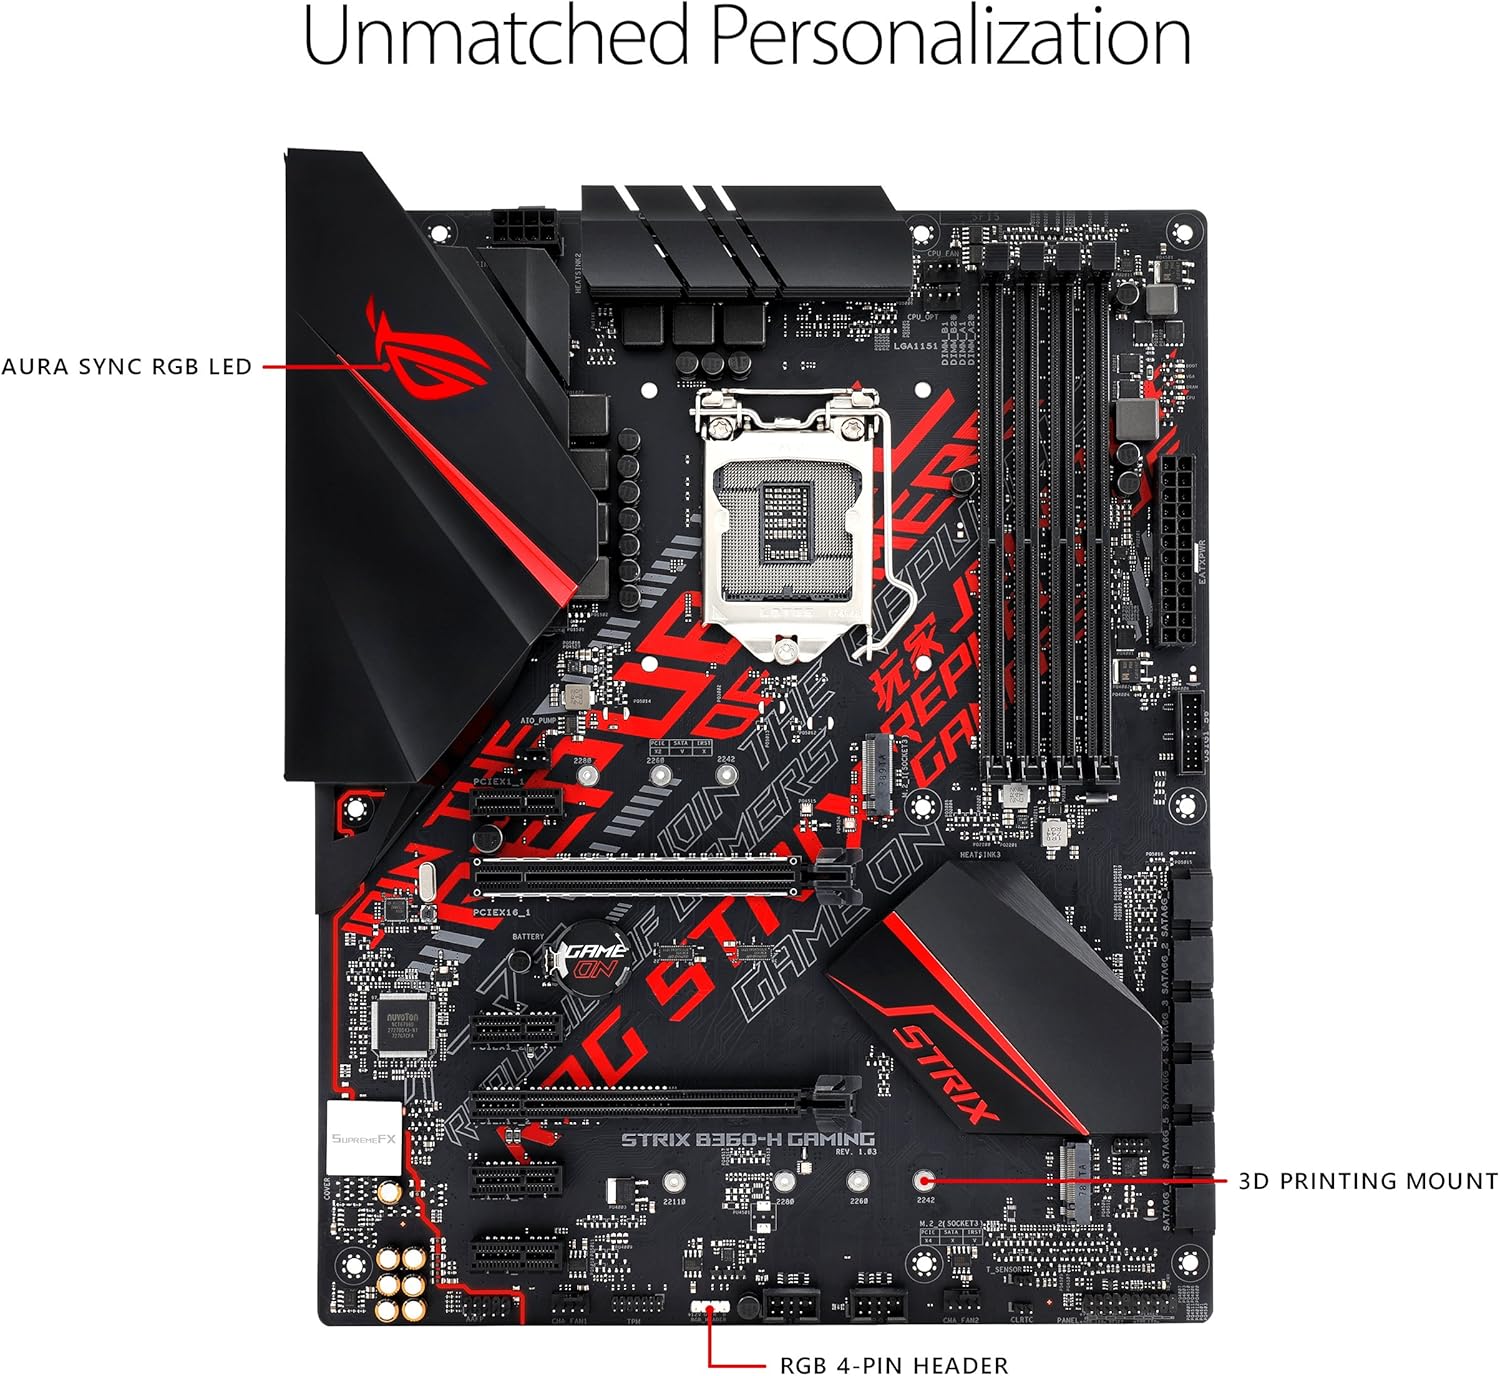
Image 3.2: The motherboard's personalization features, including the AURA SYNC RGB LED area and the RGB 4-pin header for lighting customization.
3.2 Installazzjoni tal-Komponenti
- Installazzjoni tas-CPU: Carefully align your 8th Generation Intel Core processor with the LGA1151 socket. Ensure the triangle on the CPU matches the triangle on the socket. Lower the retention arm to secure the CPU.
- Installazzjoni tal-Memorja (RAM): Open the clips on both ends of the DIMM slots. Align the notch on the DDR4 memory module with the key in the slot. Press down firmly on both ends until the clips snap into place.
- Storage Devices (M.2/SATA): Install M.2 SSDs into the designated M.2 sockets. For SATA drives, connect them to the SATA ports using the provided SATA cables.
- Installazzjoni tal-Karta Grafika (GPU): Insert your graphics card into the reinforced SafeSlot PCIe 3.0 x16 slot. Ensure it is seated firmly and secure it with the case screw.
- Konnessjonijiet tal-Enerġija: Qabbad il-konnettur tal-enerġija ATX ta' 24 pin u l-konnettur tal-enerġija tas-CPU ta' 8 pin mill-provvista tal-enerġija tiegħek mal-motherboard.
3.3 Konnessjoni tal-Periferali
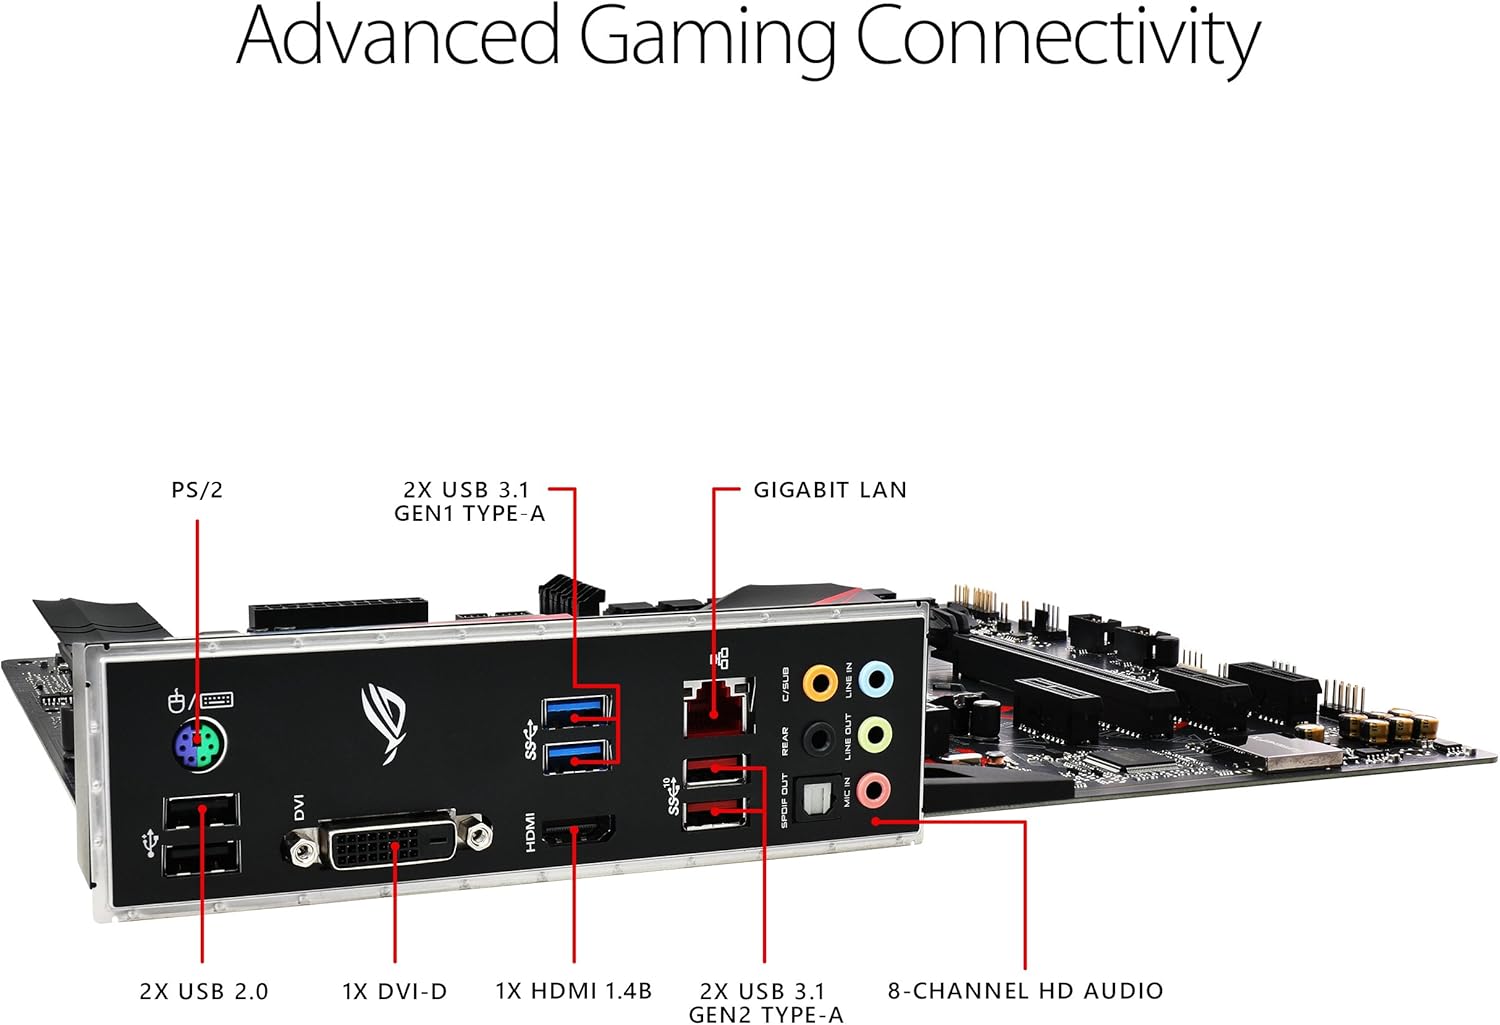
Image 3.3: The rear I/O panel of the motherboard, showing various ports for connectivity including USB, HDMI, DVI-D, LAN, and audio jacks.
Connect your monitor, keyboard, mouse, and other peripherals to the appropriate ports on the rear I/O panel. This includes PS/2, USB 2.0, USB 3.1 Gen1 Type-A, USB 3.1 Gen2 Type-A, DVI-D, HDMI 1.4b, Gigabit LAN, and 8-channel HD audio ports.
4. It-Tħaddim tal-Motherboard Tiegħek
Ladarba l-komponenti kollha jkunu installati u konnessi, tista' tixgħel is-sistema tiegħek.
4.1 Konfigurazzjoni tal-BIOS/UEFI
Biex taċċessa l-utilità tas-setup tal-BIOS/UEFI, agħfas il-buttuna DEL ċavetta jew F2 key during the Power-On Self-Test (POST) when the ASUS logo appears. The BIOS allows you to configure system settings, boot order, and monitor hardware status.
4.2 Softwer u Sewwieqa
After installing your operating system (e.g., Windows 10), install the necessary drivers from the included support DVD or download the latest versions from the official ASUS support website. This includes chipset drivers, audio drivers, LAN drivers, and any utility software like FanXpert 4 for fan control and ASUS Aura Sync for RGB lighting customization.

Image 4.1: The motherboard's cooling features, including the ROG Strix Armor Plating and multiple fan headers for comprehensive thermal management.
5. Manutenzjoni
Manutenzjoni regolari tgħin biex tiżgura l-lonġevità u l-prestazzjoni ottimali tal-motherboard u s-sistema tal-PC tiegħek.
- Tneħħija tat-Trab: Periodically clean dust from inside your PC case, especially from fans and heatsinks, using compressed air. Ensure the system is powered off and unplugged before cleaning.
- Ġestjoni tal-Kejbil: Kun żgur li l-kejbils huma mqiegħda pulit biex jippromwovu fluss tal-arja aħjar u jipprevjenu interferenza.
- Aġġornamenti tal-BIOS/Sewwieqa: Iċċekkja l-appoġġ tal-ASUS website regularly for updated BIOS versions and drivers to improve stability and performance.
6 Issolvi l-problemi
Jekk tiltaqa' ma' problemi, irreferi għall-passi komuni li ġejjin għas-soluzzjoni tal-problemi:
- Ebda Display: Ensure your monitor is connected to the graphics card (or motherboard's integrated graphics port) and is powered on. Reseat the graphics card and RAM modules.
- Is-Sistema Mhux Tibbutja: Check all power connections (24-pin ATX, 8-pin CPU). Verify that the CPU and RAM are correctly seated. Try booting with only essential components (CPU, one RAM stick, GPU).
- Periferali Mhux Rilevat: Ensure the peripheral is properly connected to the correct port. Try a different port or update drivers.
- Is-sħana żejda: Check fan connections and ensure proper airflow within the case. Monitor temperatures using software utilities.
- Irrisettjar tal-BIOS: If system instability occurs after changing BIOS settings, clear the CMOS by removing the motherboard battery for a few minutes or using the CLRTC jumper (refer to the full user manual for location).
For more detailed troubleshooting, please refer to the comprehensive Manwal għall-Utent (PDF).
7. Speċifikazzjonijiet
| Karatteristika | Speċifikazzjoni |
|---|---|
| Brand | ASUS |
| Serje | STRIX B360-H GAMING |
| Numru tal-Mudell tal-Oġġett | STRIX B360-H GAMING |
| Socket tas-CPU | LGA 1151 |
| Proċessuri Kompatibbli | 8 Ġenerazzjoni Intel Core |
| Tip ta' Ċipset | Intel B360 |
| Teknoloġija tal-Memorja RAM | DDR4 |
| Veloċità tal-Arloġġ tal-Memorja | 2400 MHz |
| Kapaċità tal-Ħżin tal-Memorja | 64 GB (Mass) |
| Dimensjonijiet tal-Prodott | 12 x 2.68 x 9.6 pulzieri |
| Piż tal-oġġett | 2.86 liri |
| Tip bla fili | 802.11a/b/g/n/ac (Note: This model does not include integrated Wi-Fi, this specification might refer to compatible accessories) |
| Numru ta 'USB 2.0 Ports | 1 (Internal Header) |
| Numru ta 'USB 3.0 Ports | 4 (Internal Headers/Rear I/O) |
| Pjattaforma | Windows 10 |
8. Garanzija u Appoġġ
ASUS provides a limited warranty for its products. Please refer to the warranty card included in your product package for specific terms and conditions, including warranty period and coverage details.
8.1 Appoġġ għall-Klijent
Għal assistenza teknika, downloads ta' sewwieqa, jew aktar informazzjoni, jekk jogħġbok żur is-sit uffiċjali tal-appoġġ tal-ASUS website or contact their customer service. You can also find the complete Manwal għall-Utent (PDF) online for detailed instructions and diagrams.
Ask a question about this manual
Ask about setup, troubleshooting, compatibility, parts, safety, or missing instructions. Manuals+ will review the question and use this page’s manual context to help answer it.