
BLACK+DECKER WD7201G
BLACK+DECKER 7.2V Cordless Li-Ion Wet & Dry Cyclonic Dustbuster Hand Vacuum WD7201G Instruction Manual
Model: WD7201G
Introduzzjoni
This manual provides essential information for the safe and efficient operation, maintenance, and care of your BLACK+DECKER 7.2V Cordless Li-Ion Wet & Dry Cyclonic Dustbuster Hand Vacuum, model WD7201G. Please read these instructions thoroughly before using the appliance and retain them for future reference.
Informazzjoni dwar is-Sigurtà
Always observe basic safety precautions when using electrical appliances to reduce the risk of fire, electric shock, and personal injury. This appliance is intended for household use only. Do not use it for industrial or commercial purposes. Keep the appliance out of reach of children.
- Kun żgur li l-adapter tal-iċċarġjar huwa kompatibbli mal-provvista tal-enerġija lokali tiegħek.
- Tgħaddix l-apparat fl-ilma jew likwidi oħra.
- Taqbadx likwidi li jaqbdu jew kombustibbli, bħall-gażolina, jew tużax f'żoni fejn jistgħu jkunu preżenti.
- Tiġborx xi ħaġa li tkun qed taħraq jew tpejjep, bħal sigaretti, lofarini, jew irmied jaħraq.
- Tużax mingħajr il-filtru f'postu.
- Jekk il-korda tal-provvista tkun bil-ħsara, għandha tiġi sostitwita mill-manifattur, l-aġent tas-servizz tiegħu, jew persuni kwalifikati bl-istess mod biex jiġi evitat periklu.
Kontenut tal-Pakkett
Ivverifika li l-komponenti kollha huma preżenti u f'kundizzjoni tajba:
- BLACK+DECKER 7.2V Cordless Li-Ion Wet & Dry Cyclonic Dustbuster Hand Vacuum
- Charging wall/stand mount
- Filtru li jista' jinħasel
- Accessory Kit (specific accessories may vary)
- Manwal ta' Istruzzjoni
Setup
Iċċarġjar tal-Appliance
Before first use, fully charge the vacuum for approximately 10-16 hours. Subsequent charges will typically take less time. The appliance is powered by a Lithium-ion battery.
- Connect the charging adapter to the charging wall/stand mount.
- Ipplaggja l-adapter f'sokit elettriku standard.
- Place the hand vacuum onto the charging mount. Ensure the charging indicator light illuminates, confirming proper connection.
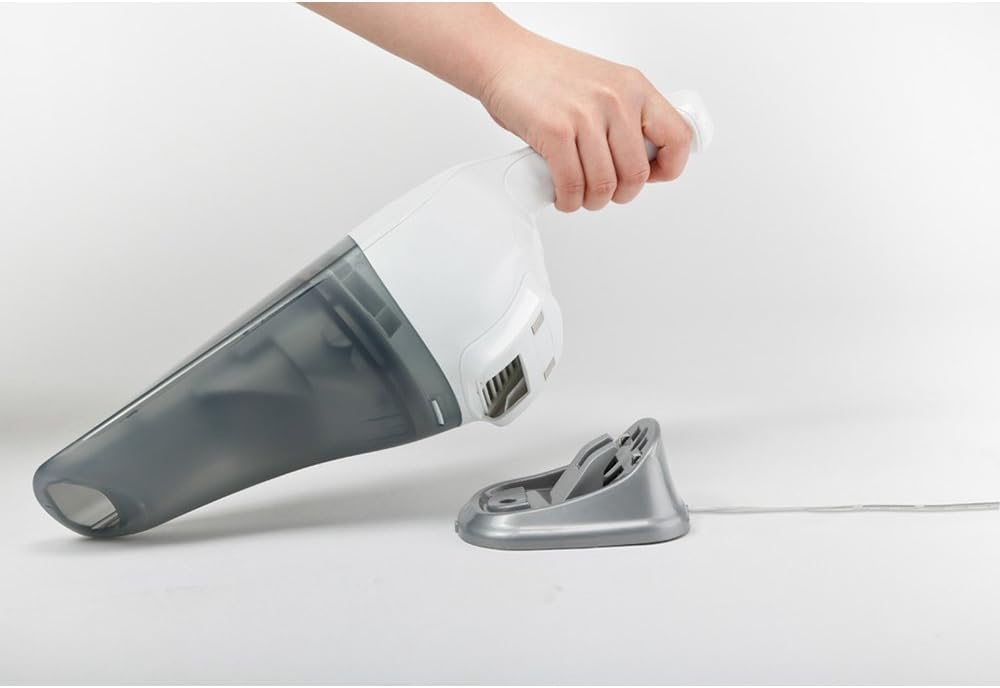
Figura 1: The hand vacuum placed on its charging stand, connected to power. The charging stand allows for convenient storage and ensures the vacuum is always ready for use.
Istruzzjonijiet Operattivi
Użu Ġenerali
To turn the vacuum on, slide the power switch to the 'ON' position. To turn it off, slide the switch to the 'OFF' position. The vacuum is designed for both wet and dry cleaning tasks.
Tindif Niexef
For dry debris such as crumbs, dust, or pet hair, ensure the wet pick-up nozzle is removed (if attached) and the filter is clean and dry. Position the nozzle over the debris and activate the vacuum. Move the vacuum slowly over the area to ensure thorough cleaning.

Figura 2: The hand vacuum effectively picking up dry crumbs from a kitchen counter. Its compact design allows for easy maneuverability for quick clean-ups.
Tindif imxarrab
For liquid spills, attach the wet pick-up nozzle (if included in your accessory kit). Ensure the dust container is empty before picking up liquids. Do not exceed the maximum liquid fill line indicated on the dust container. After picking up liquids, always empty and clean the dust container and filter immediately to prevent odors and maintain performance.

Figura 3: The hand vacuum demonstrating its wet cleaning capability by suctioning a liquid spill from a table surface. This feature makes it versatile for various household accidents.
Manutenzjoni
Tbattil tal-Kontenitur tat-Trab
For optimal suction performance, empty the dust container after each use or when the debris reaches the 'MAX' fill line. To empty:
- Kun żgur li l-vacuum cleaner ikun mitfi.
- Agħfas il-buttuna tar-rilaxx biex tneħħi l-kontenitur tat-trab mill-parti prinċipali.
- Carefully remove the filter assembly.
- Empty the contents of the dust container into a waste bin.
- Reassemble the filter and dust container, ensuring they click securely into place.
Tindif tal-Filtru
The washable filter should be cleaned regularly to maintain suction power. For best results, clean the filter after every 5-10 uses, or more frequently if vacuuming fine dust.
- Remove the dust container and filter as described above.
- Tap the filter gently over a waste bin to dislodge loose dirt.
- Rinse the filter under running water until the water runs clear. Do not use hot water or detergents.
- Allow the filter to air dry completely for at least 24 hours before reinserting it into the vacuum. Using a wet filter can damage the motor.
Issolvi l-problemi
| Problema | Kawża Possibbli | Soluzzjoni |
|---|---|---|
| Il-vacuum cleaner ma jixgħelx. | Il-batterija hija skarikata. | Charge the battery for the recommended time. |
| Qawwa tal-ġbid imnaqqsa. | Dust container is full. Filter is clogged. Nozzle is blocked. | Empty the dust container. Clean or replace the filter. Clear any blockages from the nozzle. |
| Water leaks from the vacuum during wet pick-up. | Dust container is overfilled. Wet pick-up nozzle not properly attached. | Do not exceed the maximum liquid fill line. Ensure the wet pick-up nozzle is securely attached. |
Speċifikazzjonijiet
| Karatteristika | Dettall |
|---|---|
| Brand | BLACK+DECKER |
| Isem tal-Mudell | WD7201G-B1 |
| Voltage | 7.2 Volts |
| Sors tal-Enerġija | Mħaddma bil-batterija |
| Karatteristiċi Speċjali | Tindif Imxarrab u Niexef |
| Tip ta 'filtru | Skartoċċ |
| Rakkomandazzjoni tal-wiċċ | Upholstery, Car Interiors |
| Piż tal-oġġett | 0.72 Kilogrammi |
| Wattage | 100 watt |
| Komponenti Inklużi | Kitt Aċċessorju |
| Fattur tal-Formola | Jinżamm fl-idejn |
| Użu fuq ġewwa/barra | Ġewwa |
Garanzija u Appoġġ
This BLACK+DECKER appliance comes with a Garanzija ta' Sena mill-Manifattur Lokali (Singapor). For warranty claims, technical support, or service inquiries, please contact your local BLACK+DECKER service center or the retailer from whom the product was purchased. Keep your proof of purchase for warranty validation.
Ask a question about this manual
Ask about setup, troubleshooting, compatibility, parts, safety, or missing instructions. Manuals+ will review the question and use this page’s manual context to help answer it.