
1. Prodott Aktarview
The GeoVision GV-EFD4700-0F is an indoor, fixed, mini-sized network camera designed for day and night surveillance. It features an automatic IR-cut filter and integrated IR LEDs to ensure clear imaging in various lighting conditions. This model offers an entry-level surveillance solution with essential features and high image quality.
Il-karatteristiċi ewlenin jinkludu:
- 1/3" progressive scan super low lux CMOS sensor for minimal illumination at 0.02 lux.
- Dual streams supporting H.265, H.264, and MJPEG codecs.
- Video resolutions up to 20 fps at 2592 x 1520, 25 fps at 2560 x 1440, and 30 fps at 2048 x 1520.
- Intelligent IR with a distance of up to 15 meters (50 ft).
- Wide Dynamic Range Pro (WDR Pro) for clear images in high-contrast scenes.
- 3D noise reduction for improved image clarity.
- Built-in microphone for audio monitoring.
- 2-axis mechanism (pan / tilt) for flexible positioning.
- Power options: DC 12V or Power over Ethernet (PoE IEEE 802.3af).
2. Kontenut tal-Pakkett
Jekk jogħġbok ivverifika li l-oġġetti kollha huma preżenti u f'kundizzjoni tajba malli tiftaħ il-pakkett:
- GeoVision GV-EFD4700-0F Mini Fixed IP Dome Camera
- Kit tal-Viti tal-Immuntar
- Mudell ta 'Installazzjoni
- Quick Start Guide / Instruction Manual (this document)
3. Informazzjoni dwar is-Sigurtà
Read these instructions carefully before installation and operation. Keep this manual for future reference.
- Sors tal-Enerġija: Use only the specified power adapter (DC 12V) or a compliant PoE (IEEE 802.3af) switch. Incorrect voltage jistgħu jagħmlu ħsara lill-apparat.
- Installazzjoni: Ensure the camera is securely mounted to prevent it from falling. Installation should be performed by qualified personnel if necessary.
- Ambjent: This camera is designed for indoor use. Do not expose it to water, moisture, or extreme temperatures.
- Tindif: Skonnettja l-provvista tal-enerġija qabel it-tindif. Uża drapp artab u niexef. Tużax prodotti tat-tindif likwidi jew aerosol.
- Servizzi: Tippruvax isservi dan il-prodott int stess. Irreferi l-manutenzjoni kollha lil persunal tas-servizz kwalifikat.
4. Setup u Installazzjoni
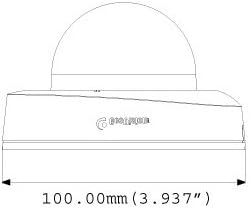
4.1 Dimensjonijiet Fiżiċi
Understand the camera's dimensions for proper placement and mounting.

4.2 Għażliet ta 'Immuntar
The GV-EFD4700-0F supports both ceiling and wall-surface mounting.


4.3 Passi ta' Installazzjoni
- Agħżel Post: Choose a suitable indoor location for optimal surveillance coverage.
- Ipprepara wiċċ: Use the provided installation template to mark drilling points on the ceiling or wall.
- Drill toqob: Drill pilot holes according to the template. Insert wall anchors if necessary.
- Kamera Sikura: Attach the camera base to the mounting surface using the supplied screws.
- Qabbad Kejbils: Connect the Ethernet cable for network and PoE, or a DC 12V power adapter and a separate Ethernet cable.
- Aġġusta Angolu: Loosen the adjustment screws to pan and tilt the camera lens to the desired viewAngolu tal-ing. Issikka l-viti ladarba jkunu aġġustati.
4.4 Konfigurazzjoni Inizjali
After physical installation and power connection, access the camera's web interface for initial setup:
- Konnessjoni tan-Netwerk: Ensure the camera is connected to your network. It will typically obtain an IP address via DHCP.
- Skopri l-Kamera: Use GeoVision's IP Device Utility software or a network scanner to find the camera's IP address.
- Aċċess Web Interface: Iftaħ a web il-browser u daħħal l-indirizz IP tal-kamera.
- Idħol: Enter the default username and password (refer to the Quick Start Guide or GeoVision documentation for default credentials). Change these immediately for security.
- Settings Bażiċi: Configure network settings, date/time, video resolution, and recording preferences.
5. It-tħaddim tal-Kamera
5.1 Ħaj View u Reġistrazzjoni
Once configured, you can access the live video feed through the web interface or compatible NVR/VMS software. The camera supports continuous recording, scheduled recording, and event-triggered recording (e.g., motion detection).
- Kompressjoni H.265: Utilizes H.265 video codec for efficient storage and reduced network bandwidth while maintaining high image quality.
- WDR Pro: Wide Dynamic Range Pro enhances image visibility in scenes with both very bright and very dark areas.
- Funzjonalità IR: The built-in IR LEDs automatically activate in low-light conditions, providing clear black and white images up to 15 meters.
5.2 Sejbien tal-Mozzjoni u Twissijiet
Configure motion detection zones and sensitivity within the camera's web interface. The camera can be set to trigger recordings, send email alerts, or notify your VMS upon detecting motion.
5.3 Monitoraġġ tal-Awdjo
The integrated microphone allows for audio monitoring of the surveillance area. Audio settings can be adjusted via the web interface.
6. Manutenzjoni
6.1 Tindif
Naddaf il-lenti u l-housing tal-kamera regolarment biex tiżgura kwalità ottimali tal-immaġni. Uża drapp artab u mingħajr suf. Għal ħmieġ iebes, neħħi ftitamp Jista' jintuża drapp b'deterġent ħafif, segwit minn drapp niexef. Evita prodotti tat-tindif jew solventi li joborxu.
6.2 Aġġornamenti tal-Firmware
Iċċekkja l-GeoVision perjodikament website for firmware updates. Firmware updates can provide new features, performance improvements, and security enhancements. Follow the instructions provided with the firmware update package carefully to avoid damaging the device.
7 Issolvi l-problemi
If you encounter issues with your GV-EFD4700-0F camera, refer to the following common problems and solutions:
- Ebda Qawwa:
- Check if the power adapter is securely connected and providing 12V DC.
- If using PoE, ensure the Ethernet cable is connected to a PoE-enabled switch or injector and that the switch port is active.
- L-ebda Feed tal-Vidjo:
- Verify network connectivity. Ping the camera's IP address.
- Ensure the camera's IP address, subnet mask, and gateway settings are correct.
- Check if the video stream settings (e.g., resolution, frame rate) are compatible with your viewing software or NVR.
- Restart the camera by disconnecting and reconnecting power.
- Kwalità Fqira tal-Immaġni:
- Naddaf il-lenti tal-kamera.
- Iċċekkja għal ostakli fil-kamp tal-kamera view.
- Adjust WDR Pro settings in the web interface for high-contrast scenes.
- Ensure sufficient lighting for optimal color images; IR will provide black and white in low light.
- Ma nistax naċċessa Web Interface:
- Confirm the camera's IP address is correct.
- Kun żgur li l-kompjuter tiegħek jinsab fuq l-istess segment tan-netwerk bħall-kamera.
- Ipprova differenti web browser.
- Iddiżattiva temporanjament kwalunkwe softwer tal-firewall fuq il-kompjuter tiegħek.
If problems persist, contact GeoVision technical support.
8. Speċifikazzjonijiet
| Karatteristika | Dettall |
|---|---|
| Isem tal-Mudell | GV-EFD4700-0F |
| Sensor tal-Immaġni | 1/3" progressive scan super low lux CMOS |
| Riżoluzzjoni Għadha Effettiva | 4 MP |
| Illuminazzjoni Minima | 0.02 lux |
| Kompressjoni tal-vidjo | H.265, H.264, MJPEG |
| Massimu Rata tal-Qafas | 30 fps at 2048 x 1520 |
| Distanza IR | Sa 15 m (50 pied) |
| Lenti | 2.8mm (Fissat) |
| Medda Dinamika | WDR Pro |
| Tnaqqis tal-Ħoss | Tnaqqis tal-Ħoss 3D |
| Awdjo | Mikrofonu inkorporat |
| Pan/Tilt Mechanism | 2-assi |
| Input tal-Enerġija | DC 12V / PoE (IEEE 802.3af) |
| Teknoloġija tal-Konnettività | Wired (Ethernet), Wi-Fi (for certain functions/protocols) |
| Użu fuq ġewwa/barra | Ġewwa |
| Dimensjonijiet (Oġġett) | 3.9 x 3.9 x 2.4 pulzieri (100 x 100 x 60.8 mm) |
| Piż (Oġġett) | 5.28 uqija |
| Kulur | Abjad |
| Manifattur | USA Vision Systems |
9. Informazzjoni dwar Garanzija
GeoVision products typically come with a limited manufacturer's warranty. Specific warranty terms, conditions, and duration may vary by region and retailer. Please refer to the warranty card included with your purchase or visit the official GeoVision webgħal informazzjoni dettaljata dwar il-garanzija u proċeduri ta' reġistrazzjoni. Żomm il-prova tax-xiri tiegħek għal talbiet ta' garanzija.
10. Appoġġ
Għal assistenza teknika, mistoqsijiet dwar il-prodott, jew aktar appoġġ, jekk jogħġbok uża r-riżorsi li ġejjin:
- Uffiċjali ta' GeoVision Websit: Żur www.geovision.com.tw for product documentation, FAQs, software downloads, and support contact information.
- Appoġġ Tekniku: Contact GeoVision's technical support team through their website or the contact details provided in your product's packaging.
- Riżorsi onlajn: Explore online forums and communities for user-generated tips and solutions.