1. Introduzzjoni
This manual provides detailed instructions for the installation, operation, and maintenance of your ASRock AB350M-HDV MicroATX Motherboard. The ASRock AB350M-HDV is designed to support AMD Socket AM4 A-Series APUs (Bristol Ridge) and Ryzen Series CPUs (Summit Ridge), featuring a Digi Power design and 7 Power Phase design for stable performance. It supports DDR4 memory and offers various connectivity options including SATA3, USB 3.0, and an Ultra M.2 slot.
2. Prodott Aktarview
The ASRock AB350M-HDV motherboard is a MicroATX form factor board, ideal for compact PC builds. It features essential components for a modern computing system.

Figura 2.1: Angolat view of the ASRock AB350M-HDV Motherboard, showcasing its compact MicroATX design and various components.
Karatteristiċi ewlenin:
- Supports AMD Socket AM4 A-Series APUs (Bristol Ridge) and Ryzen Series CPUs (Summit Ridge).
- DDR4 memory support up to 3200+ (OC) for Ryzen CPUs and 2400 for A-series APUs.
- 1 PCIe 3.0 x16 slot and 1 PCIe 2.0 x1 slot for expansion cards.
- 4 SATA3 ports and 1 Ultra M.2 (PCIe Gen3 x4 & SATA3) slot for storage.
- 6 USB 3.0 ports (2 front, 4 rear) and 2 USB 2.0 ports for peripheral connectivity.
- Integrated Gigabit Ethernet for network connectivity.
- Video outputs: VGA, DVI, HDMI.

Figura 2.2: Minn fuq għal isfel view of the ASRock AB350M-HDV Motherboard, highlighting the CPU socket, RAM slots, M.2 slot, and PCIe slots.
3. Setup u Installazzjoni
Follow these steps carefully to install your ASRock AB350M-HDV motherboard and its components.
3.1 Installazzjoni tas-CPU
- Sib is-sokit tas-CPU AM4 fuq il-motherboard.
- Erfa' l-lieva tat-tagħbija fuq il-ġenb tas-sokit.
- Allinja l-marka trijangulari fuq is-CPU mal-marka korrispondenti fuq is-sokit. Poġġi s-CPU bir-reqqa fis-sokit mingħajr ma tisforzah.
- Baxxi l-lieva tat-tagħbija biex twaħħal is-CPU f'postha.
- Installa l-cooler tas-CPU skont l-istruzzjonijiet tal-manifattur tiegħu.
3.2 Installazzjoni tar-RAM (Memorja)
- Locate the DDR4 DIMM slots. This motherboard has 4 slots.
- Iftaħ il-klipps fiż-żewġt itruf tas-slott tad-DIMM.
- Allinja l-islott fuq il-modulu tar-RAM maċ-ċavetta fl-islott tad-DIMM.
- Insert the RAM module firmly into the slot until the clips snap into place. Ensure both clips are closed.
3.3 Storage Device Installation (SATA & M.2)
Drajvs SATA:
- Qabbad tarf wieħed ta' kejbil tad-dejta SATA ma' port SATA3 fuq il-motherboard.
- Qabbad it-tarf l-ieħor tal-kejbil tad-dejta SATA mal-hard drive jew l-SSD tiegħek.
- Qabbad kejbil tal-enerġija SATA mill-unità tal-provvista tal-enerġija (PSU) tiegħek mat-tagħmir tal-ħażna.
M.2 SSD:
- Locate the Ultra M.2 slot on the motherboard.
- Remove the M.2 screw and standoff from the slot.
- Daħħal l-M.2 SSD fl-islott f'angolu ta' 30 grad.
- Push the M.2 SSD down and secure it with the screw and standoff.
3.4 Konnessjonijiet tal-Enerġija
- Qabbad il-konnettur tal-enerġija ATX ta' 24-pin mill-PSU tiegħek mas-sokit tal-enerġija ta' 24-pin fuq il-motherboard.
- Connect the 8-pin (or 4-pin) ATX 12V power connector from your PSU to the corresponding socket near the CPU.
3.5 Konnessjonijiet ta' Front Panel
Connect the cables from your PC case (Power Button, Reset Button, HDD LED, Power LED, USB, Audio) to the corresponding headers on the motherboard. Refer to the motherboard layout diagram in your physical manual for exact header locations.
3.6 Installazzjoni tal-Karta tal-Grafika
- Sib l-islott PCIe 3.0 x16.
- Neħħi l-għatu tas-slott ta' espansjoni korrispondenti mill-kaxxa tal-PC tiegħek.
- Align the graphics card with the PCIe slot and press it down firmly until it clicks into place.
- Waħħal il-karta grafika mal-kaxxa b'vit.
- Qabbad kwalunkwe kejbil tal-enerġija PCIe meħtieġ mill-PSU tiegħek mal-karta grafika.
4. Istruzzjonijiet Operattivi
4.1 L-Ewwel Boot u s-Setup tal-BIOS/UEFI
- Wara li tiġbor il-komponenti kollha, qabbad il-monitor, it-tastiera u l-maws tiegħek.
- Ixgħel is-sistema tiegħek.
- Waqt l-istartjar, agħfas ripetutament il-buttuna DEL or F2 ċavetta biex tidħol fl-utilità tas-setup tal-BIOS/UEFI.
- In the BIOS, you can configure boot order, system time, and other advanced settings. Save changes and exit to boot into your operating system installation media.
4.2 Installazzjoni tas-sewwieq
After installing your operating system, install the necessary drivers for the motherboard components. These typically include chipset drivers, audio drivers, LAN drivers, and any specific utility drivers. Drivers can be found on the ASRock official websit għall-mudell speċifiku tal-motherboard tiegħek.
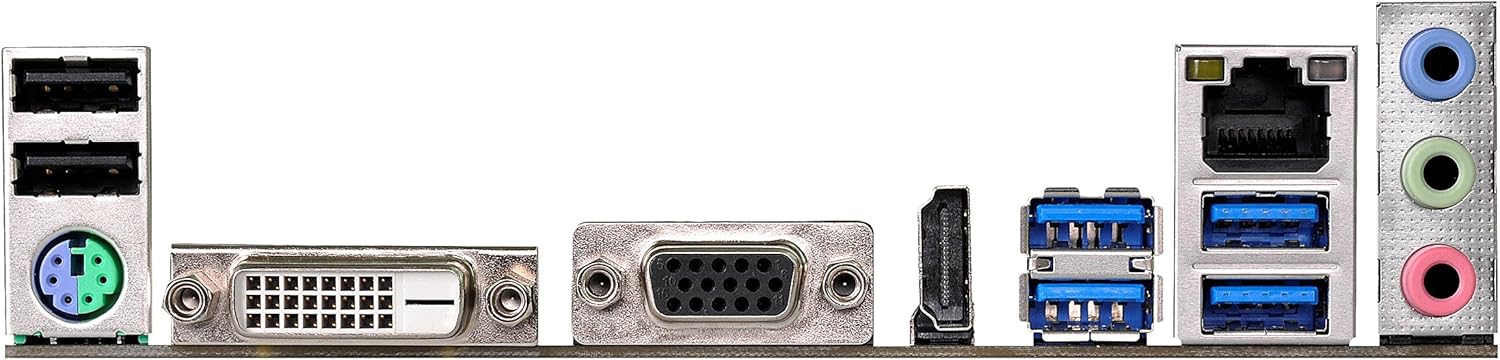
Figure 4.1: Rear I/O panel of the ASRock AB350M-HDV Motherboard, showing USB ports, video outputs (VGA, DVI, HDMI), LAN port, and audio jacks.
5. Manutenzjoni
Manutenzjoni xierqa tiżgura l-lonġevità u l-prestazzjoni ottimali tal-motherboard tiegħek.
5.1 Tindif
- Naddaf regolarment it-trab mill-motherboard u l-komponenti billi tuża arja kkompressata.
- Kun żgur li s-sistema tkun mitfija u skonnettjata qabel ma tnaddafha.
- Evita li tuża prodotti tat-tindif likwidi direttament fuq il-komponenti.
5.2 Aġġornamenti tal-BIOS/UEFI
Iċċekkja l-ASRock perjodikament website for BIOS/UEFI updates. Updates can improve compatibility, stability, and performance. Follow the instructions provided by ASRock carefully when performing a BIOS update to avoid system damage.
6 Issolvi l-problemi
Din it-taqsima tipprovdi soluzzjonijiet għal kwistjonijiet komuni li tista’ tiltaqa’ magħhom.
6.1 Ebda Qawwa / Ebda POST (Test Awtomatiku tal-Power-On)
- Iċċekkja l-Konnessjonijiet tal-Enerġija: Ensure the 24-pin and 8-pin (or 4-pin) CPU power connectors are securely seated.
- Ivverifika l-PSU: Test your power supply unit (PSU) to ensure it is functional and providing adequate power.
- Erġa' poġġi l-Komponenti: Remove and re-install the CPU, RAM, and graphics card to ensure they are properly seated.
- CMOS ċar: Refer to your physical manual for instructions on how to clear the CMOS (Complementary Metal-Oxide-Semiconductor) settings, which can resolve boot issues.
6.2 L-ebda Output tal-Wiri
- Konnessjoni tal-monitor: Ensure your monitor is correctly connected to the graphics card or motherboard (if using an APU with integrated graphics).
- Karta Grafika: If using a dedicated graphics card, ensure it is properly installed and has sufficient power. Test with another graphics card if possible.
- APU Compatibility: If using an AMD A-Series APU, ensure your monitor is connected to the motherboard's video outputs (VGA, DVI, HDMI). Ryzen CPUs without integrated graphics require a dedicated graphics card.
6.3 Operating System Not Booting
- Ordni tal-Ibbutjar: Check the BIOS/UEFI settings to ensure the correct boot device (e.g., SSD/HDD with OS) is prioritized.
- Apparat tal-Ħżin: Verify that your storage device is detected in the BIOS.
- Installazzjoni tas-Sistema Operattiva: If the OS is newly installed, ensure the installation process completed successfully.
7. Speċifikazzjonijiet
| Brand | ASRock |
| Isem tal-Mudell | AB350M-HDV |
| Socket tas-CPU | Sokit AM4 |
| Tip ta' Ċipset | AMD Promontory B350 |
| Proċessuri Kompatibbli | AMD A-Series APUs (Bristol Ridge), Ryzen Series CPUs (Summit Ridge) |
| Teknoloġija tal-Memorja RAM | DDR4 |
| Veloċità tal-Arloġġ tal-Memorja | 2133 MHz (Base), up to 3200+ (OC) for Ryzen CPU |
| Slots tal-Memorja Disponibbli | 4 |
| Interface tal-Kard Grafika | PCI Express (1x PCIe 3.0 x16, 1x PCIe 2.0 x1) |
| Portijiet SATA Totali | 4 (SATA3) |
| Slot M.2 | 1 (Ultra M.2, PCIe Gen3 x4 & SATA3) |
| Portijiet USB totali | 8 (6x USB 3.0, 2x USB 2.0) |
| Outputs tal-Vidjo | VGA, DVI, HDMI |
| Tip ta 'Konnettur tal-Enerġija Prinċipali | ATX ta' 24-Pin |
| Fattur tal-Formola | MicroATX |
| Piż tal-oġġett | 1.3 Liri |
8. Informazzjoni dwar Garanzija
The ASRock AB350M-HDV Motherboard comes with a 1 Snin Garanzija. For specific terms and conditions, please refer to the warranty card included with your product or visit the official ASRock websit.
9. Appoġġ
Għal aktar assistenza, appoġġ tekniku, jew downloads ta' sewwieqa, jekk jogħġbok żur is-sit uffiċjali ta' ASRock websit:
You can also find contact information for customer service and support resources on their websit.