
1. Introduzzjoni
The ASUS Prime B250M-A is a Micro ATX motherboard designed to support 7th generation Intel Core processors. It features an LGA1151 socket, DDR4 memory support, and various connectivity options including HDMI, DVI, VGA, and dual M.2 slots. This manual provides essential information for the proper installation, configuration, and maintenance of your motherboard.
- Connectivity and Speed: Features integrated Dual M.2 slots with Intel Optane Memory compatibility and a rear USB 3.1 Type C connection.
- Hardware Safeguards: Equipped with 5X Protection III, providing hardware-level safeguards for component longevity and reliability. Includes ASUS LAN Guard and a Realtek RTL8111H Gigabit LAN Controller.
- Kontroll tat-tkessiħ: FanXpert 2 PLUS offers advanced fan control with an integrated AIO pump header for dynamic cooling.
- PCIe Slot Durability: Dual Patent-pending Safe Slot Core fortified PCIe slots prevent damage from heavyweight GPUs.
- Personalizzazzjoni: On-board 3D-printing mounts allow for unique designs on your customized build.
2. Setup u Installazzjoni
Qabel tibda l-installazzjoni, kun żgur li s-sistema tiegħek hija mitfija u skonnettjata mis-sors tal-enerġija. Immaniġġja l-motherboard mit-truf tagħha biex tevita skariku statiku.
2.1. Kontenut tal-Pakkett
Ivverifika li l-oġġetti kollha huma preżenti fil-pakkett tal-motherboard tiegħek:
- Manwal tal-utent
- Kejbils tas-Serjali ATA 6.0Gb/s (2)
- Tarka I / O
- Viti M.2 (2)
- DVD ta 'Appoġġ
2.2. Layout tal-Motherboard
Familiarize yourself with the layout of the ASUS Prime B250M-A motherboard to identify key components and connectors.

Figura 1: Minn fuq għal isfel view of the ASUS Prime B250M-A motherboard. This image displays the central LGA1151 CPU socket, four DDR4 RAM slots, multiple PCIe expansion slots, and various headers and connectors for power, storage, and peripherals.

Figura 2: Angolat view of the ASUS Prime B250M-A motherboard. This perspective shows the rear I/O panel with its various ports, the CPU socket, RAM slots, and the layout of the PCIe slots and M.2 slots.
2.3. Installazzjoni tas-CPU
Carefully open the LGA1151 socket lever, align the CPU with the triangular mark on the socket, and gently place it into the socket. Close the lever to secure the CPU. Refer to the CPU manufacturer's instructions for cooler installation.
2.4. Installazzjoni tar-RAM
The motherboard supports up to 64GB of DDR4 memory at 2133 MHz across four DIMM slots. Open the clips on both ends of the DIMM slot, align the memory module with the slot key, and press down firmly until the clips snap into place.
2.5. Installazzjoni tal-SSD M.2
The motherboard features dual M.2 slots. Insert the M.2 SSD into the slot at an angle, then gently push it down and secure it with the provided M.2 screw. Nota: If a SATA M.2 SSD is used, the first SATA port (SATA6G_1) may be disabled. Consult the detailed manual for specific slot configurations.
2.6. Installazzjoni tal-Karta PCIe
Insert your graphics card or other PCIe expansion cards into the appropriate PCIe slots. Ensure the card is fully seated and secured with a screw to the chassis. The Safe Slot Core design provides enhanced retention for heavy GPUs.
2.7. Konnessjonijiet tal-Enerġija
Connect the 24-pin ATX power connector from your power supply to the motherboard. For CPU power, connect the 4-pin CPU power connector. If your power supply has an 8-pin CPU power connector, it can be partially inserted into the 4-pin slot, ensuring the correct pins are aligned for power delivery.
2.8. Storage and I/O Connections
Connect SATA drives to the six SATA III 6.0Gb/s ports using the provided SATA cables. Install the I/O Shield into your chassis before mounting the motherboard. Connect front panel headers (USB, audio, power/reset switches, LEDs) according to the labels on the motherboard and your chassis manual.
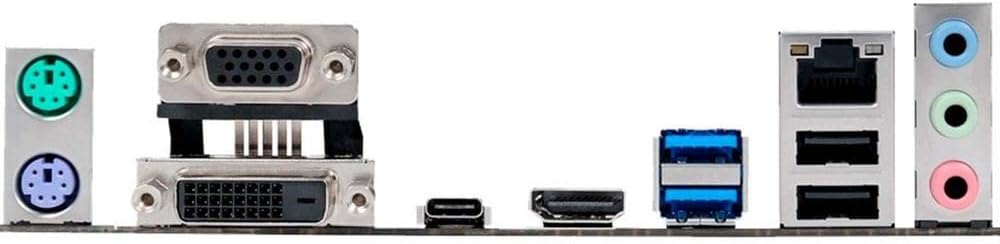
Figure 3: Rear I/O panel of the ASUS Prime B250M-A motherboard. This image details the available ports including PS/2 keyboard/mouse, VGA, DVI-D, HDMI, USB 2.0, USB 3.0, USB 3.1 Type-C, Gigabit LAN, and audio jacks.
3. Istruzzjonijiet Operattivi
After completing hardware installation, connect your display, keyboard, and mouse. Power on your system to begin the operating system installation process.
3.1. Konfigurazzjoni tal-BIOS/UEFI
Mal-ewwel boot, agħfas il-buttuna DEL or F2 key to enter the UEFI BIOS Utility. The UEFI interface is designed for easy navigation, allowing you to configure boot options, system settings, and monitor hardware status. Save changes before exiting.
3.2. Installazzjoni tas-sewwieq
Install necessary drivers from the included Support DVD or download the latest versions from the ASUS official website. This includes chipset drivers, LAN drivers, audio drivers, and graphics drivers for integrated or discrete GPUs.
3.3. Fan Control with FanXpert 2 PLUS
Utilize the FanXpert 2 PLUS software to customize fan speeds and profiles for optimal cooling and noise levels. This utility also supports control for AIO pump headers.
3.4. On-board Lighting
The motherboard features subtle orange LED lighting. This lighting can be configured in the BIOS to breathe or remain steadily lit. It will remain active as long as the power supply is on, even in sleep mode or when shut down, unless configured otherwise in the BIOS.
4. Manutenzjoni
Manutenzjoni regolari tgħin biex tiżgura l-lonġevità u t-tħaddim stabbli tal-motherboard u s-sistema tiegħek.
4.1. Tindif
Periodically clean dust from inside your computer case, especially around fans, heatsinks, and motherboard components. Use compressed air and ensure the system is powered off and unplugged before cleaning.
4.2. Aġġornamenti tal-BIOS
ASUS provides utilities for easy BIOS updates, often through software within the operating system or directly from the UEFI BIOS. Regularly check the ASUS support website for the latest BIOS versions to improve compatibility and performance. Follow update instructions carefully to avoid system instability.
4.3. Aġġornamenti tas-Sewwieqa
Żomm is-sewwieqa tiegħek aġġornati billi tiċċekkja regolarment l-appoġġ tal-ASUS website. Updated drivers can provide performance improvements, bug fixes, and enhanced compatibility with new hardware or software.
5 Issolvi l-problemi
Din it-taqsima tindirizza kwistjonijiet komuni li tista' tiltaqa' magħhom waqt is-setup jew l-operazzjoni.
5.1. Is-Sistema Ma Tixgħelx
- Ensure all power cables (24-pin ATX and 4-pin CPU power) are securely connected to the motherboard.
- Ivverifika li l-provvista tal-enerġija hija mixgħula u konnessa ma' sokit tal-enerġija li jaħdem.
- Iċċekkja l-konnessjonijiet tas-swiċċ tal-enerġija tal-pannell ta' quddiem mal-motherboard.
5.2. L-ebda Output tal-Wiri
- Confirm that your monitor is connected to the correct video output port (HDMI, DVI, or VGA) on the motherboard or discrete graphics card.
- Erġa' poġġi l-karta grafika u l-moduli tal-memorja f'posthom.
- Ipprova boot b'RAM stick wieħed biss installat.
5.3. SATA M.2 SSD Disables SATA Port
If you install a SATA-based M.2 SSD, the SATA6G_1 port will be disabled. This is normal behavior. If you require all SATA ports, consider using a PCIe-based M.2 SSD or connecting your SATA drive to a different SATA port.
5.4. Windows 7 Installation Issues
Installing Windows 7 on this motherboard can be challenging due to driver compatibility with newer hardware. Specific requirements include using 6th generation CPUs and DDR4 2133MHz memory. ASUS provides a specific guide on their website for Windows 7 installation, which may require loading drivers during the OS setup process. It is recommended to use Windows 10 or later for optimal compatibility and driver support.
5.5. General Instability or Errors
- Ensure all components are properly seated (CPU, RAM, expansion cards).
- Check for bent pins in the CPU socket before CPU installation.
- Verify that your power supply provides sufficient wattage għall-komponenti kollha.
- Aġġorna l-BIOS u d-drivers għall-aħħar verżjonijiet.
6. Speċifikazzjonijiet
Below are the key technical specifications for the ASUS Prime B250M-A motherboard.
| Karatteristika | Speċifikazzjoni |
|---|---|
| Brand | ASUS |
| Isem tal-Mudell | PREMIUM B250M-A |
| Socket tas-CPU | LGA 1151 |
| Proċessuri Kompatibbli | 7 Ġenerazzjoni Intel Core |
| Tip ta' Ċipset | Intel B250 |
| Teknoloġija tal-Memorja RAM | DDR4 |
| Max RAM | 64 GB |
| Veloċità tal-Arloġġ tal-Memorja | 2133 MHz |
| Dimensjonijiet tal-Prodott (LxWxH) | 10.24 x 2.03 x 10.63 pulzieri |
| Piż tal-oġġett | 10.7 uqija |
| Portijiet USB 2.0 | 2 (rear) + internal headers |
| USB 3.1 Tip-Ċ | 1 (wara) |
| Outputs tal-Vidjo | HDMI, DVI-D, VGA |
| LAN | Gigabit LAN (Realtek RTL8111H) |
| Ħażna | 6 x SATA 6Gb/s ports, 2 x M.2 Socket 3 |
7. Informazzjoni dwar Garanzija
For detailed warranty information regarding your ASUS Prime B250M-A motherboard, please refer to the warranty card included in your product packaging or visit the official ASUS support websit. It-termini u l-kundizzjonijiet tal-garanzija jistgħu jvarjaw skont ir-reġjun u l-bejjiegħ bl-imnut.
8. Appoġġ
If you encounter issues not covered in this manual or require further assistance, please utilize the following resources:
- Appoġġ Uffiċjali tal-ASUS Websit: Żur www.asus.com/support/ for updated drivers, BIOS, utility software, FAQs, and detailed product manuals in PDF format.
- Included Support DVD: The product package includes a Support DVD with drivers and utilities.
- Appoġġ Tekniku: Contact ASUS technical support directly through their websit għal assistenza personalizzata.